
The great flavor of multigrain bread without that dense heavy texture is associated with whole-grain bread. Just follow the step-by-step photo instructions.

TABLE OF CONTENTS

This is a special loaf with lots of great taste and texture—a stand mixer bread you can do at home. I chose to make it as French batard bread, but you can use the dough as you wish. While it is whole wheat-based, the other whole grains make it special.
I had intentions of following a recipe, but I had my reasons to run amuck again. A tweet here, a small change there, and a few simplifications, and I was good to go.
Serve with Boursin Cheese Sauce with Chicken and Pasta, Chicken Parmesan Soup, Baked Ziti with Sausage, or Italian Sausage Marinara Sauce.
And don't miss these other great bread recipes, like Julia Childs French Bread, Everyday Homemade Bread, Rustic Peasant Bread, and English Muffin Bread.
A very nice multigrain bread that really is not a lot of work and relatively quick. Adapted from a Cooks Illustrated recipe.
The Multigrain Ingredient
I couldn't find the 7-grain hot cereal that CI used, so I got Bob's Red Mill Muesli. Any multigrain good quality hot cereal can be used. Add in other whole grains and make it what you want. And use good quality whole wheat flour.
👨🍳Baking
What Shape to Make Your Loaf?
If you don't have a fancy french loaf pan nor a pastry cloth, you can still make this bread. A good dough can be baked in any shape you want. Just be sure it is done.
You can do free form on parchment paper on wood (like a pizza peel or a large cutting board). Of course, cover and let rise. Then cut, water, and transfer to a pizza stone that has been preheated in the oven for 30 minutes using the parchment paper to transfer the loaf.
This bread can also bake in a pan. But the oven temperature instructions and time estimates are for this technique. The thicker the loaf, the lower the temperature oven you use, and a longer time is needed.
What is Up with the Water?
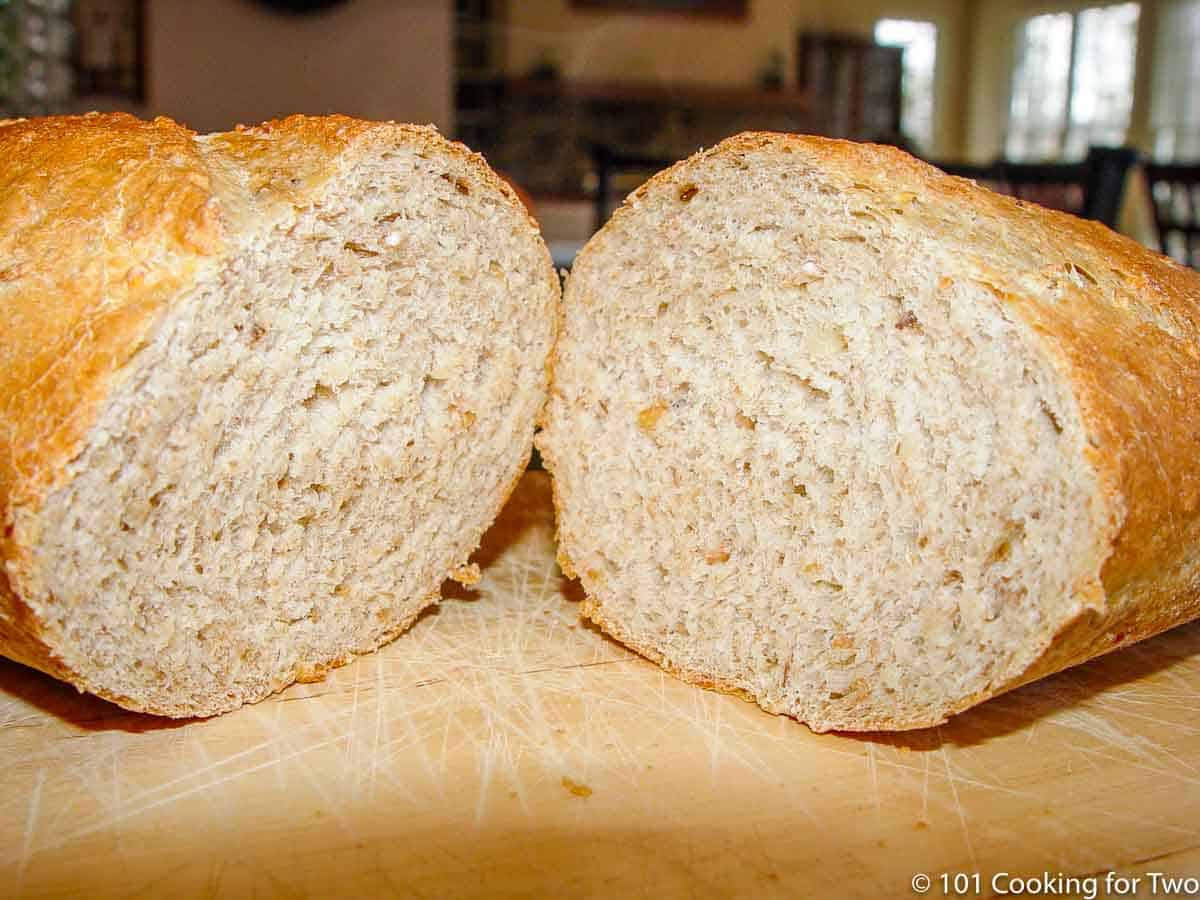
One characteristic of a French batard is the crisp crust.
The high temperature, the brushing with water before and during baking, and the moist environment all contribute to the crispy crust of the wonderful bread.
When is Bread Done?
The color: The more you bake, the better this will be for you but not for the beginners. The crust should look deep golden brown with a dry, firm feel.
Tapping the beard: You can take the bread out of the oven and tap the bottom with a finger. It should sound hollow.
The internal temperature: My favorite for the beginner or only occasional bread baker like me. Most bread will be done at an internal temperature of 190°, but if it is bread with egg, milk, or butter, 200° is a better endpoint.
The last rule about “when is bread done?” is that a bit too long is much better than too short.
❄️Storage
Store at room temperature but sealed. It will be very good for three days but four days is marginal. I'm not a fan of refrigerating bread but freezing for 1-2 months is ok but not as good as fresh.
This recipe is listed in these categories. See them for more similar recipes.
Have you tried this recipe, or have a question? Join the community discussion in the comments.
Step-by-Step Photo Instructions

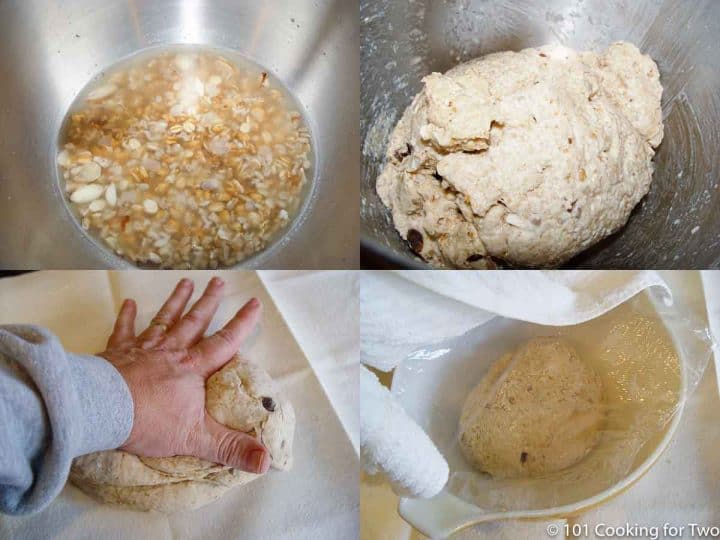
1) In the bowl of the stand mixer, combine 1 cup multigrain cereal mix. Add 1 ¾ cup boiling water. Mix well and let sit until temp is down to 110° (about 20 minutes). Add 3 tablespoons honey and 3 tablespoons olive oil while setting. Mix well.
2) When the temp is down to 110°, add yeast and mix well. Add 1 cup whole wheat flour.
3) Mix on "2" in a stand mixer until the flour is incorporated. Then add AP flour ½ cup at a time. Continue to mix and add, scraping sides and bottom occasionally until all flour is incorporated.
4) Add 2 teaspoons salt, turn the mixer on 2 again, and knead for 8 minutes. You want the dough to grab the sides some and not ride up the dough hook completely. Add extra AP flour or water 1 tablespoon at a time to get the right hydration.
5) Remove the dough hook and cover the bowl with plastic wrap for 20 minutes.

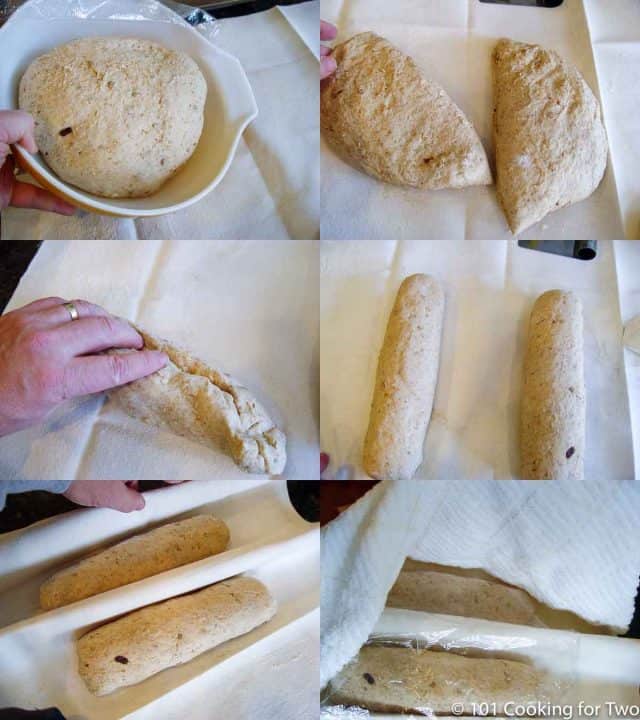
6) Move to the floured surface and hand knead for 2 minutes. Transfer to an oiled bowl and cover with plastic wrap and a towel. Place in a warm spot to rise until doubled in size. About 1 hour.
7) Move to a floured surface. Handling the dough gently, form a 12 by 9 rectangle. Cut in half. Roll into long loaves, sealing the edge by pinching and rolling ends under slightly and also pinch. Place seam down.
8) Place parallel about 4 inches apart on a pastry cloth and move as a unit to the French Loaf pan. If you don't have the pan, put folds in the cloth. Cover with plastic wrap and towel. Place in a warm spot until double in size. About 45 minutes.
9) Preheat oven to 425°convection or 450° conventional oven with a pan of water on the bottom rack for at least 30 minutes.
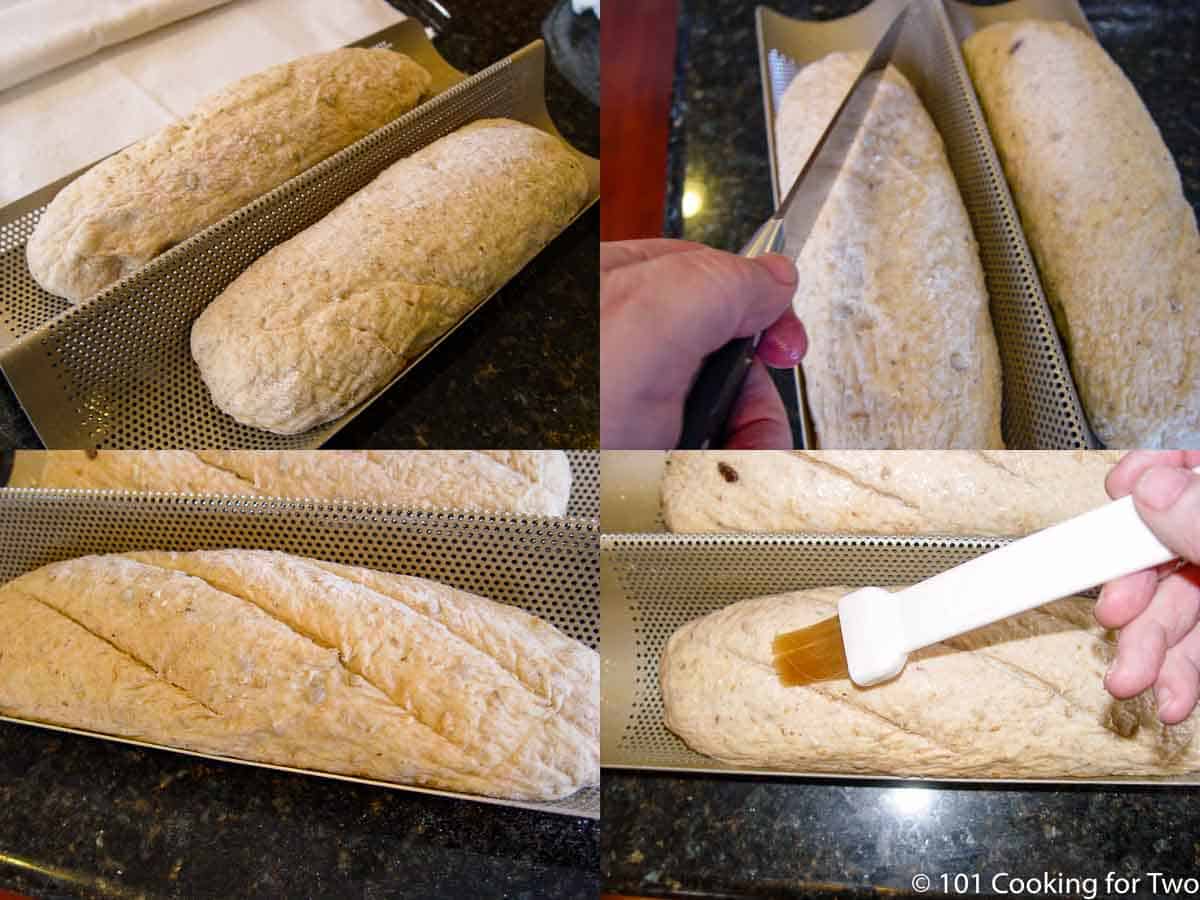
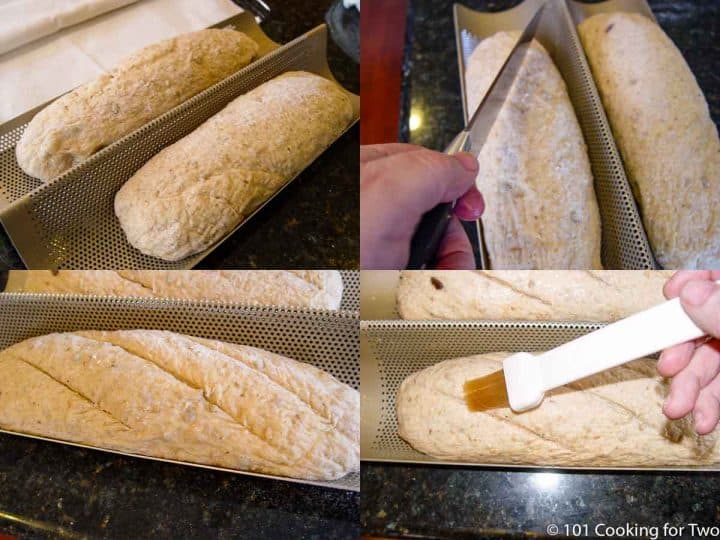
10) Remove the dough from the pan cloth to the pastry cloth. Spray the pan with Pam. Gently move the loaves back to the pan by working your hands gently under the ends of the dough. If you don't have the fancy pan, see the discussion above.
11) Slash the top of the dough with a sharp knife or razor blade to allow for expansion. Brush the top of the loaves with water, place on the middle rack, and add 1-2 cups of water to a pan on the bottom rack.
12) After 6 minutes, brush the tops of the loaves with water and add more water to the pan if dry.
13) Bake until internal temp is 200°, about another 20 minutes, making a total of about 26 minutes.
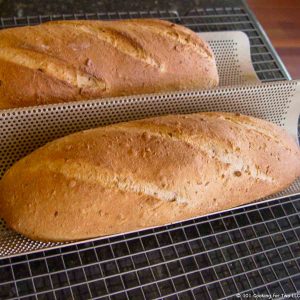
14) Move to a cooling rack.
Join the Club—Subscribe Today.
Stay in the loop with updates.
📖 Recipe
Multigrain French Bread in a Stand Mixer
Ingredients
- 1 cup Multigrain hot cereal mix
- 1 ¾ cup water
- 3 tablespoons honey
- 3 tablespoons olive oil
- 1 pack instant yeast
- 2 cups AP flour
- 1 cup whole wheat flour
- 2 teaspoon salt
Instructions
- In the bowl of the stand mixer, combine 1 cup multigrain cereal mix. Add 1 ¾ cup boiling water. Mix well and let sit until temp is down to 110° (about 20 minutes). Add 3 tablespoons honey and 3 tablespoons olive oil while setting. Mix well.

- When the temp is down to 110°, add yeast and mix well. Add 1 cup whole wheat flour.
- Mix on "2" in a stand mixer until the flour is incorporated. Then add AP flour ½ cup at a time. Continue to mix and add scraping sides and bottom occasional until all flour is incorporated.
- Add 2 teaspoons salt and turn the mixer on 2 again and knead for 8 minutes. You want the dough to grab the sides some and not ride up the dough hook completely. Add extra AP flour or water 1 tablespoon at a time to get the right hydration.
- Remove dough hook and cover the bowl with plastic wrap for 20 minutes.
- Move to the floured surface and hand knead for 2 minutes. Transfer to an oiled bowl, cover with plastic wrap and towel. Place in a warm spot to rise until doubled in size. About 1 hour.

- Move to a floured surface. Handling the dough gently, form 12 by 9 rectangle. Cut in half. Roll into long loaves sealing the edge by pinching and rolling ends under slightly and also pinch. Place seam down.
- Place parallel about 4 inches apart on a pastry cloth and move as a unit to the French Loaf pan. If you don't have the pan, put folds in the cloth. Cover with plastic wrap and towel. Place in a warm spot until double in size. About 45 minutes.
- Preheat oven to 425° convection or 450° conventional oven with a pan of water on the bottom rack for at least 30 minutes.
- Remove dough and pastry cloth from pan. Spray pan with Pam. Gently move loaves back to the pan by working your hands gently under the ends of the dough. If you don't have the fancy pan, see the discussion above.
- Slash top of the dough with a sharp knife or razor blade to allow for expansion. Brush top of loaves with water and place on middle rack and add 1-2 cups of water to a pan on the bottom rack.
- After 6 minutes, brush tops of loaves with water and add more water to the pan if dry.
- Bake until internal temp is 200°, about another 20 minutes making a total of about 26 minutes.

- Move to a cooling rack.


Your Own Private Notes
Recipe Notes
Pro TIps
- I made this as two smaller French batard loaves but it is a great dough and can be used in other shapes or even a pan. But you will need to adjust the oven temperature and cooking time.
- Use the multigrain you prefer but use the hot water to precook them a bit before baking in the bread.
- This uses both whole wheat and white flour. You can change the ratio. The more whole wheat, more fluid is needed, and the bread will be more dense.
- Unless you are an experienced bread baker, internal temperature is the best way to determine when a loaf of bread is done. 200° with this loaf.
- Baking a bit too long is always better than too short.
- Store sealed at room temperature for 3-4 days. I do not recommend refrigerating. I’m not a big fan of freezing bread but if you must then 1-2 months only.
To adjust the recipe size:
You may adjust the number of servings in this recipe card under servings. This does the math for the ingredients for you. BUT it does NOT adjust the text of the instructions. So you need to do that yourself.
Nutrition Estimate
© 101 Cooking for Two, LLC. All content and photographs are copyright protected by us or our vendors. While we appreciate your sharing our recipes, please realize copying, pasting, or duplicating full recipes to any social media, website, or electronic/printed media is strictly prohibited and a violation of our copyrights.
Editor's Note: Originally Published April 13, 2010. Updated with expanded options, refreshed photos, and a table of contents to help navigation.

Margie E Picard
I would like to make the dough in my bread machine. Any ideas on altering it for the machine would be greatly appreciated
Dan Mikesell AKA DrDan
Hi Margie,
Welcome to the blog.
I'm not going to be any help. I gave away my last bread machine about 20 yrs ago and have not used one since.
Dan
Rosa Paredes
Terrible recipe! what a waste of time and materials. 1 3/4 cup of water was not enough for the flour. 425 oven was way too much, bread was tasty but hard from over baking it.
Abbie
Just made this recipe except instead of adding water in step 5, I added kefir, and quite a bit(1/2 cup or so). I balanced it out with a scant amount of extra flour. They came out AMAZING! A little more fluff in the texture with out losing that "tooth".It gave it a more raise. Awesome, thanks!
Dan Mikesell
Great... I think most people are afraid of bread baking but really it is simple and modifications like you did almost always work.
Greg
I want some next time I come home for a weekend.
Renata
Oh, these loaves look gorgeous! I have bought myself one of these french bread loaf pans but I haven't been brave enough to use it yet, but you have certainly encouraged me! And I love multigrain bread! That's perfect!