
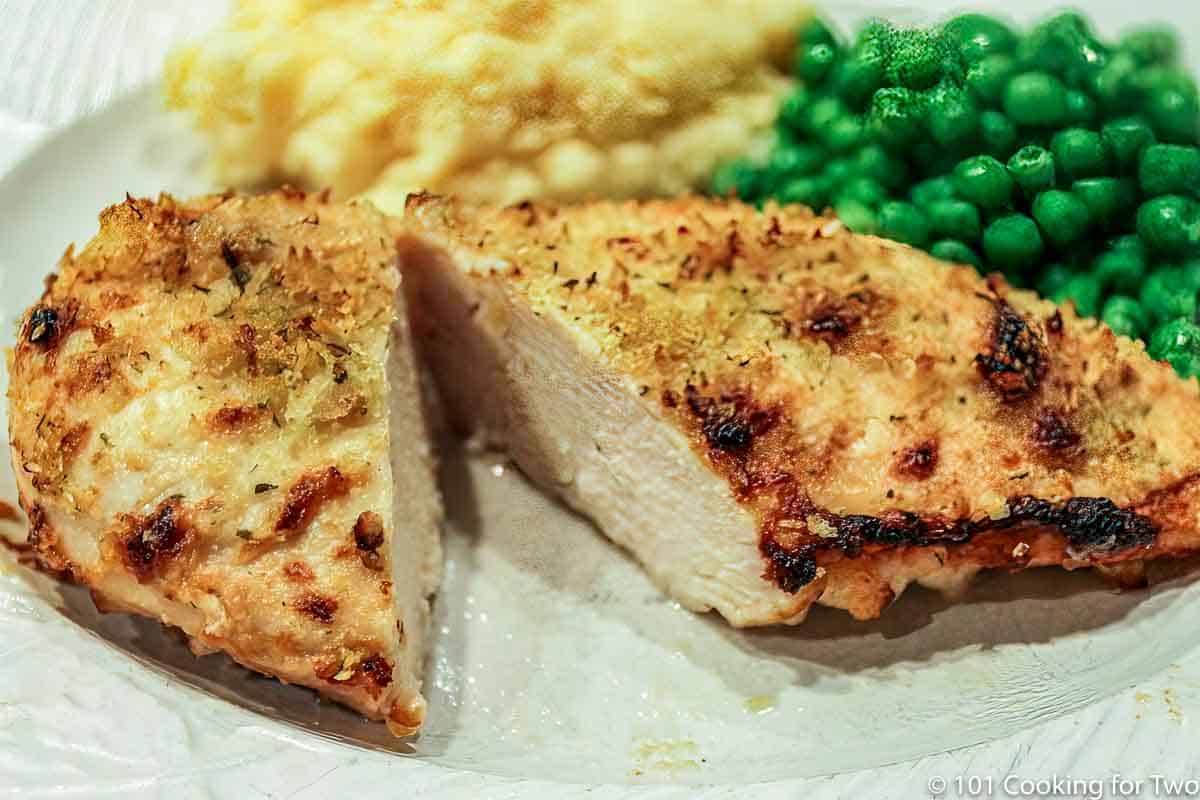
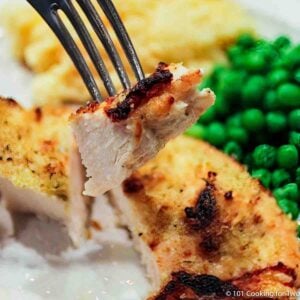
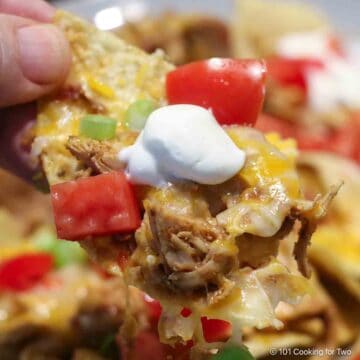
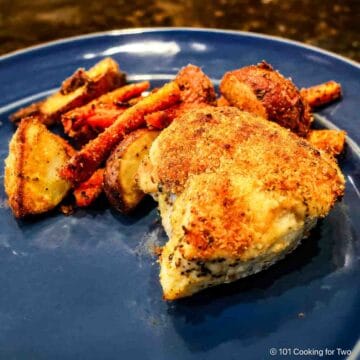
Mayo Parmesan Chicken is an internet classic — often called Melt in Your Mouth Chicken. It’s made by coating chicken breasts with seasoned mayonnaise and Parmesan cheese, then baking until juicy and tender.
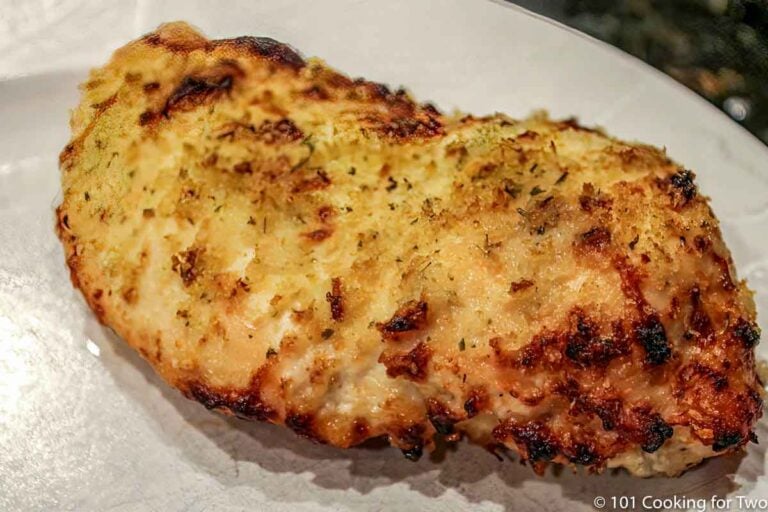
I added a light sprinkle of Panko for gentle crunch and golden edges without turning this into breaded chicken — a small upgrade that makes this version stand out.

Jump To (scroll for more)
- 🧾 TL;DR (Quick Answer Box)
- 🐓 Ingredients
- 👨🍳 Overview: How to Make Mayo Parmesan Chicken
- ⏱️ How Long to Bake Mayo Parmesan Chicken
- 🐓 Ingredient Options and Variations
- 👨🍳 Troubleshooting: Mayo Chicken Coating Tips
- 🍴 Serving Suggestions
- ❄️ Storage and Reheating
- 🍽 Related Chicken Breast Recipes
- ❓ FAQs
- 📖The Recipe Card

Featured Comment by Katherine:
⭐⭐⭐⭐⭐
"This recipe has been a go-to since you first posted it. Comes out melt-in-your-mouth perfect every time!"
🧾 TL;DR (Quick Answer Box)
What is it: Mayo Parmesan Chicken is baked chicken breast coated with seasoned mayonnaise and Parmesan cheese for a juicy, tender result.
Why you’ll love it: Creamy, cheesy comfort food with a light Panko crunch — beginner-friendly and ready in under an hour.
How to make it: Mix mayo, Parmesan, and seasonings; coat the chicken; sprinkle lightly with Panko; and bake until tender and lightly crisp.
Jump to the Recipe Card or continue reading for step-by-step photos, tips, and flavor options.
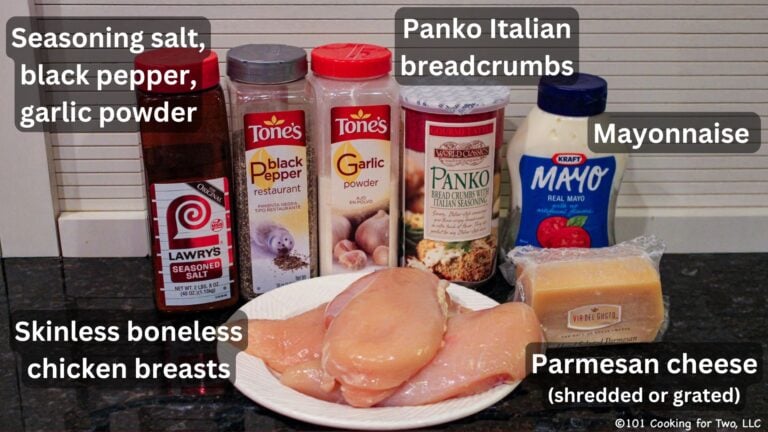
🐓 Ingredients

- Chicken breasts – Boneless, skinless, about ¾ inch thick. Pound to an even thickness for consistent cooking.
- Mayonnaise – Real mayo (not light or fat-free). Keeps the chicken moist and helps the coating stick.
- Parmesan cheese – Grated or shredded, your choice. It adds that salty, cheesy flavor that makes this recipe work.
- Panko breadcrumbs (optional but recommended) – Adds light crunch and golden color without turning it into breaded chicken.
- Seasoning – Garlic powder, seasoning salt (like Lawry’s), and black pepper. Simple, balanced, and classic.
👨🍳 Overview: How to Make Mayo Parmesan Chicken
1. Trim and pound chicken breasts to about ¾ inch thick. Pat completely dry.
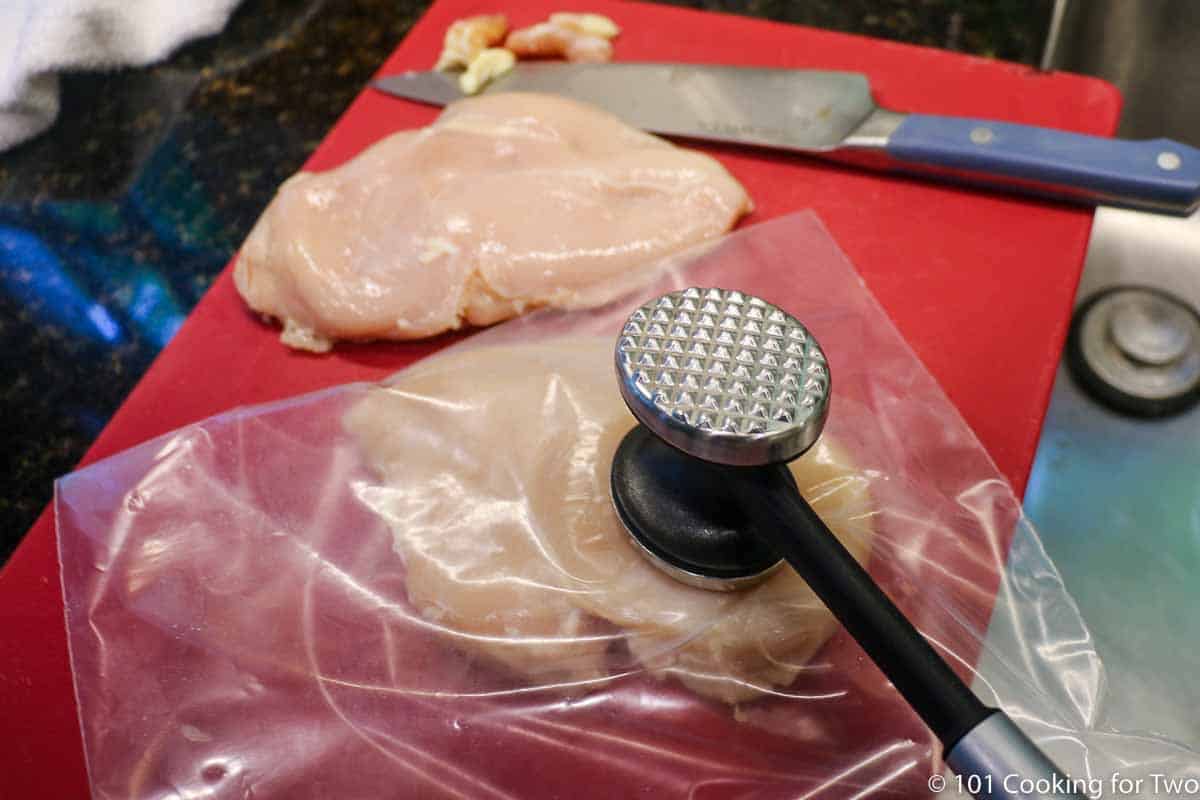
✅ Pro Tip: For safety, cover the chicken with plastic wrap or place it in a food storage bag before pounding to avoid splatter.
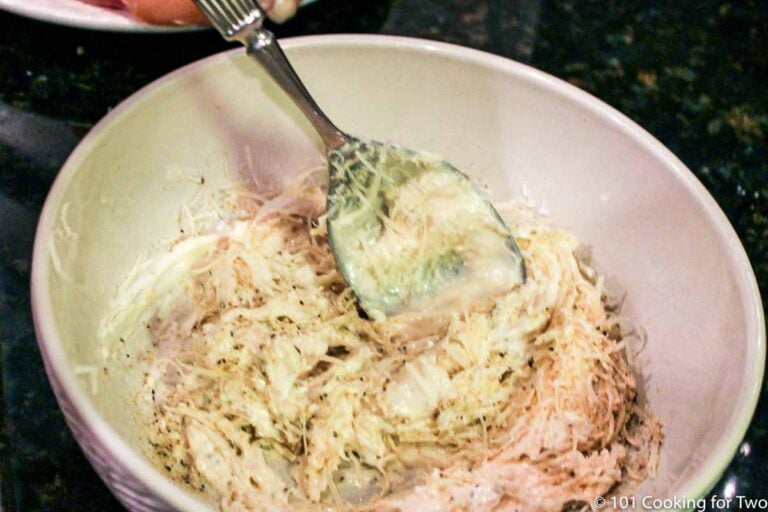
2. Mix the coating: mayonnaise, Parmesan (shredded or grated), and seasonings.

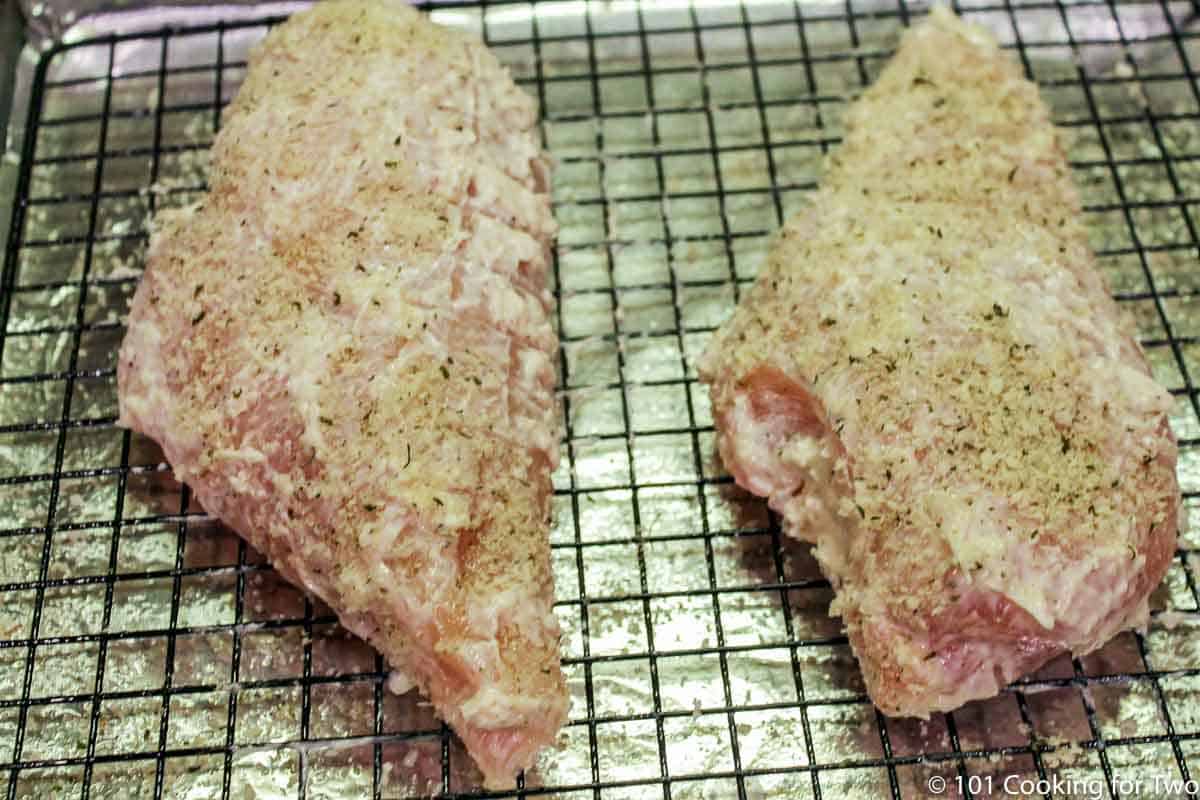
3. Coat chicken lightly with the mayo mixture and place on a prepared tray.
Optional: Sprinkle both sides with a little Italian Panko for extra crunch.
4. Bake at 375°F convection (400°F regular) until the internal temperature reaches 165°F — about 40 minutes, measured in the thickest part per USDA guidelines.

📌For complete step-by-step instructions, scroll down to the printable recipe card or keep reading for tips, flavor options, and serving ideas.
⏱️ How Long to Bake Mayo Parmesan Chicken
Bake at 375°F convection (400°F regular) for about 35–40 minutes, or until the internal temperature reaches 165°F in the thickest part. Time is only a guide—always check doneness with an instant-read thermometer.
Thinner pieces may finish closer to 25–30 minutes, and thicker ones may need up to 45 minutes.
Save this recipe!
🐓 Ingredient Options and Variations
- Chicken: Boneless, skinless breasts are standard, but thighs, tenders, or cutlets work—just adjust the cooking time.
- Mayonnaise: Use real mayo for the best flavor. Miracle Whip, Greek yogurt, or sour cream can substitute.
- Cheese: Parmesan is classic; Romano or Asiago are easy swaps.
- Breadcrumbs: Italian Panko adds light crunch without heavy breading; other flavored varieties may be used.
- Seasoning: Start with seasoning salt, garlic powder, and black pepper. Add paprika or cayenne for extra kick.
👨🍳 Troubleshooting: Mayo Chicken Coating Tips
- Start dry: Moisture keeps the coating from sticking. Pat chicken completely dry before coating.
- Use real mayo: Low-fat versions are watery and slide off instead of crisping.
- Thin layer: Too much mayo slides off; a light coat stays put.
- Thawed chicken only: Frozen spots cause soggy coating.
- Flip gently: A fork works better than tongs to keep the crust intact.
🍴 Serving Suggestions
Pair with simple sides like rice, noodles, or roasted potatoes, plus a green vegetable such as broccoli, Brussels sprouts, or asparagus. Leftovers are great sliced over salad or tucked into a sandwich.
Try it with:
❄️ Storage and Reheating
Store leftovers in an airtight container for up to 4 days in the fridge or 4 months in the freezer. The coating will soften a bit after storing.
Reheat in a convection oven or air fryer for the best texture; the microwave works in a pinch but you loss crispiness and the chicken texture may suffer.
🍽 Related Chicken Breast Recipes
If you liked these baked mayo chicken breasts, try one of these easy favorites:
❓ FAQs
Yes, once halfway through helps the bottom stay crisp—especially if you’re not using a rack.
Yes. Bake directly on foil sprayed with cooking spray, but flip halfway with a fork for the best texture.
Optional. Even a quick 15-minute brine (2 cups water + 1 tablespoon salt) can make it extra juicy. Rinse, pat dry, and skip the seasoning salt if you do. Brine for up to 2 hours maximum for the best texture.
📖The Recipe Card
Mayo Parmesan Chicken (Easy Baked Chicken Breast)
Ingredients
- 2 skinless boneless chicken breasts trimmed
- ½ cup mayonnaise
- ¼ cup Parmesan cheese—grated or shredded - fresh preferred
- ¼ teaspoon seasoning salt - Lawry’s
- ½ teaspoon garlic powder
- ¼ teaspoon black pepper
- ¼ cup Italian Panko bread crumbs - Very light coat
Step-by-Step Instructions
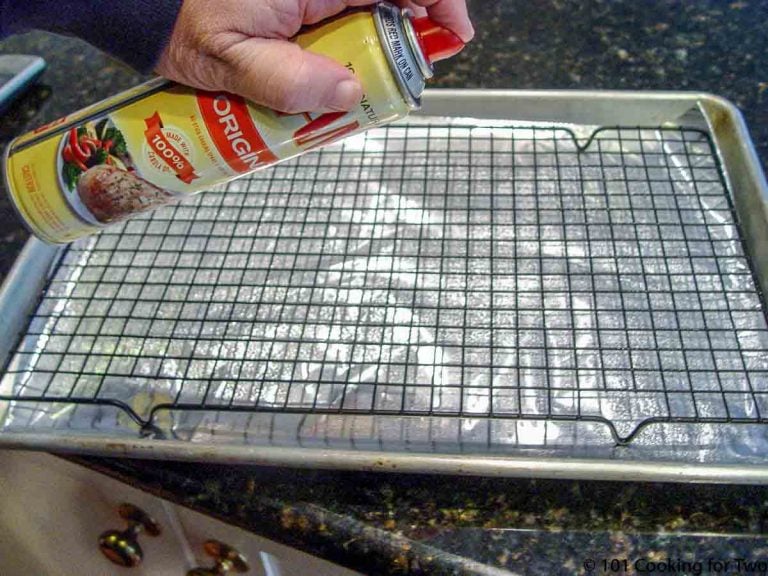
Prepare the tray and preheat
- Preheat the oven to 375°F convection or 400°F conventional.

- Line a baking sheet with foil for easy cleanup and place a rack on top (optional). Spray with cooking spray.

Prepare chicken breasts
- Trim and pat dry boneless, skinless chicken breasts. If they’re thick, pound to about ¾ inch with a meat mallet for even cooking. For safety, cover the chicken with plastic wrap or place it in a food storage bag before pounding to avoid splatter.


Prepare the coating
- In a bowl, combine ½ cup mayonnaise, ¼ cup Parmesan cheese (freshly shredded or grated preferred), ¼ teaspoon seasoning salt (I used Lawry's), ½ teaspoon garlic powder, and ¼ teaspoon black pepper.
Apply mayonnaise coating and breadcrumbs
- Pat the chicken breasts dry again. Lightly coat all sides with the mayo mixture, then place on the tray.
- Sprinkle both sides with Italian Panko. You are not breading them, just adding some crispy flavor (about ¼ cup for two breasts).


Bake the chicken
- Bake in the preheated oven until the internal temperature reaches 165°F. At around 20 minutes, you can flip the breasts with a fork to help keep the bottom from getting soggy. Depending on the size, the total cooking time is about 40 minutes. Let rest for 5 minutes before serving.
Recipe Notes
Pro Tips
- Use breasts of similar size and thickness. Flatten to ¾ inch if needed.
- Pat the chicken dry—really dry—before coating.
- Keep both the mayo and breadcrumb layers light.
- Flipping is optional, but it helps keep the bottom from getting soggy.
- Miracle Whip, Greek yogurt, sour cream, or cream cheese may be used instead of mayonnaise.
- Common problems: Not drying enough, too much coating, too many bread crumbs, cheap mayonnaise, and previously frozen chicken will release more fluid.
- Cook to the final internal temperature of 165°. If using chicken thighs, cook to an internal temperature of 180°F for tenderness.
- Store for 4 days refrigerated or 4 months frozen—reheat in a convection oven or air fryer to revive some crunch.
Your Own Private Notes
To adjust the recipe size:
You can adjust the number of servings above; however, only the amount in the ingredient list is adjusted, not the instructions.
Nutrition Estimate (may vary)
Editor's Note: Originally published December 12, 2012.

Mary Schaefer says
This is a tasty and easy-to-prepare meal. The mayonnaise and parmesan give it a delightful tang and also keep it moist while in the oven. I will be making this a regular in our dinner rotation.
Windy says
What do you think is a good mayo?
Dan Mikesell AKA DrDan says
Hi Windy,
Generally, for mayonnaises: Hellmann’s and Duke’s are the best reviewed and Kraft's is always close. So, I buy any of those three. I 100% avoid generic mayos that are guaranteed to have cheap ingredients.
I should metion that Duke's has a bit more of vinegar twang that many love. I think if it as southern and Carolina BBQish. So, it may be the best on a chicken sandwich but for cooking dishes, I tend to the other two.
Dan
Shannon says
Hi! Can this be prepared one evening, refrigerated overnight
and baked the next?
Dan Mikesell AKA DrDan says
Hi Shannon,
Welcome to the blog.
Make up the coating, trim and even out the chicken, the store. Bring it together the next day. I would not coat the chicken until time to cook.
Dan
Racheal says
I'm not a fan of mayo but I've been seeing this recipe all over online lately so I decided to give it a try. Overall.... my family and I loved it! We didn't use a rack so the crust was alittle soggy on the bottom. But the taste was delicious! We also didn't flip the chicken, we just cooked it until it was 165°. Definitely going to make this more often. Super easy and yummy!
KRK says
Hi, Dr. Dan! Have been making this recipe often for years and loving the result! Today, though, I find myself with chicken tenders instead of whole breasts. Please advise on baking time for tenders.
Dan Mikesell AKA DrDan says
Welcome to the blog.
Cooking time to the minimum safe 165° is mostly dependent on thickness. Tenders usually will take only 15-18 minutes at 400° oven. You don't want to overcook the meat but need the surface browned some. So see https://www.101cookingfortwo.com/spicy-baked-chicken-strips/#recipe to see some discussion about baking tenders. You may need to just turn on a broiler at the end to brown the surface some. I'm not too hopeful it will end up as well as the whole breasts.
Dan
Kathleen says
Exactly...it was awful. Not one person in my family enjoyed it at all
Was hoping for a good chicken recipe as we eat a lot of it. Won't be making this one again 😣
Darlene says
I tried this last night and I was sad. The coating came off at the flip. Then when I went to serve, the coating that was now on the bottom also came off. Naked chicken. Sad. It was still pretty moist, just no coating. I scraped some of the coating off the bottom of the pan/foil/rack and placed it on top to serve. The coating was delicious! I used a well-oiled rack, Hellmans Mayo, fresh chicken carefully dried, and fresh grated parm. The coating was too thick to "dip" so I had to spread it on. I will make this again, use foil, and put the coating only on the top with no flip.
Dan Mikesell AKA DrDan says
Hi Darlene,
Welcome to the blog. Sorry you had a problem.
A few hints on getting the coating to stick. Most important is dry meat. Nothing sticks well to wet chicken. If the chicken was previously frozen then be sure it is totally thawed—if not it will release fluid.
The coating layer needs to be light. You should be able to see the chicken through it. Lastly, use a good quality real mayo.
Hope that helps.
Dan