
Anyone can bake a moist and tender whole chicken with the crispiest skin with only a few steps. This simple roast chicken recipe is the perfect healthy comfort food you can easily make at home. Based on an American Test Kitchen technique, I have simplified, added troubleshooting tips, expanded options, and added gravy.
🐓Ingredients
Whole chicken—about 4 lb.
Butter—or oil
Salt and Pepper—to taste. Or the seasoning of your choice.
Optional Gravy—All-purpose flour, chicken broth, salt

Jump To (scroll for more)
This is very close to that "ideal" recipe of just throwing something in the oven and having it come out with great taste and moisture, with crispy skin.
Based on an American Test Kitchen recipe, I took the technique, expanded the details, simplified it, and added troubleshooting tips. And, of course, a super-easy, quick gravy—everybody loves gravy.
👨🍳How to Oven-Roast a Whole Chicken—Step-by-Step Photo Instructions
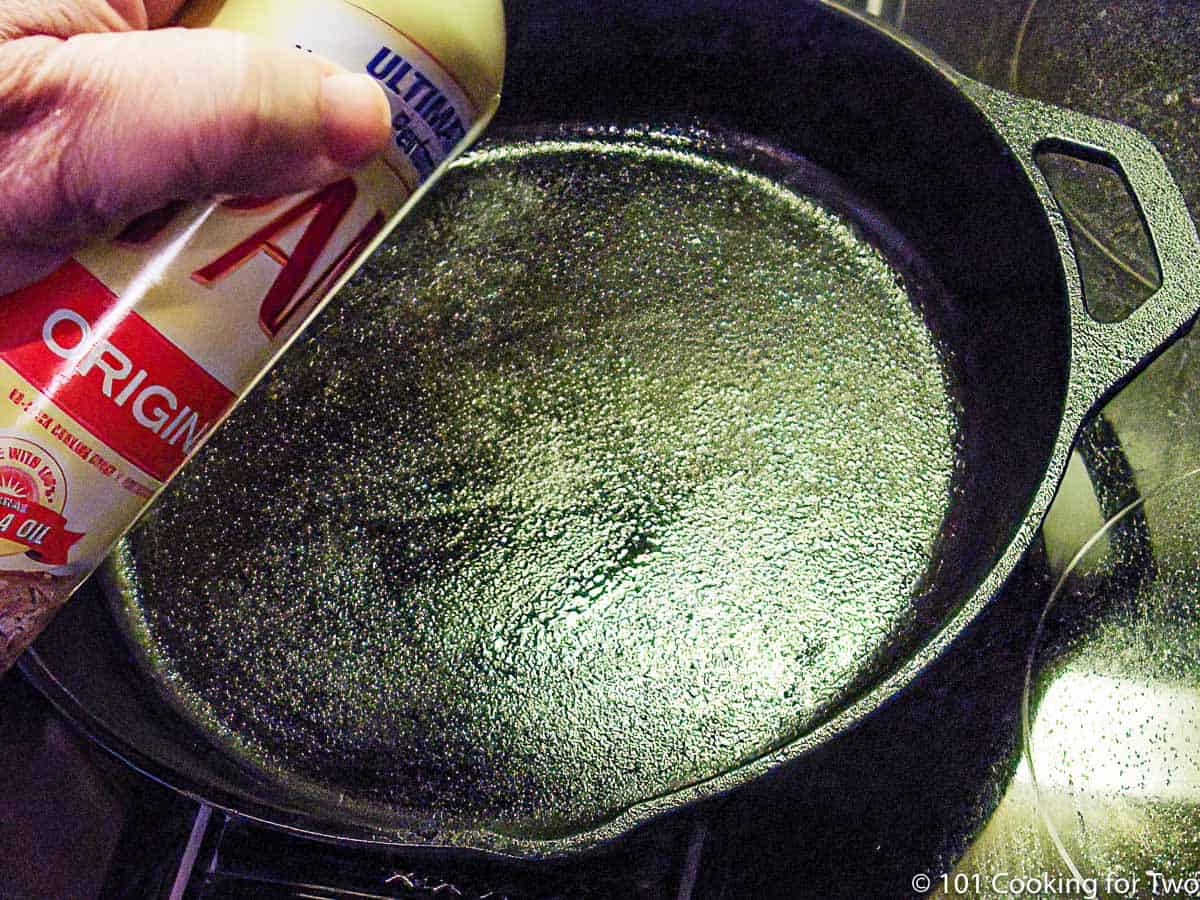
1. Spray a 12-inch oven-safe pan (cast iron preferred) with PAM. Place in the oven and preheat to 425° convection or 450° conventional.
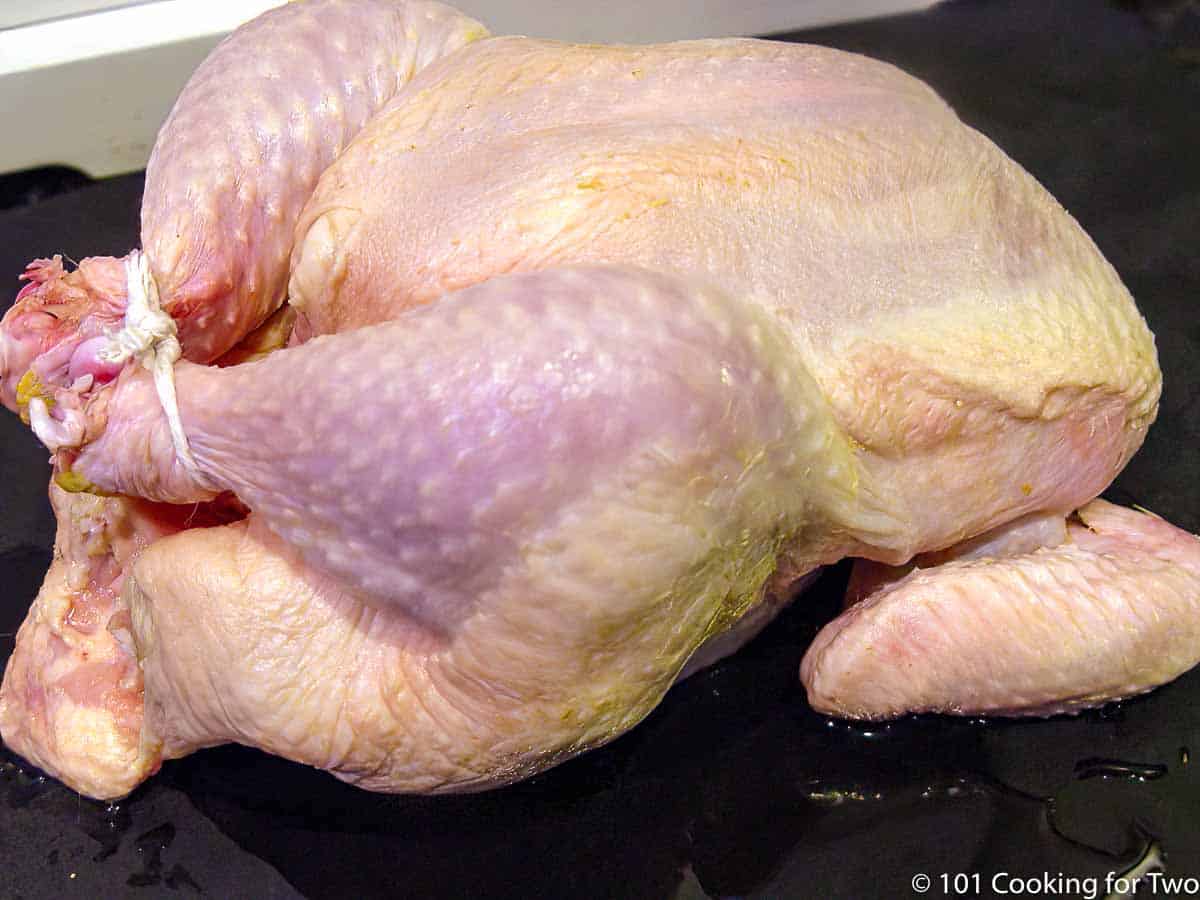
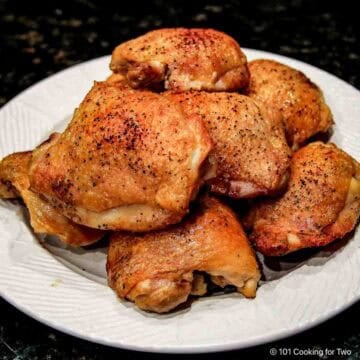
2. Pat dry a whole chicken, tie legs together with kitchen string, and tuck wings under.
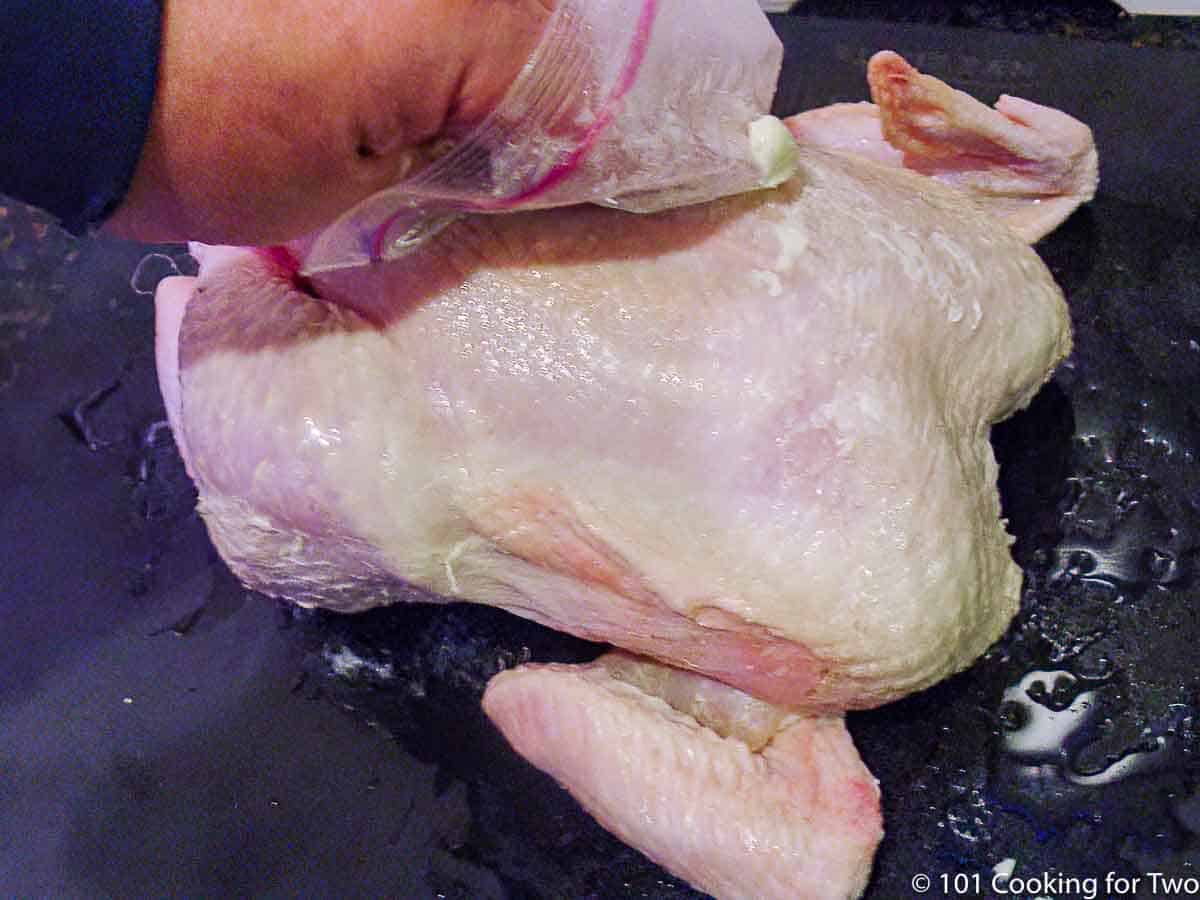
3. Coat the surface of the chicken with a good brush of oil or a tablespoon of butter. Butter will tend to smoke more.
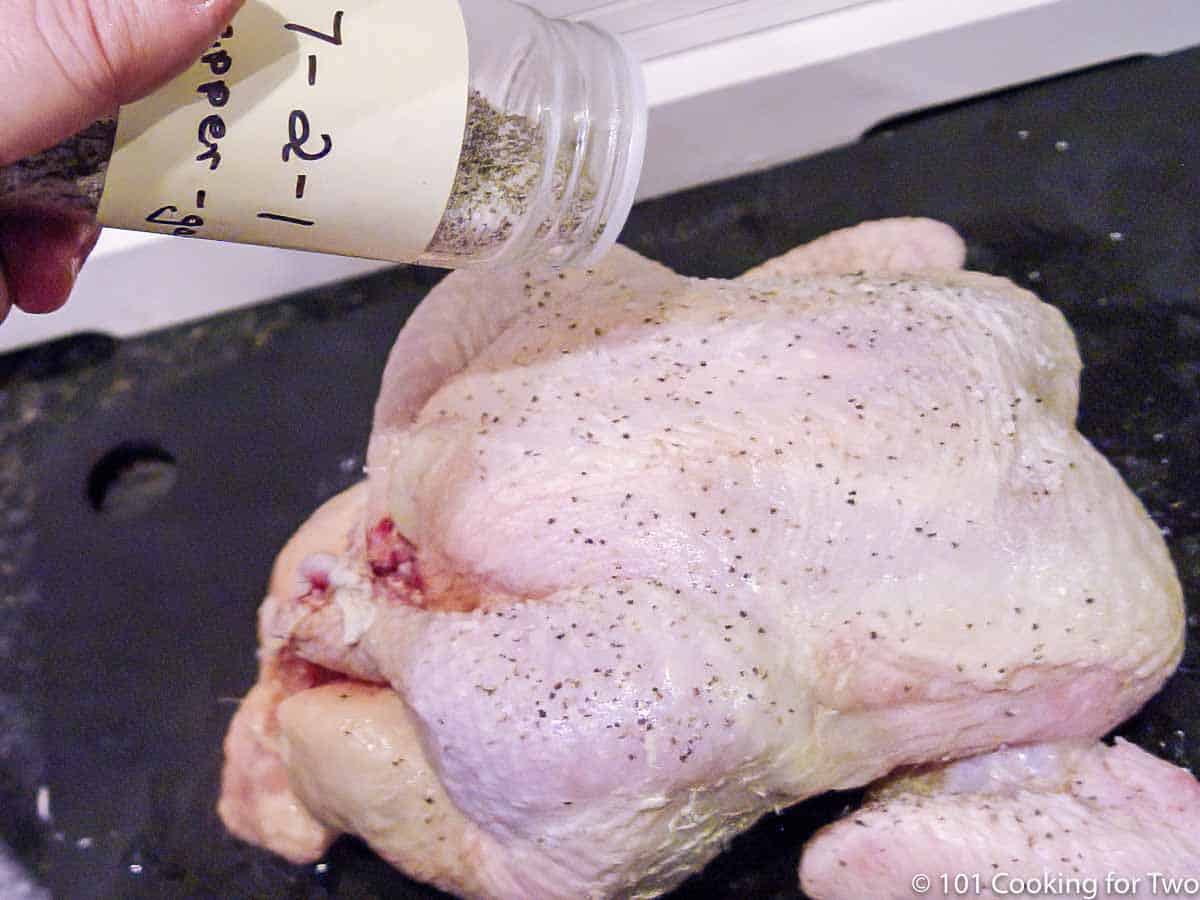
4. Season the chicken with salt and pepper to taste. I'm using some of my 7:2:1 All-Purpose Seasoning, but you can season it any way you want.
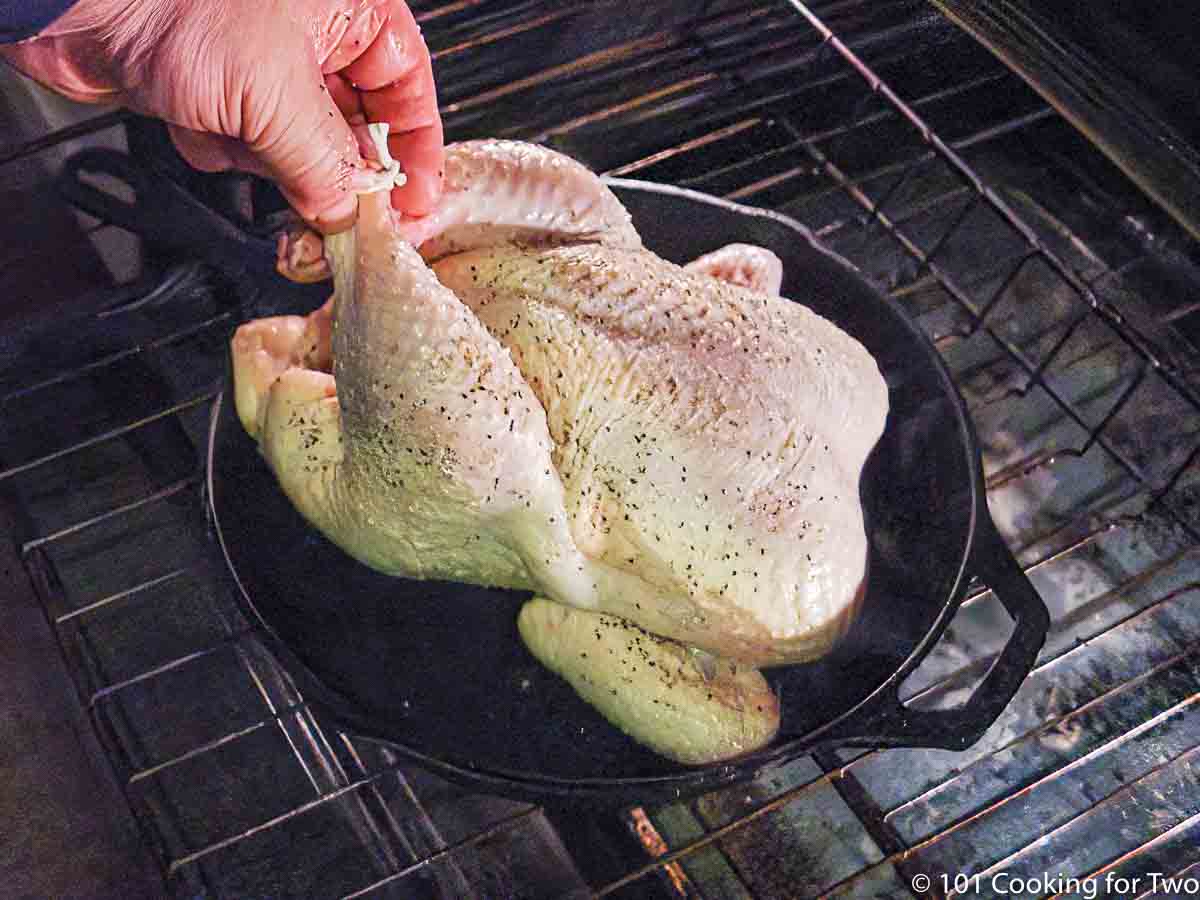
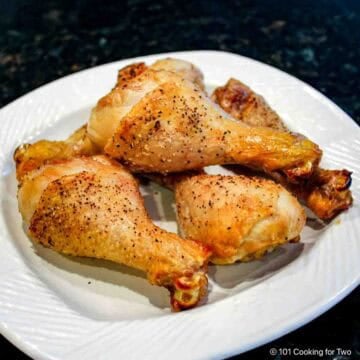
5. Transfer the chicken to your preheated pan. Let it roast until the breast temperature is 120° and the thigh is 135°. Depending on the chicken size and your oven, this will take about 30 minutes.
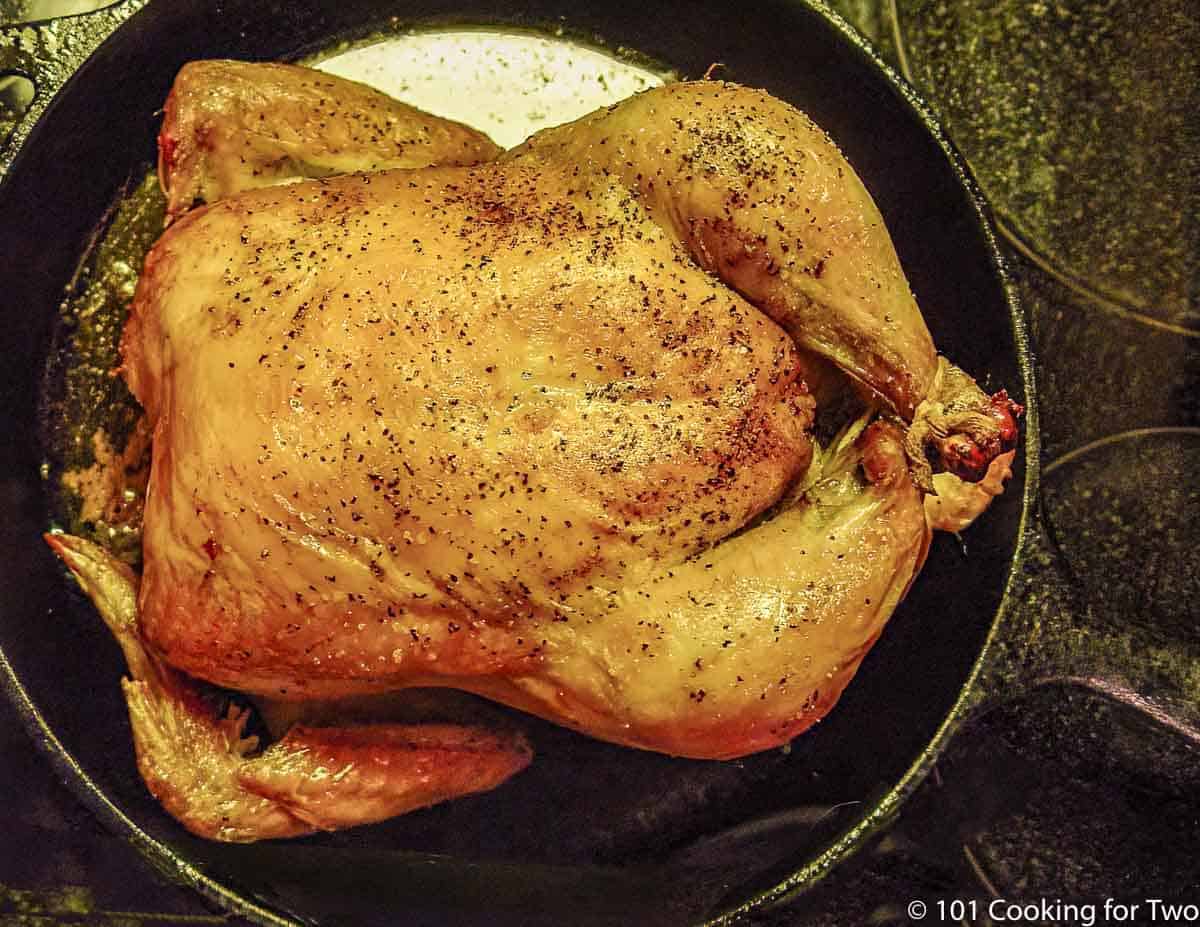
6. Turn OFF the oven and let it sit in the hot oven until breast temp is 165° and thigh is 175°+, about 30 minutes. Remove and tent for 5-10 minutes.
Making gravy

1. Whisk flour into cold water.

2. Use the baking pan with all the drainage and add chicken broth. Bring to a boil and scrape anything off the bottom of the pan.
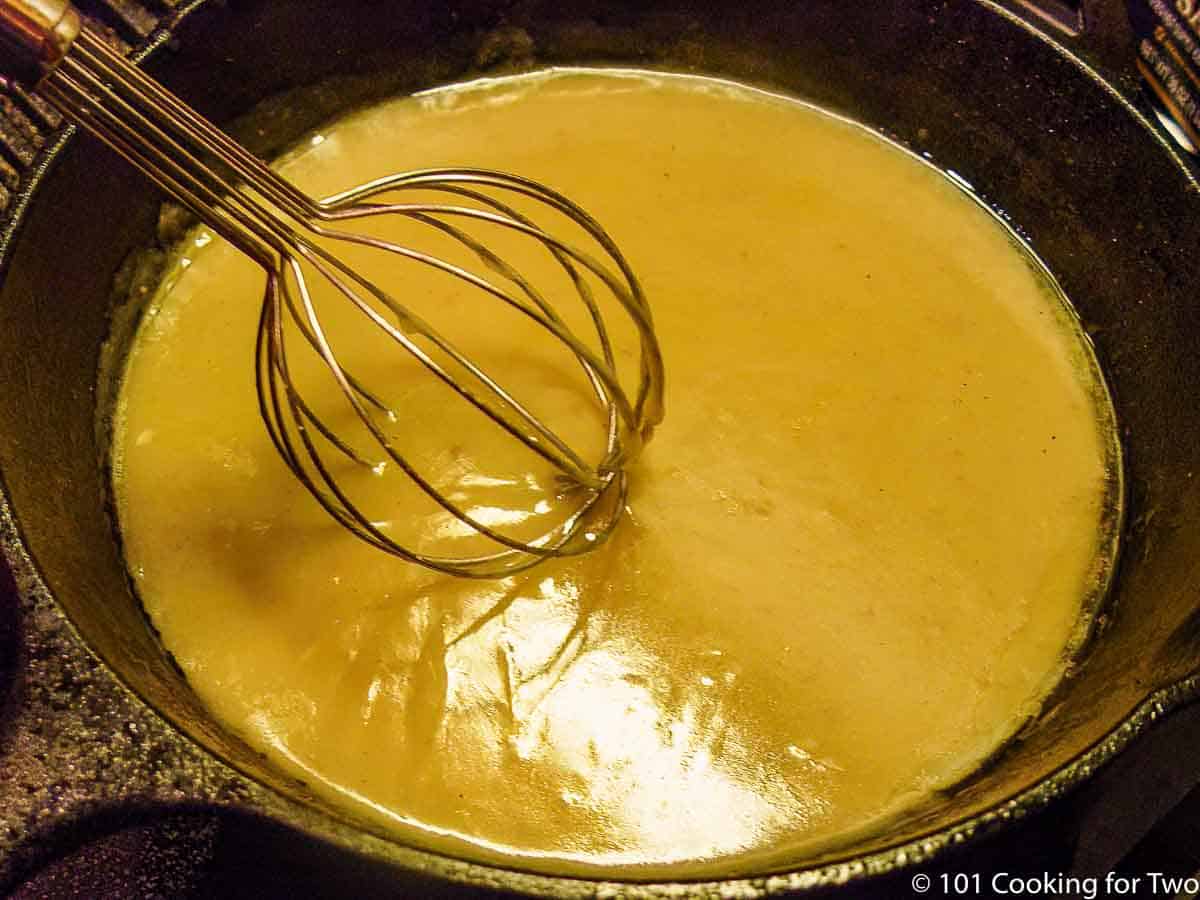
3. Slowly add most of the water/flour mixture while continuously stirring. Add more in a few minutes if needed. Add salt.
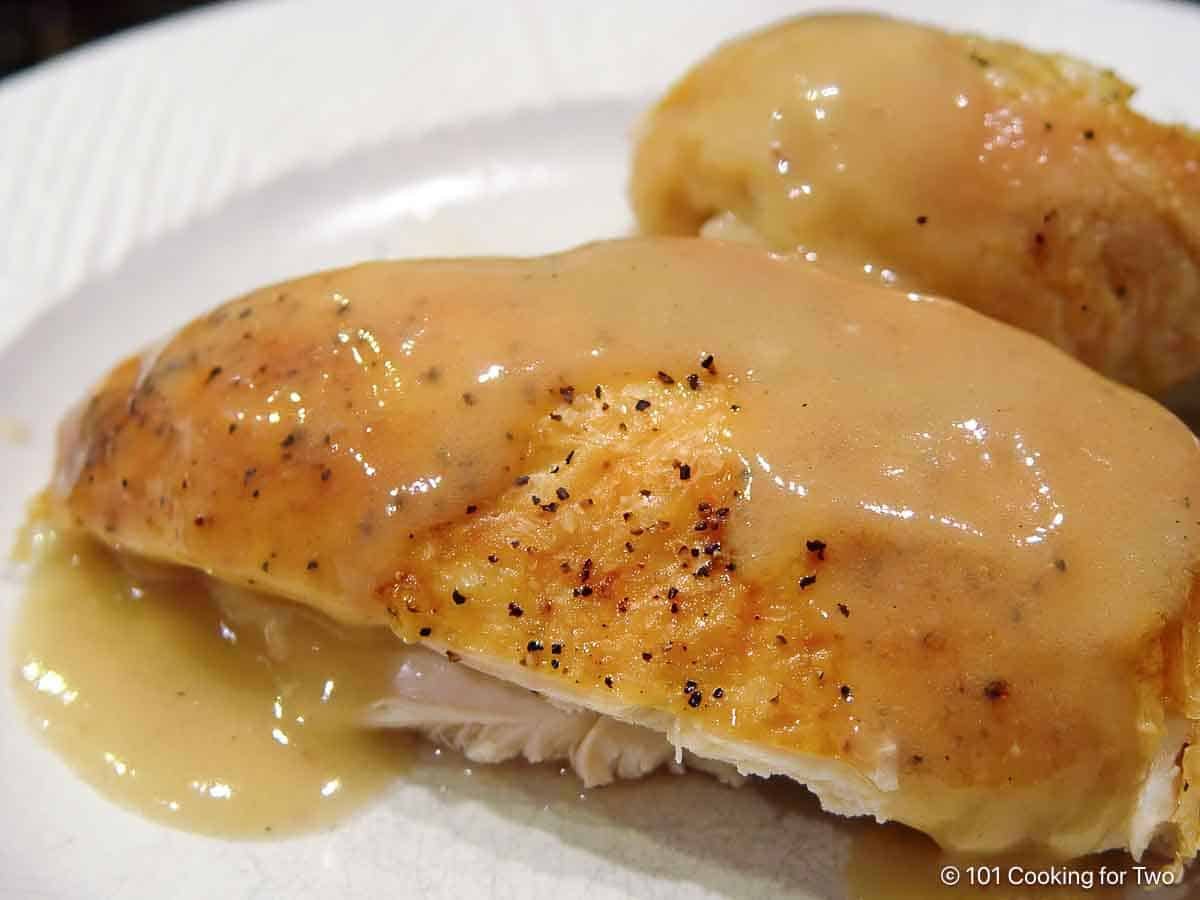
4. Serve with the roasted chicken.
For more details, keep reading. See the Recipe Card below for complete instructions and to print.
⏰How long to bake a whole chicken
A 4-pound whole chicken will take about 1 hour to cook. It takes about 25 minutes to reach 120° when the oven is turned off, and another 30 minutes to finish cooking to 165°.
According to the USDA, chicken needs to reach 165° for safety. For texture, dark meat is better at 180°-185°, and breast meat is good at 165°. You are cooking to a final internal temperature, never by time alone. So, you must use an instant-read thermometer.
⏰Approxiate Cooking Time by Weight
Cooking time varies by your oven and the weight and thickness of the chicken.
| Weight | Approximate Oven On Time (to 120°) | Approximate Oven Off Time | Approximate Total Cooking Time (to 165°) |
|---|---|---|---|
| 3-3 ½ lbs | about 25 minutes | about 25 minutes | about 50 minutes |
| 4-4 ½ lbs | about 30 minutes | about 30 minutes | about 60 minutes |
| 5 lbs | 35-40 minutes | about 35 minutes | about 70+ minutes |
Save this recipe!
😊Make it right every time
A 3-pound chicken will be 3-4 servings, while a 4-pound chicken will be 4-6. A serving of whole chicken will need ½ to 1 pound of chicken once cooked, and account for waste.
Tie the chicken legs together with kitchen twine and tuck the chicken wing tips under the ribs. This will help them cook more, even with the chicken's body.
Be sure to pat dry with paper towels to get crispier skin. Give the chicken a good vegetable or olive oil brush for crisp skin. A light coat of butter is more traditional, which is fine.
Any roasting pan will work well, but I suggest a large cast-iron skillet, which will retain and distribute heat evenly.
I'm making the gravy using a slurry method. For a more detailed discussion, please see How to Make Gravy at Home.
🧂Seasoning options
I like to keep things simple with just a sprinkle of coarse salt and black pepper. My wife is a garlic hound, so we use our All-Purpose Seasoning—7:2:1 and 7:2:2. Many people like rosemary, thyme, other spices, or fresh herbs. Spice mixes like lemon pepper or Cajun spices are also excellent choices.
My Spicy Option: Do you want more taste, more like a tasty rotisserie chicken? Kick it up several notches with a spicy rub. Mix this spicy rub after applying the oil or butter. 4 teaspoons kosher salt, 1 teaspoon each of pepper, garlic powder, onion powder, thyme, and sugar. Then add 2 teaspoons paprika and ½ teaspoon cayenne pepper (optional).
👍The traditional method
If you want to roast the chicken straight-up without this technique, start with a 400° oven for about 20 minutes and then turn down to 350° for about another 40 minutes to reach 165°.
📖Whole Chicken Recipes
Check out other whole chicken recipes, such as Grilled Whole Chicken, Grilled Flattened Chicken, or Alabama BBQ Chicken with White BBQ Sauce.
🍽️Serving Suggestions
Roast chicken is a good companion for baked rice or roasted baby potatoes. Fresh salad and other common vegetables, such as Roasted Asparagus with Garlic and Parmesan or Microwave Corn on the Cob, are also good complements.
We like Sauvignon Blanc or Chardonnay as wine pairings with chicken or turkey, but a red wine like Pinot Noir also works well.
🤔Troubleshooting
If the chicken is not reaching the final temperature, turn the oven to 350° to finish cooking to 165°.
If the oven smokes, switch out the butter for a high-temperature oil like canola oil. Use a baking dish with higher edges to prevent splatter. Be sure the oven is clean and not smoking from previous splatter.
Some ovens leak heat from the seals or poor insulation. Instead of turning the oven off, turn it down to 200°
Also, frequently checking will cause the heat to be lost rapidly. Use a remote thermometer and keep the door closed. Only check once, about 5 minutes before it should be done.
❄️What to do with leftovers
Leftovers may be stored in an airtight container and refrigerated for 4 days or frozen for 4 months. You can also use them for chicken salad, chicken soup, or chicken chili.
❓FAQs
No, we are aiming for crispy skin.
We do not routinely wash raw chicken due to water splatter. For more information, see Chicken... To Rinse or Not to Rinse?
📖The Recipe Card

Easiest Oven Roasted Whole Chicken
Ingredients
- 1 whole chicken - about 4 lb.
- 1 tablespoon butter - Or oil
- Salt and Pepper - to taste. Or seasoning of your choice.
- ¼ cup AP flour
- 2 cups chicken broth
- to taste salt
Step-by-Step Instructions
- Spray a 12-inch oven-safe pan (cast iron is preferred) with PAM. Place the pan in the oven and preheat to 425° convection or 450° conventional.

- Pat dry a whole chicken, tie legs together with kitchen string, and tuck wings under the body.
- Coat the surface of the chicken with a good brush of oil or a tablespoon of butter. Butter will tend to smoke more.
- Season the chicken with salt and pepper to taste. You can season any way you want.
- Transfer the chicken to the preheated pan. Let it roast until the breast temperature is 120° and the thigh is 135°. Depending on the size of the chicken and your oven, this will take about 30 minutes.
- Turn off the oven and let the chicken sit in the hot oven until its breast temperature is 165° and its thigh temperature is 175°+, about 30 minutes. Move the chicken to a plate and pour any liquid in the cavity into the pan. Allow the chicken to rest for 5-10 minutes before serving.

- Move the chicken to a plate and pour any liquid in the chicken cavity into the pan for gravy.


Optional Gravy Instructions
- Combine flour with a cup of cold water. You need 2 tablespoons of flour for every cup of gravy you make. You can use a bowl and whisk to combine the flour and water, or I like to use a Tupperware shaker.
- Move the pan to the stovetop and add the chicken stock or broth to the juices in the pan. Over medium-high heat, bring to a boil and scrape anything off the bottom of the pan.
- Slowly add most of the water/flour mixture while continuously stirring. In about 2-3 minutes, the mixture will thicken. If it is not thick enough, add more flour mixture and continue to stir. Continue this until the desired thickness. Add salt to taste.


Recipe Notes
Pro Tips
- The times will vary by size, thickness, and oven. Please cook by temperature and not by time. Times are provided for timing purposes only.
- Season to your taste. We usually use All Purpose Seasoning - 7:2:1 and 7:2:2.
- Crispy skin depends on drying the skin well with a paper towel before starting.
- Most people will use butter to coat the chicken, but the oil may give crisper skin and less smoke.
- The gravy is optional. 2 cups are enough for just the chicken, but you will want 4 cups if doing mashed potatoes with gravy.
- The spicy option is provided in the discussion
- Gravy is not included in nutrition.
- Oven issues, smoking ovens, and troubleshooting are provided in the post. Please check there first.
Your Own Private Notes
To adjust the recipe size:
You can adjust the number of servings above; however, only the amount in the ingredient list is adjusted, not the instructions.
Nutrition Estimate (may vary)
Editor's Note: Originally Published October 22, 2011. Refreshed with expanded and clarified instructions and updated photos.

wayne chamberlain says
hi,
i purchased a cast iron pan at a garage sale. it was a little rusty but solid. i put sime baking soda in it and a little water. brought it to a boil. then i cooled it to clean it. tooka stainless steel scouring pad and scrubbed it till it was shiny cast iron. washed it and dried it. then i put a little olive oil in it and made french toast not letting it to dry in any spot. when i was done with the toast it was a nice shiny black, so i called it seasoned. try it it worked for me. good luck and god bless.
wayne
Pam says
This was dee-licious! Could you tell me how to reheat the leftover pieces so they don't dry out?
Thanks!
Dan Mikesell AKA DrDan says
Hi Pam,
Welcome to the blog.
To reheat, I would spread in a shallow baking dish, cover with a lid or foil. Then into a 350-degree oven for 25-30 minutes. You just need to get it to eating temp. I like to go to about 140 degrees since it is already cooked. Time can vary by your oven, thickness of the chicken, and the dish. So check the temp a few times.
Thanks for the note and rating.
Dan
Lindsey says
Oh no, where is the recipe This used to be with the paprika, salt, onion and garlic powder? Was literally my family’s favorite! Been using the link from Pinterest for 2-3 years and now this recipe is totally different. I can vouch for the cooking method, love that, but want the spice misfire recipe back!
Dan Mikesell AKA DrDan says
Hi Lindsey,
Sorry for the move. The spicy version had almost no traffic so it is now gone. BUT it is the same recipe as this with a spice rub that is in the body of the post and #6 in the recipe notes on the recipe card. So it got folded into this. It is still there. If you want a pdf of the old recipe card, email me and I will forward a copy to you.
Dan
MaryKay Lawrence says
A straight sided canning jar works perfectly for mixing the flour and water for the gravy!
Denise Stratton says
I used your chicken drummie recipe on chicken leg quarters and it works great! I just had to add a little extra time to the baking (about 15 mins). My husband LOVED the skin (he said it was PERFECT)!!! :)
A little suggestion? You might want to clarify the amount of flour to liquid used in this recipe for making the gravy. Your recipe says: "combine 3/8 cup AP flour with equal amount of CUP cold water", but some people might think they should add one cup of cold water instead of an equal 3/8 cup of cold water. Since I've been cooking a while I knew what to do, but it might confuse some inexperienced cooks.
I love your recipes!!! Thank you for sharing...
DrDan says
Hi Denise,
It has apparently been like that for over 6 years. I have clarified the whole section.
Actually, I want the flour in one cup of cold water. An equal amount works as you know but I'm trying to get the volume up for the total amount of gravy to be more reasonable for a whole chicken.
Thanks so much for the proof-read and welcome to the blog.
Dan
Cole says
I notice that you oil your whole roasted chicken but not your drummies. Why the difference?
Dan Mikesell says
Ho Cole,
Good question. With the drumsticks, I what very crispy skin so no oil. Here I want a skin with a little flex that will stay on the pieces when cut. Also I wanted some butter taste and it does help hold the spices. Lastly a little butter in the gravy is always good for taste. But you can skip it if you want.
Dan
Mnique S. says
Please send me recipes as you make them. I like what you do.
Chris says
That breast looks perfectly cooked. I do a similar roast chicken except I do mine spatchcocked and start skin down at the beginning just for a quick sear. That gets the color started well but yours turned out great too. I'll have to experiment with this.