
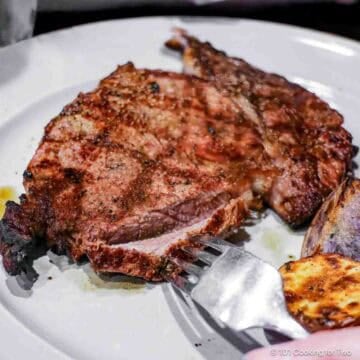
Cook juicy, tender New York strip steak like the best steakhouses at home. This simple, reliable method uses a quick pan sear for a flavorful crust, then finishes in the oven for a perfect center.
⏱️ Quick Answer: How Long to Cook New York Strip Steak in the Oven
After searing for 2–3 minutes per side, finish New York strip steak in a 400°F oven for about 4–8 minutes.
- Rare (125°): about 4–5 minutes
- Medium-rare (130–135°): about 5–7 minutes
- Medium (140–145°): about 6–8 minutes
Cook to your desired internal temperature—time will vary with thickness.


Featured Comment by Colleen:
⭐⭐⭐⭐⭐
"I made this for my family tonight. I got 5 STARS from even the pickiest eater"
Jump To (scroll for more)
- 🔥 How to Cook New York Strip Steak (Pan Seared and Oven Finish Method)
- 🧡 Why You’ll Love This Recipe
- 🥩 Ingredients and Seasoning
- 👨🍳 Quick Overview: How to Cook New York Strip Steak
- ⏰ How Long to Cook Strip Steaks in the Oven
- 🔧 Oven Temperature & Timing Tips
- 👍 Tips for Cooking Strip Steaks Right Every Time
- 🥩 Related Steak Recipes
- 🥔 What to Serve with New York Strip Steak
- ❄️ Storage and Reheating Leftovers
- ❓ FAQs
- 📖The Recipe Card
🔥 How to Cook New York Strip Steak (Pan Seared and Oven Finish Method)
This is a simple, reliable method for cooking New York strip steak with a great crust and juicy center—works for most 1 to 1½ inch thick steaks.
- Finish in a hot oven to your desired doneness
- A quick pan sear
🧡 Why You’ll Love This Recipe
- Juicy and tender every time: A reliable method that delivers consistent results.
- Better than the grill (for some): Great crust without flare-ups, and easy to control.
- Cooked to your perfect doneness: From rare to well-done, you’re in control.
- Made for home cooks: No special equipment—just a pan and a little confidence.
🥩 Ingredients and Seasoning
What you need
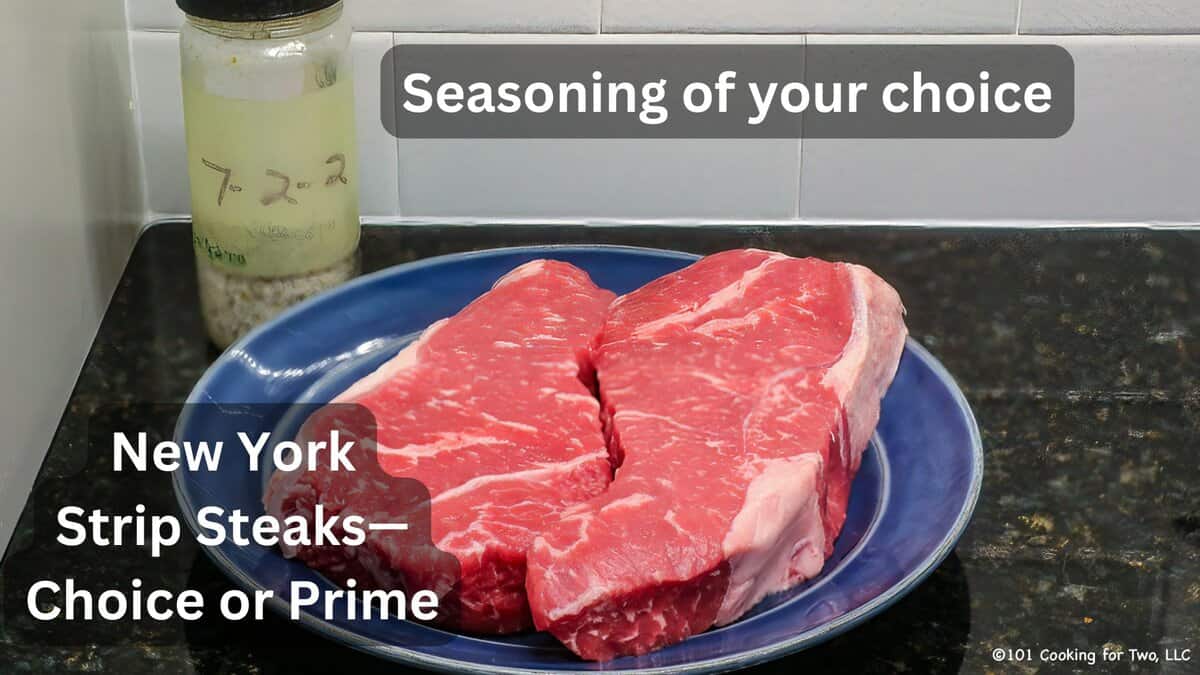
- New York strip steaks — 1 to 1½ inches thick, Choice or Prime grade. Also called strip steaks, Kansas City strip steaks, or striploin.
- Salt and pepper — Coarse kosher salt and black pepper are all you really need.
Optional seasonings
- Add a bit of garlic powder or use all-purpose seasoning mix for extra flavor.
- Try a commercial blend like Montreal steak seasoning.
- Fresh or dried herbs like thyme or rosemary can add a nice touch.
- For a flavor twist, use a dry rub (like coffee rub) or a steak marinade if you plan ahead.
👨🍳 Quick Overview: How to Cook New York Strip Steak
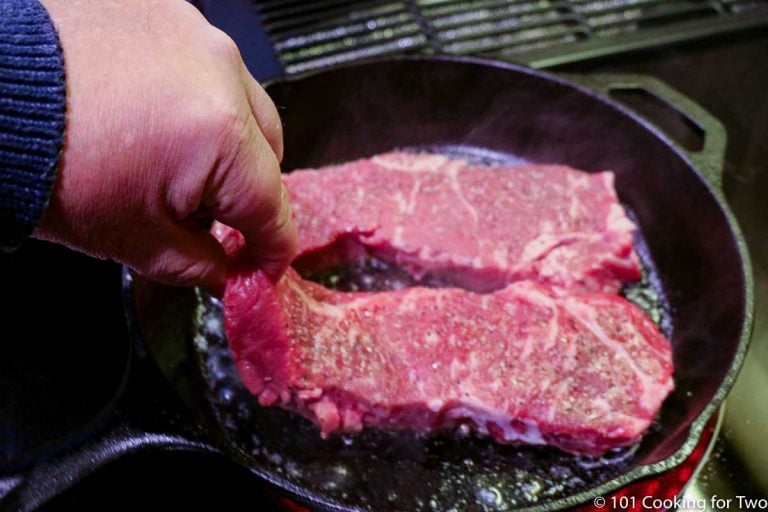
1. Trim and season:
Let steaks rest at room temperature for 15–30 minutes if you have time. Trim excess fat, pat dry, and season with salt, pepper, or your favorite steak seasoning.
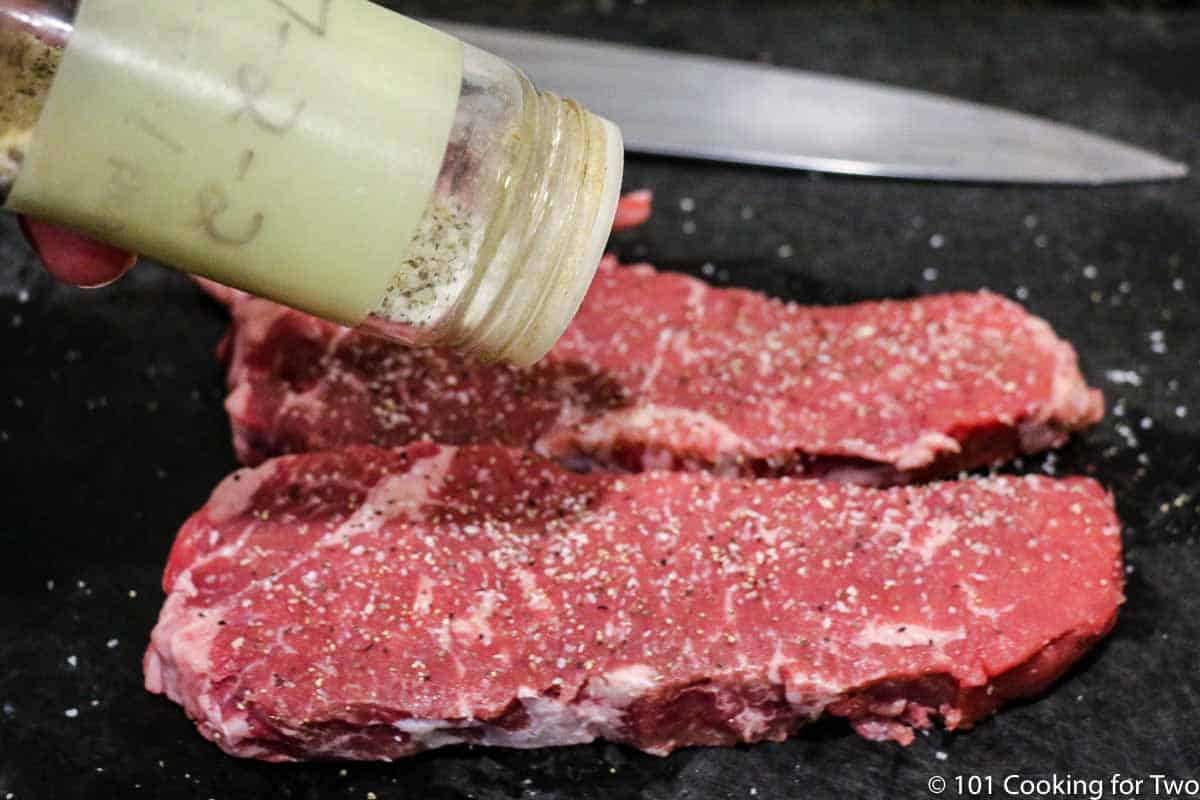
✅ Pro Tip: For the juiciest steak, season with salt either right before searing or at least an hour ahead. Salt pulls moisture at first, but given time, it reabsorbs and flavors the meat from within.
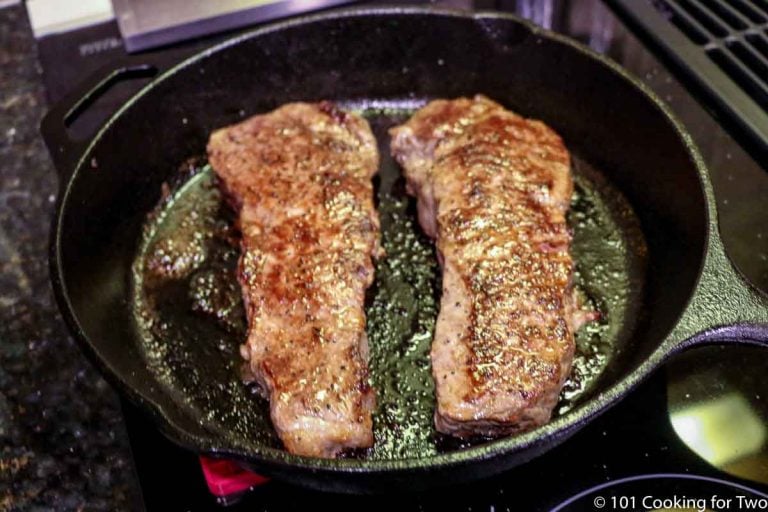
2. Pan sear for flavor:
Heat a cast iron or oven-safe skillet over medium-high heat. Add oil or butter, then sear both sides for about 2 minutes per side until a deep brown crust forms.

✅ Pro Tip: Flip once more right before transferring—this helps even out the crust and reduces the risk of overcooking.
3. Finish steak in the oven:
Move the skillet to a 400°F convection (425°F regular) oven. Cook about 5–7 minutes for medium-rare or 7–9 minutes for medium, depending on thickness.

✅ Pro Tip: Pull the steak 3–5° before your target temperature—carryover cooking will finish it perfectly.
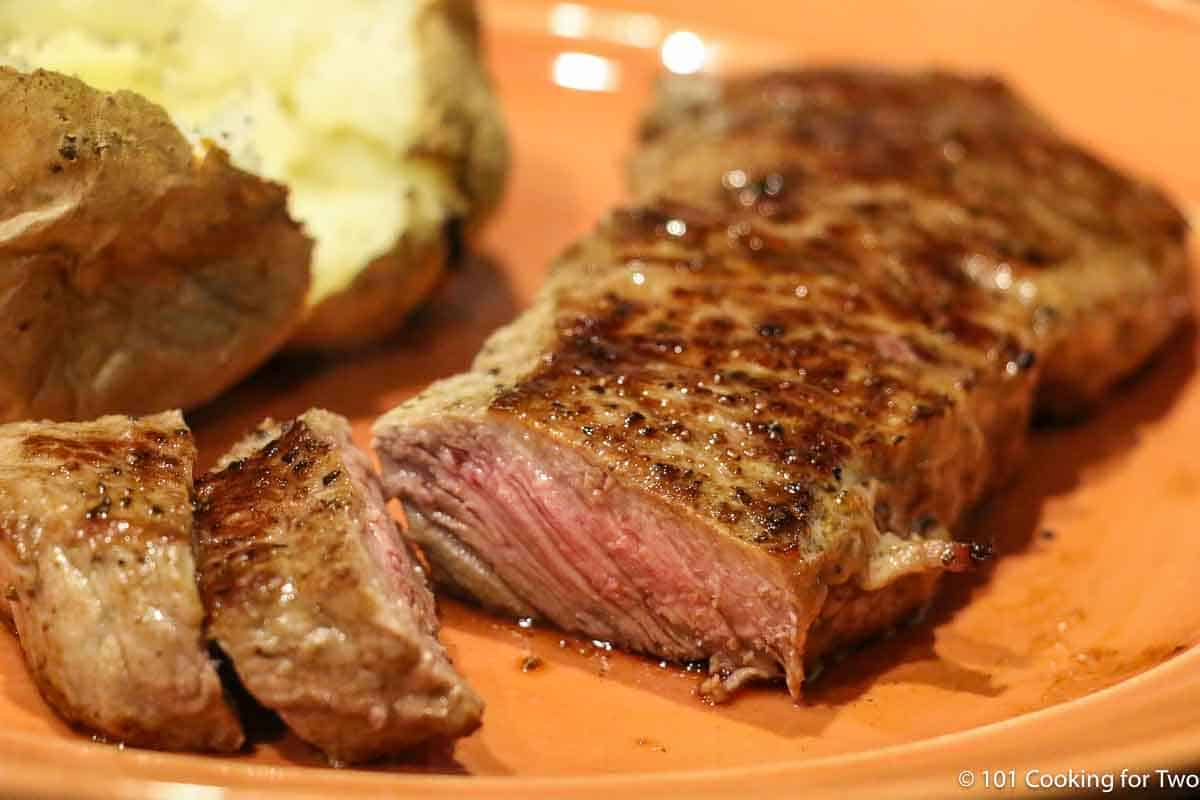
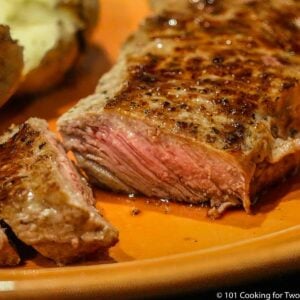
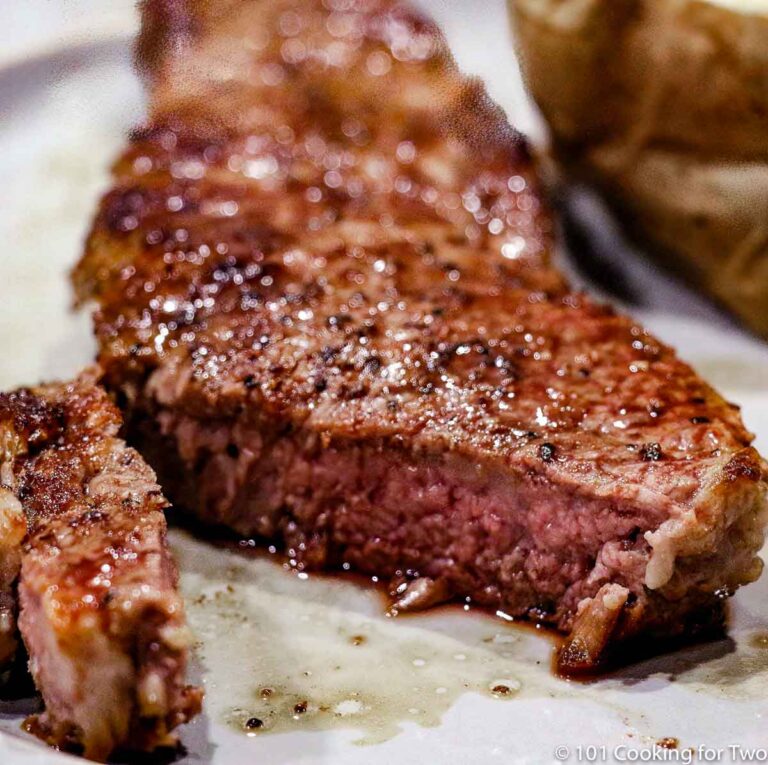
4. Rest before serving:
Tent loosely with foil and rest for 5 minutes before slicing. This keeps the juices where they belong—inside the steak.
📌 For full step-by-step instructions, scroll to the printable recipe card or keep reading for pro tips, seasoning ideas, and sides.
⏰ How Long to Cook Strip Steaks in the Oven
All total times include about 4 minutes of pan-searing before finishing in the oven at 400°F convection (or 425°F regular).
- Rare (125°–130°F): 2–4 minutes in the oven for a total of 6–8 minutes
- Medium-rare (130°–135°F): 5–7 minutes in the oven for a total of 9–11 minutes
- Medium (140°–145°F): 7–9 minutes in the oven for a total of 11–13 minutes
- Medium-well (150°–155°F): 9–11 minutes in the oven for a total of 13–15 minutes
- Well done (160°+): 12–15 minutes in the oven for a total of 16–19 minutes
You can skip the sear and cook New York strip steak fully in the oven. Expect it to take longer, and you won’t get the same browned crust, but it will still reach your desired internal temperature.
✅ Pro Tip: Always cook to internal temperature — not just time. Pull the steak 3–5° early for carryover cooking.
Save this recipe!
🔧 Oven Temperature & Timing Tips
- Best oven temperature: 400°F convection (or 425°F regular) gives the best crust and juicy center.
- Other oven temp options: 350°F or 375°F will work but need longer oven time — check early.
- What affects timing: Oven accuracy, steak thickness, sear time, and starting temperature all change how long it takes in the oven.
👍 Tips for Cooking Strip Steaks Right Every Time
- Start with quality beef: Prime or Choice grade strip steaks are the most tender and flavorful.
- Right thickness matters: This method works best for steaks between ¾ and 1½ inches thick. Thicker cuts need a reverse sear.
- Bone-in works fine: Expect slightly longer oven time.
- Season smart: Salt right before cooking or at least an hour ahead for the juiciest results.
- Use a thermometer: Always check internal temp — it’s the only reliable way to hit your perfect doneness.
- Rest before serving: Let steaks rest about 5 minutes to keep the juices where they belong.
🥩 Related Steak Recipes
Try one of these other great cuts for more steakhouse-quality results at home:
Grilled New York Strip Steak
⭐️⭐️⭐️⭐️⭐️
Learn the simple way to grill a perfect New York strip steak—crispy outside, juicy inside, and no guesswork. Perfect for beginners.

🥔 What to Serve with New York Strip Steak
Steak loves simple sides. Potatoes are the classic match — roasted, smashed, or twice-baked.
Add a vegetable for balance:
- Baked Green Beans with Bacon
- Roasted Asparagus with Garlic and Parmesan
- Parmesan Roasted Cauliflower
🍷 What wine to serve with strip steak
Rich, flavorful steaks like New York strip pair well with bold red wines. Try:
- Pinot Noir – lighter, but still earthy enough to hold up
- Cabernet Sauvignon – classic steakhouse pairing
- Merlot – smooth and balanced
❄️ Storage and Reheating Leftovers
Store leftover strip steak in an airtight container or zip-top bag for up to 4 days in the refrigerator or 3–4 months in the freezer.
Reheat gently in the microwave, stovetop, oven, or air fryer — just until warm to keep the texture tender. Cold slices are great on a salad or sandwich.
❓ FAQs
Yes, you can cook New York strip steak entirely in the oven without pan-searing. It will take longer, and you’ll miss the crust and flavor from searing, but just cook to your desired doneness.
For best results, cook on a rack to allow heat to circulate and cook both sides more evenly. You can use the broiler at the end to add some browning, but it will raise the internal temperature quickly—so stop the oven cooking a little early.
For a 1-inch steak rested to room temperature, sear for about 4 minutes total, then finish in a 400°F convection (or 425°F regular) oven for 5–7 minutes for medium-rare or 7–9 minutes for medium.
Always check early — steak thickness and oven temperature can vary.
Cast iron heats evenly, holds temperature, and moves easily from stovetop to oven. It creates a consistent, flavorful crust — exactly what you want for steakhouse-quality results.
A New York strip comes from the short loin behind the ribs — a tender muscle with great flavor and a bit of chew. It’s also sold as a strip steak, Kansas City strip, or striploin steak.
Yes — it’s the same method. You sear for flavor, then finish in the oven for even cooking and a juicy center.
📖The Recipe Card
Pan Seared New York Strip Steak (Oven Finish Method)
Video Slideshow
Ingredients
- 2 New York strip steaks - 1 inch thick
- salt and pepper to taste - or season to taste
Step-by-Step Instructions
Trim and season
- If you have time, allow the steaks to rest at room temperature for 30-60 minutes. Then, preheat the oven to 400° convection or 425° conventional.

- Trim any easily trimmable edge fat. Pat dry with paper towels. Season to your taste. A good sprinkle of black pepper and Kosher salt is all you need, but I use 7:2:2 (my homemade seasoning).

Pan sear for flavor
- Melt 1 tablespoon of butter or use oil in a cast iron or other oven-safe pan over medium-high heat. Some people prefer oil because of butter's lower smoke point, but I've never had issues with either.
- When hot, add the strip steaks and sear both sides for about 2 minutes, or until they reach your desired crust color.

Finish the steak in the oven
- Transfer the pan to a 400°F convection oven (or 425°F conventional). Roast to a few degrees below your final temperature—about 5–7 minutes for medium-rare (130°–135°), or 7–9 minutes for medium (140°–145°). Always check a few minutes early. (The variables are the steak thickness, how long you seared, and the actual oven temperature.)
Rest before serving
- Remove the pan from the oven, tent lightly with foil, and let the steaks rest for 5 minutes before serving to allow the juices to absorb back into the cells for maximum tenderness.
Recipe Notes
Pro Tips:
- Resting at room temperature before cooking helps steaks cook more evenly. Skip it if you must.
- I like to use 400°F convection, but other oven temps will work. Just adjust the cook time and remember: you’re cooking to temperature, not time.
- Trim excessive fat for better searing
- For the juiciest steak, season with salt right before searing or at least an hour ahead. Use the seasoning of your choice or some coarse salt and pepper. Marinades will also work well.
- Butter or oil both work; butter gives flavor, but oil has a higher smoke point.
- The internal temperature will rise a few degrees during resting after cooking.
- Always rest for at least 5 minutes before serving.
- NEVER cook by time alone. Use an instant-read thermometer to check doneness.
Your Own Private Notes
To adjust the recipe size:
You can adjust the number of servings above; however, only the amount in the ingredient list is adjusted, not the instructions.
Nutrition Estimate (may vary)
Editor's note: This article was originally published on February 20, 2015. It has been updated with expanded options, refreshed photos, and a table of contents to help with navigation.

Jonathan says
Thanks for the advice, ill try it out. I really need the thermometer you guys say I need to invest in. I have a few electronic ones but I don't like them. Thanks for the help and tips.
Jonathan Pattee says
Normally Chuck roast. I have not purchased one from a butcher shop. Either way, I would prefer your advice. I am always open to suggestions.
DrDan says
I personally prefer a chuck roast due to the marbling. Other than cutting it up for various uses, straight cooking of a chuck roast I aways do using this recipe https://www.101cookingfortwo.com/wifo-pot-roast-basic-comfort-food/ I have experienced with some searing several years ago but it didn't seem needed, more of a waste of time for me and made my wife mad since I was screwing with her pot roast. Using this recipe, it is moist and tender. The surface gets hot enough for a Maillard reaction hence searing didn't do much.
Outside of that, I don't sear things like a ribeye roast or eye of round since I have butter all over it. Cooks Illustrated does do a fair amount of searing of roasts. I have done a eye of round but I felt it made the surface too dry so I now go the butter route. I just don't cook large chunks of meat that often.
So I'm not too helpful for you. You might want to read about reverse searing methods. I haven't done much with it but I might be an answer for you.
Dan
Jonathan Pattee says
I will have to admit, I have been on several sites looking for a good cast iron steak recipe and this is what I will use tonight. DrDan is so knowledgeable, that I read all of the post. I don't do this normally, but he fired back at all of the sniper questions with great knowledge. I upgraded to a pioneer woman cast iron an am eager to try this out with potatoes and asparagus. Off topic, if you are this good at steak do you have a roast sear recipe? I gave up on roast because mine always becomes dried out.
DrDan says
Hi Jonathan,
First thanks for the note and the compliments. I try to be polite about these things.
What type of roast are you talking about?
Dan
Mark says
So how would this translate to a well done steak? I'm not overly fond of the red on the inside due to my upbringing, but I love well done steak.
Whenever I attempt to cook the steak well enough for me to enjoy, it just ends up.. burnt.
DrDan says
Hi Mark,
Well done is in the 160 range. Most of the pink will disappear about 155. 165 is definitely well done and may be more than you want.
If I was aiming for that range of temperature, I would first be sure to let the meat set at room temperature for about 60 minutes before starting. That will make it much easier to get the internal temperature you want without burning the exterior.
Next is thickness. This will be harder with thicker steak. If you go over one inch it will be very difficult.
Last, you must have a good instant read meat thermometer. Remove from the oven a few degrees less than your target. Tent lightly for about 5 minutes.
One last thought, since you will be cooking a bit longer (probably about 2 minutes I think), you will be more likely to have the butter start smoking. I suggest using oil. Then a pat of butter on top when you tent.
Hope that helps
Dan
Jeff says
Absolutely perfect! I could not grill, no burn order and I have five acres of dry grass just waiting to be on fire. I was skeptical didn't want to waste some nice strip steaks but this technique worked perfectly for me. Thank you for sharing!!
lisa says
It pains me to do it, but I will make this for my husband. I am a vegetarian. And although he is eating much less meat these days, he likes a good steak once in a while. With the rave reviews, I'm sure he will love it. Thanks for posting. I will only use free roaming local grass fed however. (Sorry, not from Iowa)
DrDan says
He will love you for it.:)
AMAMLM says
Just used this guide to cook up two NY steaks and they turned out amazing! Thanks for sharing!
Sarah Warner says
I have to say... just reading DrDan’s responses to everyone’s questions made my night! I have made my steaks exactly as he says and they turn out beautifully every time! However, what made me smile is his wit, and what seems to be a very lovely human being behind his words!
Just wanted to say THANK YOU DRDAN for being a nice man in not always such a nice world
Thank you for sharing your wisdom too!
DrDan says
Thanks for the note and compliment. I just try to be helpful. It is the old "golden rule" thing. Also, I don't engage in unnecessary combat like the grass feed thing. Enough has been said about that.
Dan
Estelle Crawford says
This was The Best steak I have ever made.
I followed your instructions to the letter including making certain to tip the pan periodically so the butter swirles during the brief but intense cooking.
The aroma was mouthwTering and the steak was perfect.
Thank you for this 5 star receipe!
Jim says
Your instructions are perfect, but the Grass Fed comments are fake news. Cows are supposed to be eat grass and not stand still all day and eat GMO infused corn.
Taylor says
There's a definite difference in taste between grass and grain fed cows! I work for an Internet based meat company (we sell and ship mostly gourmet beef (Wagyu, Japanese Wagyu Kobe beef etc) pork and some chicken from local farms) and from customer responses and personal experience grass fed cattle beef has a *gamey* taste more like deer venison, and grain fed beef does not have that gamey flavor. Some prefer the grass while some prefer the grain fed. It's not fake news, but a fact
DrDan says
Hi Taylor and welcome to the blog.
Well said. I will not buy grass feed. Fortunately, they are proud of it and label it well.
I tend not to reply to comments like Jim's. We each have an opinion and I see no need to engage and this is not the place for a GMO debate.
Thanks again for the note.
Dan
Eastclif says
Gordon Ramsay starts with olive oil, but near the end throws butter in, and when it melts, he tilts the pan, and spoons it over and over and over the steaks. (he doesn't do the oven method, but I thought this might help the people worried about the smoking butter )
I.L.Davis says
I ama New Yorker in the Charolais region of France. I have a 3 pound porterhouse
I wish to sear and roast . I am getting all kinds of mixed messages relative to proper cooking. I have been told to sear for 4 minutes / side and then roast at 425f
For 10-12 minutes. Then Inhavw been also toldd to sear for two minutes,/ side and then roast at 400f for 8-10 minutes ON EACH SIDE. Help !
DrDan says
Now that is a large porterhouse. Start looking at it as what you want at the end not just techniques that people tell you. You want a nice sear on the meat and you have a desired internal temperature you want when done.
Part of the issue is the bone. When you pan sear, it will shrink the meat so the meat near the bone will not be in contact with the pan. That is ok but just realize it won't sear in those areas. So I tend to do bone-in things on a grill.
But let proceed with discussing doing stovetop to oven. First and probably the most important step will be resting to room temperature before starting. Next preheat oven, anywhere from 350 to 425. The exact temp of the oven is probably not that important but the thicker the meat, the LOWER I would use, it will just take longer for the heat to penetrate the meat. So lower temp and longer time for thicker meat. Obviously an oven safe pan.
Sear both sides for a few minutes to get to approximately the final sear you want.
Now you are ready for the oven. Do a final flip just before the oven. Then roast to a few degrees less than you want. Remove to plate and tent for 10 minutes. Done.
Another option is called reverse searing. Basically, you do the oven part first and then sear. I have never done this and I don't know the temperature you use as the oven endpoint.
If grilling, again rest to room temp. Then grill over medium heat, not high, on the grill like my grilled filet recipe. But it may take multiple flips.
Janet says
I agree on the oil vs butter searing. Save the butter for finishing/resting. Great flavor. I've been doing steaks this way for 20 or more years when it's either too hot or too cold to grill. Works every time!
Karen says
I just cooked NY strip steaks using your method. I'm confident that the next time I do it using a different source for the beef they will turn out wonderfully (these were grass-fed which I've eaten before from a different supplier and they were delicious, but tonight's are dryish and chewy even though I cooked them to medium rare.) My question, since my freshly DrDanned cast iron skillet is staring me in the face, is how do YOU clean yours after it has had butter and sticky garlic seared and baked onto it??, without destroying its seasoning?
DrDan says
Officially, you use hot water with a sponge or stiff brush. Never soaps or steel wool. You can get special scrubbers that look like chain mail.
Now how do I do it? I use hot water and 3M scrub pads. I do occasionally use a little dish soap if needed but try to avoid it. I then immediately dry with a paper towel then a light spray of PAM that I spread with the paper towel. I have never had any rust and the seasoning is fine.
I must admit to my sins but I have gotten away with it for 5 years. Also I wash my knives in the dishwasher. The shame of it all...
Rebecca says
Quick question on the oven roasting component - how do you prevent butter or oil from "popping" out of the pan once it's in the oven? Isn't there a grease fire risk? Or do you pour off the excess before switching from stovetop to oven? I've considered covering the pan, but I think the steam would impact the texture in a negative way.
DrDan says
Hi Rebecca,
It has never been a problem for me. Be sure your pan has some sides. If you're concerned then remove any free fluid. Do not cover, it will get the steam effect.
Thanks for the note.
Dan
Rune Gosta says
I don't like grass fed...... haha. I think what you mean is I don't like beef the way it's supposed to taste.