
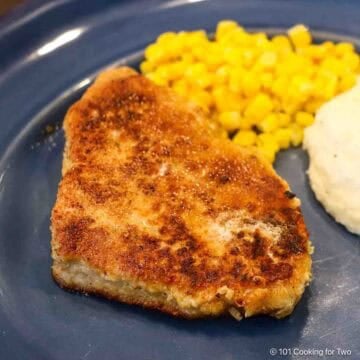
Learn how to cook thick pork chops in the oven using a classic sear-and-bake method for 2-inch and thicker chops. This recipe works for bone-in or boneless thick-cut pork chops and avoids the dry results common with thick chops.
⏱️ Quick Answer: How Long to Bake Thick Pork Chops
For 1½–2-inch thick pork chops:
- Sear: 2–3 minutes per side
- Bake: 400°F for 20–25 minutes
- Done: 145°F internal temperature
Jump To (scroll for more)
- ❤️ Why You’ll Love This Recipe
- 🐖Ingredients
- 👨🍳 How to Cook Thick Pork Chops in the Oven
- ⏲️ Time and Doneness for Thick Pork Chops in the Oven
- 😊 Pro Tips for Perfect Pork Chops
- 🔥 Grilling Thick Pork Chops
- 🥣 Making the Optional Gravy
- 🥩 Thinner Pork Chop Recipes
- 🍴 Serving Suggestions
- ❄️Storing leftovers
- ❓FAQs
- 📖The Recipe Card

Featured Comment by Debbie:
⭐⭐⭐⭐⭐
"I tried your recipe tonight. I am not a big fan of pork chops, they always end up a bit dry. I followed your recipe, including the brine…THEY WERE THE BEST CHOPS I HAVE EVER EATEN!! I will never cook them any other way."
Today's pork is not yesterday's pork. It is now lean, healthy meat and can be a delicious protein for a healthy, balanced diet.
❤️ Why You’ll Love This Recipe
- Beginner-friendly but impressive enough for guests.
- Thick pork chops in the oven come out tender and flavorful every time.
- Quick sear + oven finish gives professional results — no fancy tools.
- Rest thick-cut chops before cooking — the key to even doneness.
- Includes an optional pan gravy and adaptations for 2½-inch+ chops.
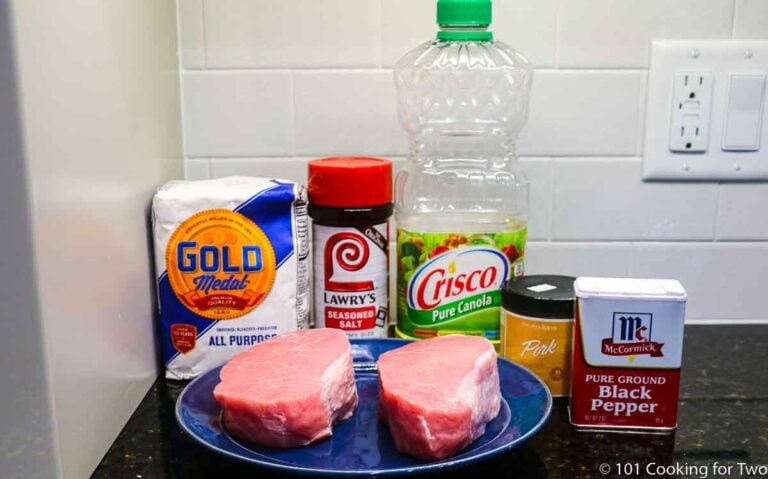
🐖Ingredients

- Thick pork chops – Use 1½ to 2-inch thick-cut center-cut pork chops, boneless or bone-in. Adjustments are included for chops 2½ inches or thicker. Well-marbled pork gives better flavor and juiciness. Boneless will cook a bit faster, but both work well.
- Seasoning salt – Lawry’s is my go-to, but any seasoned salt you like is fine.
- Black pepper – Freshly ground adds a little extra pop.
Optional
- Other seasonings or dry rub – Garlic powder, paprika, or your favorite pork rub.
- Gravy ingredients – Broth, flour, and salt.
👨🍳 How to Cook Thick Pork Chops in the Oven
Note: This overview assumes 1½ to 2-inch thick chops—for thicker cuts, see the special section below.
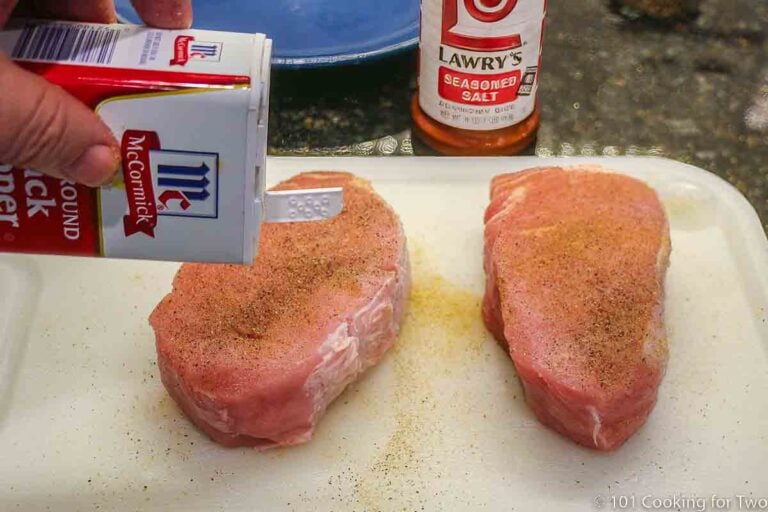
1. 🧂 Rest, trim, and season
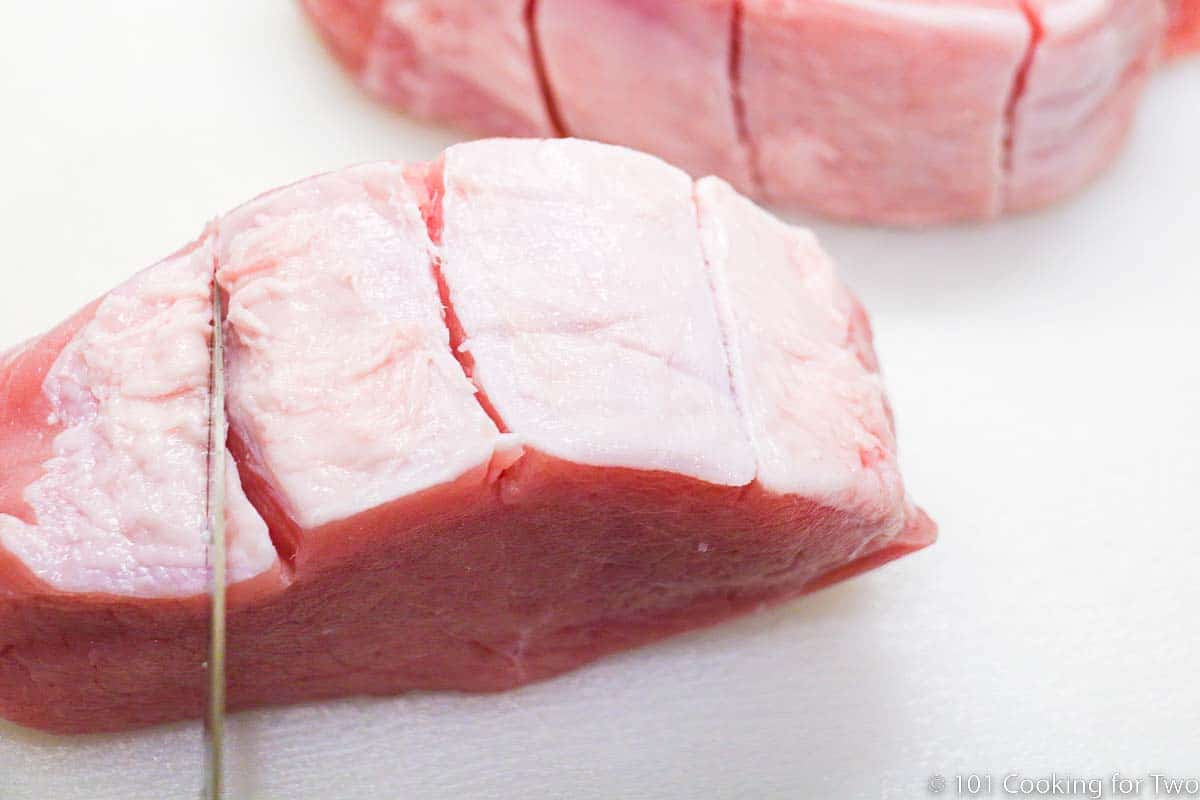
Let thick-cut chops sit at room temperature 30–60 minutes. Trim and score the fat rim.
✅ Pro Tip: The rest is important – it helps the center cook through without drying out the outside.
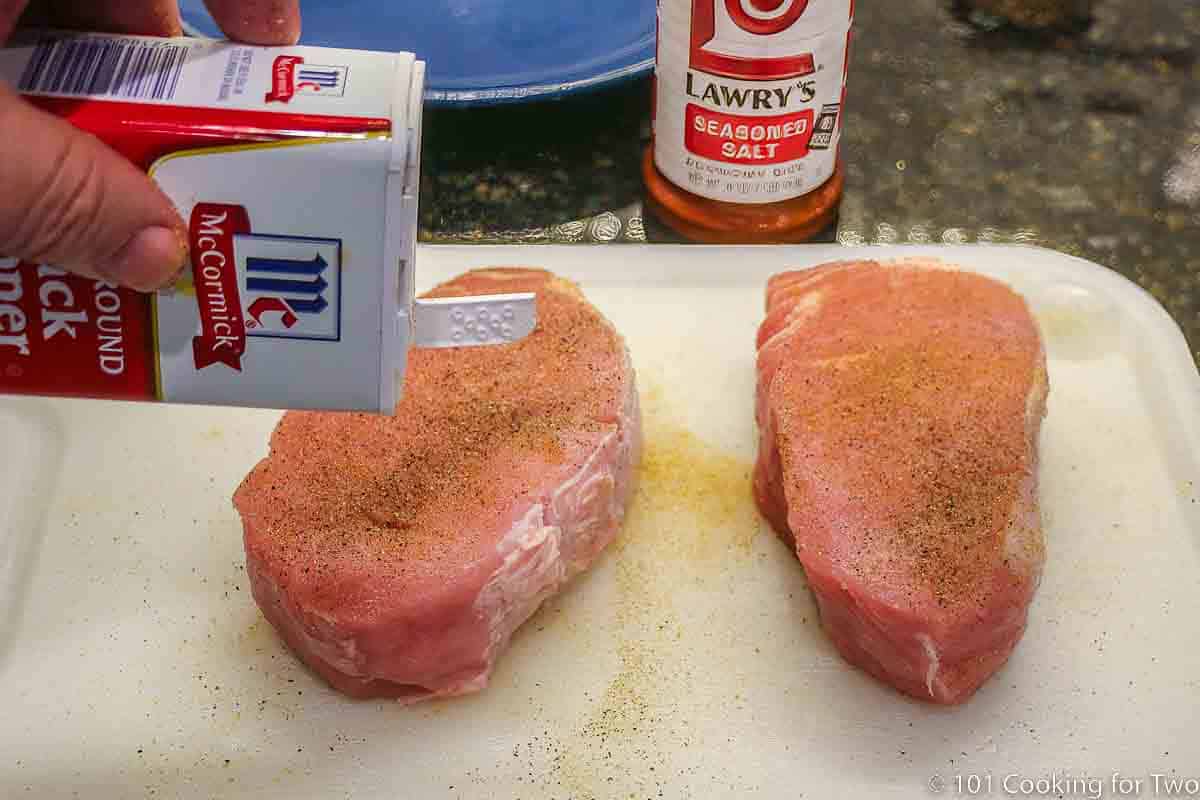
Season with seasoning salt and black pepper.
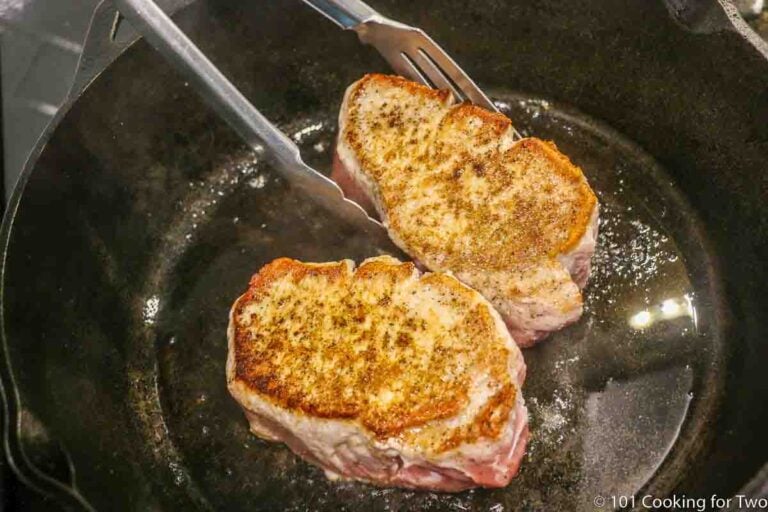
2. 🔥 Sear
Heat a skillet with oil over medium-high heat. Sear both sides of the chops for 2–3 minutes until browned.

✅ Pro Tip: A cast iron skillet gives the best sear, but any oven-safe skillet will work.
3. ⏲️ Bake in the oven
Transfer to a 400°F oven and cook until the internal temperature is 145°–150°F, usually 20–25 minutes for 2-inch chops.

✅ Pro Tip: According to the USDA, the minimum safe internal temperature for pork chops is 145°F.
4. 🛑 Rest
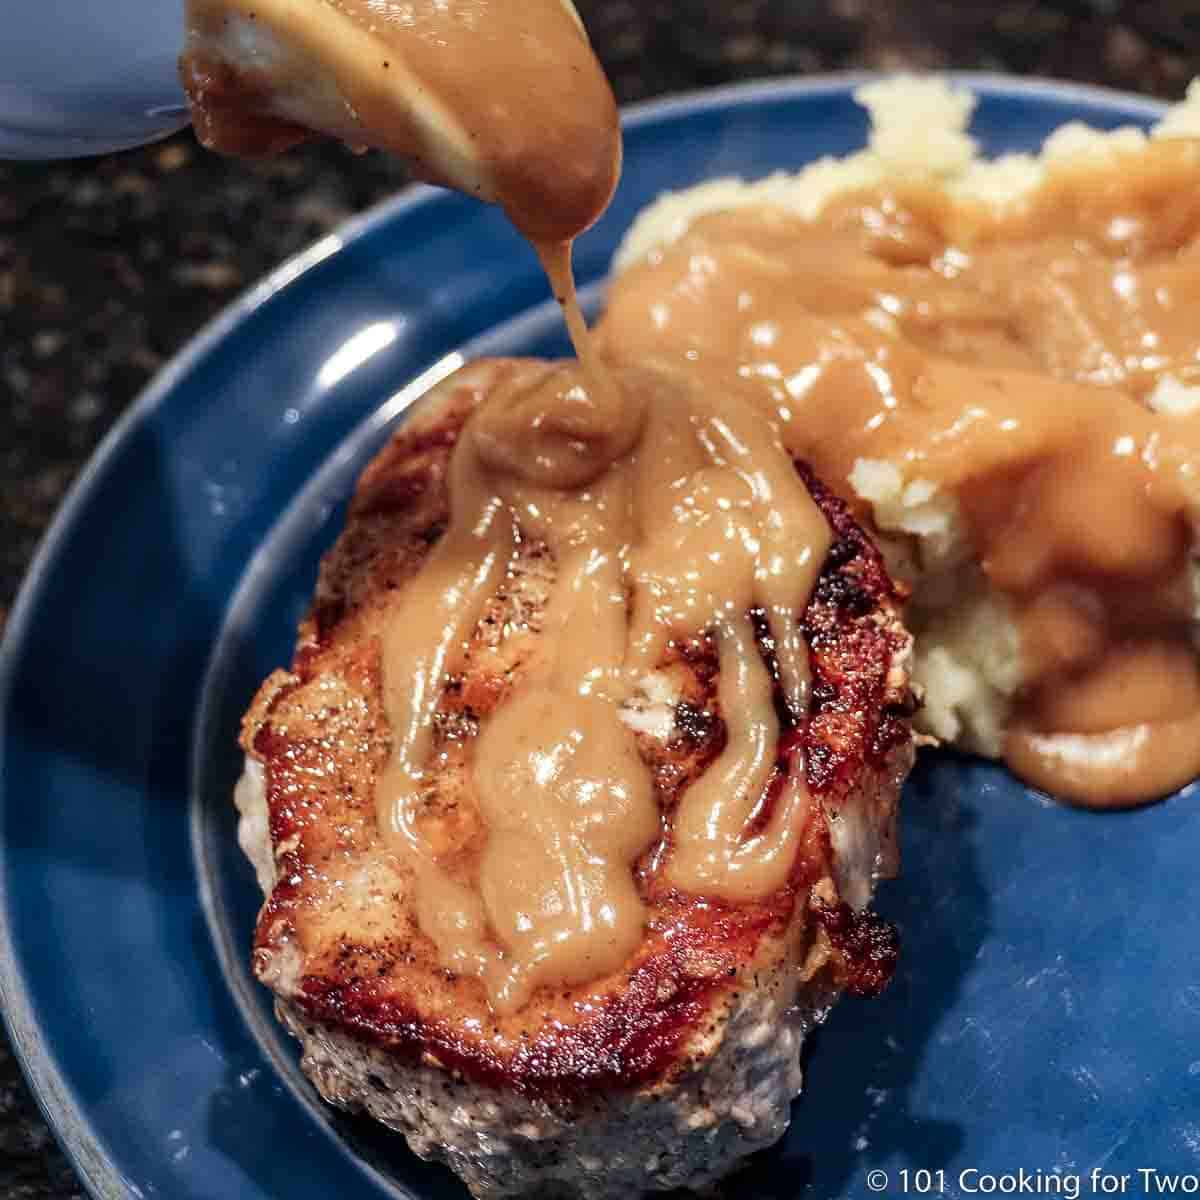
Remove from the oven and tent with foil for 10 minutes before serving.

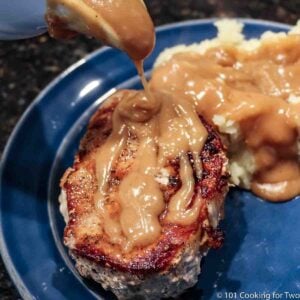
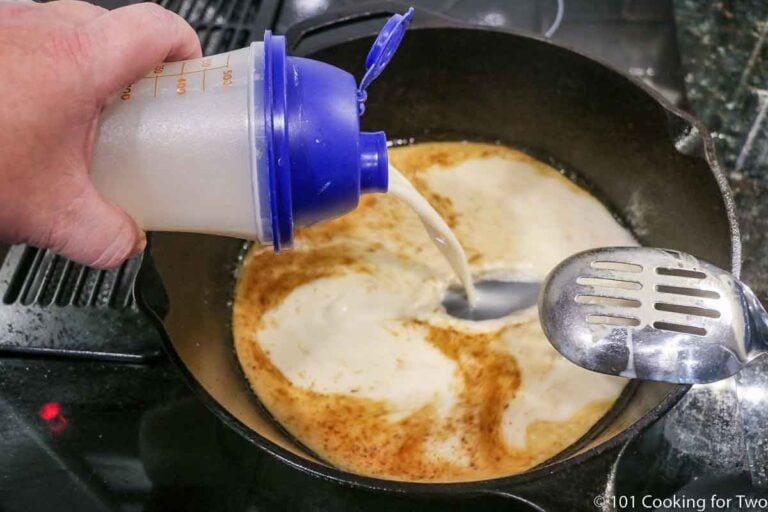
5. 🥣 Optional Gravy
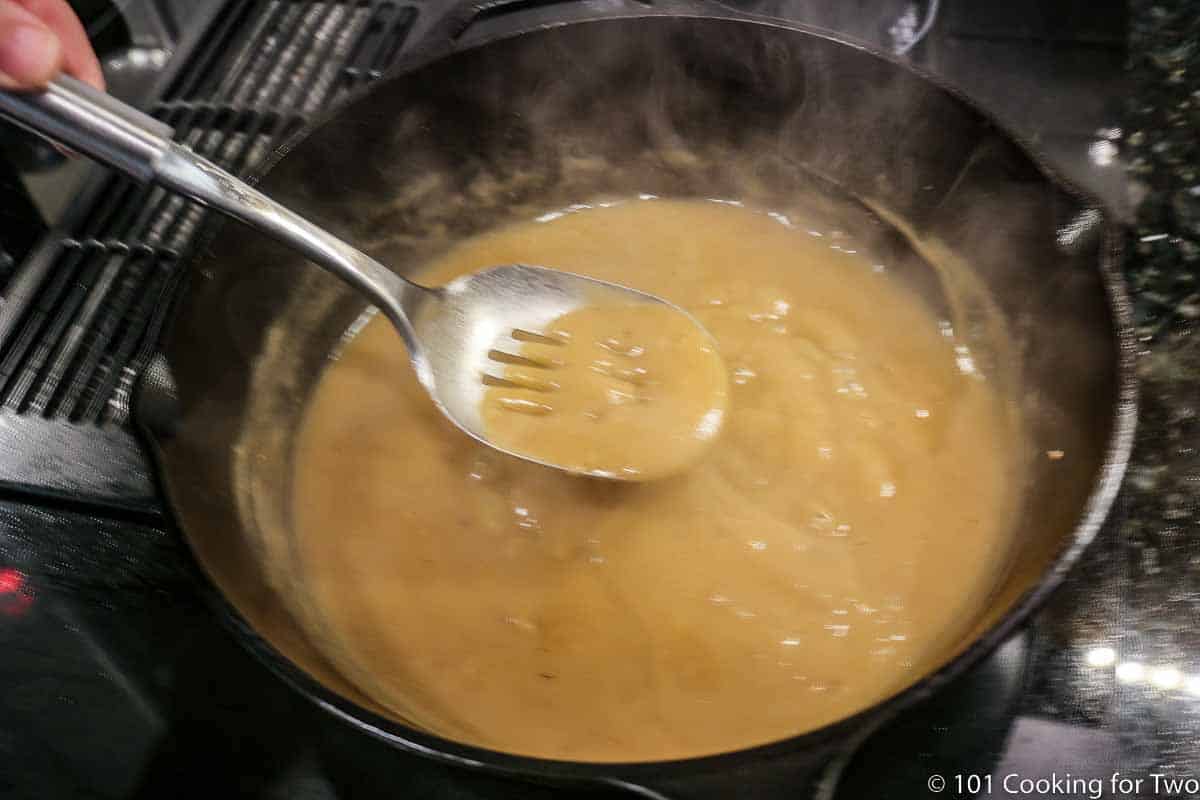
In a bowl, whisk flour into half of the broth. In the same pan, bring the rest of the broth to a boil. Slowly whisk in the flour mixture.

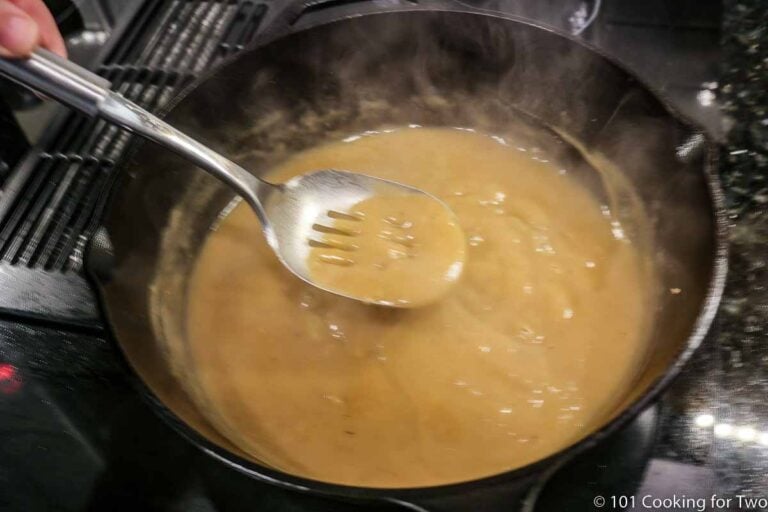
Continue to whisk until thickened, about 2–3 minutes.
👇 Scroll down for the printable recipe card and step-by-step photos—or keep reading for more tips, serving ideas, and a grill variation.
⏲️ Time and Doneness for Thick Pork Chops in the Oven
A 2-inch thick pork chop takes about 30 minutes of active cooking time: 4–5 minutes to sear, then 20–25 minutes in a 400°F oven (375°F convection) to reach an internal temperature of 145°–150°F. Bone-in chops may take a few minutes longer.
👉 Searing isn’t just for looks — it starts the Maillard reaction for better flavor and texture. Skip it, and you’ll need extra oven time and lose that golden crust.
🌡️ Doneness Levels
- Less than 145°F (Rare) – Not recommended for safety reasons.
- 145°–150°F (Medium-Rare) – Juicy, with a little pink in the center.
- 150°–155°F (Medium) – Slightly firmer, just a hint of pink.
- 155°–160°F (Medium-Well) – Starting to dry out.
- 160°F+ (Well Done) – Dry and tough. Not recommended.
Save this recipe!
😊 Pro Tips for Perfect Pork Chops
- Season simply or use your favorite rub – Salt, pepper, and seasoning salt work great. If you brined, skip any extra salt. Paprika adds nice color and flavor. A marinade (like my steak marinade) also works well for extra flavor.
- Choose the right chops – Boneless or bone-in chops between 1½ and 2½ inches thick work best for this method.
If your chops are thicker than 2½ inches, see the adjustments below for timing and technique. - Don’t skip the rest – Letting the chops sit at room temperature for 30 to 60 minutes helps them cook more evenly—so the inside finishes without overcooking the outside.
- Cook to temperature, not time – Start checking the internal temperature around 12–15 minutes into baking. Use a meat thermometer to get it just right.
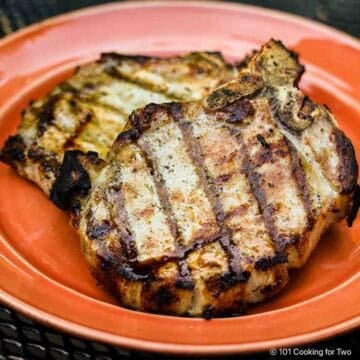
🔥 Grilling Thick Pork Chops
While I prefer the sear-and-bake method for the best temperature control, grilling adds great flavor and works well for thick chops using an indirect cooking method.
- Follow the same prep as the oven method: trim, rest at room temperature, brine if you want, and season.
Do not sear first. - Preheat your grill for indirect cooking at a surface temperature of 350° to 400°F in the indirect area.
- Grill the chops with indirect heat, flipping every 5 minutes, until the internal temperature reaches 135°F—this will take about 20–25 minutes, depending on thickness and grill setup.
- Move the chops to direct heat and sear both sides with the burners on high, just until they develop good color and reach a final internal temperature of 145°F.
- Remove from the grill and tent with foil for 5 minutes before serving.
🥣 Making the Optional Gravy
Everybody loves gravy, so let’s make a quick and easy one that actually tastes great.
I like to use a pork gravy base from Penzeys to make “pork broth.” You can also use pork bouillon dissolved in water for the same purpose. If neither is available, chicken or vegetable broth works just fine.
There are two basic ways to make gravy:
- Classic roux – Mix flour with the grease in the pan and cook it for a few minutes before adding liquid.
- Easy method – Whisk the flour into some of the broth, then slowly stir it into boiling liquid in the pan.
Either works—but the second one’s faster and a little more foolproof for home cooks.
👉 Visit my How To Make Gravy at Home for more information on gravy.
🥩 Thinner Pork Chop Recipes
Looking for a recipe for 1-inch pork chops or thinner? Try one of these:
👉 For the grill, see How to Grill Pork Chops
🍴 Serving Suggestions
I usually serve pork chops with mashed potatoes (and gravy, of course), but they’re also great with:
- Oven Roasted Red Potatoes
- Baked French Fries.
- A hot vegetable like roasted Parmesan asparagus, baked green beans with bacon, or baked cauliflower
End the meal with something simple and cozy like easy apple crisp or blueberry crumble pie.
❄️Storing leftovers
Store leftover pork chops in an airtight container:
- Refrigerate for up to 4 days
- Freeze for up to 4 months
Gravy made with flour stores just fine alongside the pork—same timeframes apply.
❓FAQs
Brining isn’t required, but it does help keep chops extra juicy.
To brine: mix 2 tablespoons each of salt and sugar (white or brown) with 2 cups of water. Submerge the chops and refrigerate for 30 minutes to a few hours. Rinse well afterward and skip seasoning salt — just use pepper and maybe a little paprika.
For 1½–2-inch thick pork chops: after a 2–3 minute sear per side, bake at 400°F (regular) or 375°F (convection) until the internal temperature reaches 145°F. That usually takes 20–25 minutes in the oven phase — start checking at 12–15 minutes.
Yes. Thickness, oven temp, and searing time all vary. The only reliable way to cook thick pork chops to doneness is with a thermometer.
No. Any oven-safe skillet works. Cast iron is ideal for searing because it holds heat, distributes it evenly, and goes from stovetop to oven without issue.
This recipe is built for thick center-cut pork chops — boneless or bone-in. Most extra-thick chops are just boneless slices of pork loin cut 1½–2 inches thick (or more). Bone-in chops work fine too; just add a few minutes since bones slow heat transfer.
✅ Tip: Buy a whole pork loin when it’s on sale and slice it yourself. You’ll get the thickness you want, save money, and they freeze well for 3–4 months.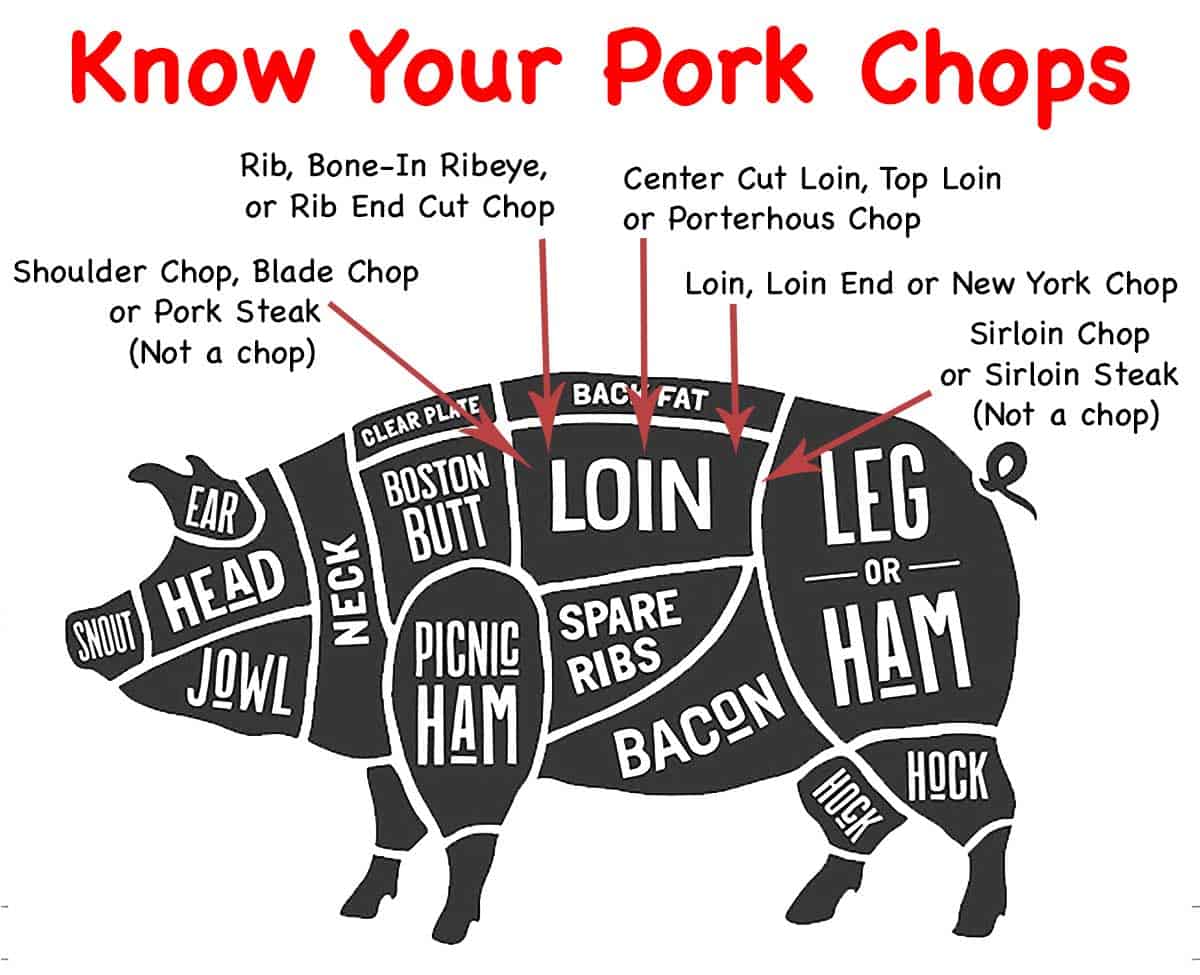
📖The Recipe Card
Oven-Baked Thick Pork Chops (Juicy & Foolproof)
Ingredients
- 2 Thick pork chops - 1½ to 2 inches thick or more
- 2 tablespoons Oil
- Lawry's Seasoning salt - to taste
- Pepper - to taste
- 2 cups Broth—pork, chicken or vegetable.
- 4 tablespoons Flour
- Salt to taste
Step-by-Step Instructions
Rest, trim, and season
- Pat the pork chops dry and let them rest at room temperature for 30–60 minutes. Preheat the oven to 375° convection (or 400° conventional).
- Trim the fat rim to less than ¼ inch and make relief cuts every inch to prevent curling.

- Season with seasoning salt and pepper to taste.
Sear
- Heat 2 tablespoons of oil over medium-high heat. When shimmering, add the pork chops. Sear both sides for 2–3 minutes until nicely browned.

Bake in the oven
- Transfer the skillet to the preheated oven and bake until the internal temperature reaches 145°—about 20–25 minutes. The time required will vary based on the thickness and starting temperature.
Rest
- Remove from the oven and tent lightly with foil for 5-10 minutes while you make the gravy (optional).

Optional Gravy
- Mix 2 cups of pork broth using a gravy base, bouillon, or substitute chicken or vegetable broth. Whisk 4 tablespoons of flour into 1 cup of the broth.
- Bring the other 1 cup of broth to a boil in the pan with the pan juices. Slowly whisk in most of the flour mixture. Stir continuously until the mixture thickens—about 2–3 minutes. Add more of the flour mixture if needed.
- Simmer for a few minutes more to finish.
Recipe Notes
Pro Tips:
- Instructions for 2½-inches+, seasoning options, and grill instructions are in the post.
- Don’t skip the rest, before or after cooking.
- Use an oven-safe pan like cast iron. Sear to nearly the final color you want.
- Brine, if you have time: Mix 2 cups water with 2 tablespoons each of salt and brown sugar. Brine for 30 minutes to 2 hours in the refrigerator. Rinse after. Skip salt-based seasonings afterward.
- Cook to temperature, not time. Use an instant-read thermometer for best results. Remember, the temperature will rise slightly after removal.
- The gravy is optional, but a nice bonus. Pork gravy base works best, but chicken broth, veggie broth, or bouillon are good alternatives.
Your Own Private Notes
To adjust the recipe size:
You can adjust the number of servings above; however, only the amount in the ingredient list is adjusted, not the instructions.
Nutrition Estimate (may vary)
Editor's Note: Originally published July 17, 2016. Updated with expanded options, refreshed photos, and a table of contents to help navigation.


Debbie Requa says
I tried your recipe tonight. I am not a big fan of pork chops, they always end up a bit dry. I followed your recipe, including the brine. Changed up the gravy, used a tsp of better than bouleyon beef and a tsp of better than bouleyon roasted garlic in a little over 2 cups of water instead of broth. THEY WERE THE BEST CHOPS I HAVE EVER EATEN!! I will never cook them any other way. Chops were about 1 1/2 inches thick.
Trisha S. says
Followed the directions to a “t,” including the brining and rest, and they were delicious! I seared mine for about 3 minutes on each side, and at 15 min, they hit the internal temperature.
Tiff C says
Omg YUM! I'm not a fan of pork chops but my daughter loooves them! I checked this recipe and ..well..droooooling lol so I made it! I did a few small variations but couldn't be happier! Thank you for giving clear step by step instructions and how you were repetitive with temperature so I was aware repetitive!
Jim says
I think you may want to reread the last part of the recipe where you mention making the gravy. The sentence that begins : "When boiling... does not follow correctly from the previous. There is nothing to add to the gravy at this point, all ingredients are in.
Dan Mikesell AKA DrDan says
Hi Jim,
Welcome to the blog and thanks for the note.
The wording is right. We have 2 cups of broth. The first cup has flour whisked in - but not added to the pan. Then the second cup is added and brought to a boil. Then the first cup with the flour is added. Maybe needs some wording updates, I will give it some thought.
Again, thanks for the note.
Dan
Gary says
I’ve been using your recipe for the past 2-years. Thank you for posting, it is the best and perfect! We get the boneless pork chops at Costco and they’re pretty huge, between 12-16 oz each.
Susan Grand says
Fanfreakingtastic! Thank you for the excellent instructions. I followed them exactly from brining to gravy and you would have thought those pork chops were from Outback Steakhouse! They melted in your mouth and were so juicy and tender! It also prompted me to learn a bit more about my stainless steel skillet and how best to use it to my full advantage! Who says you can't teach an old dog a new trick? This old dog just learned one and I will use this recipe each and every time we have pork chops. I also signed up for your email service and am excited to see what other great recipes you have. Thank you again
Rob mitchell says
Great chops. Thank you for explaining everything perfectly.
Catherine says
An easy, simple recipe that results in a moist, well cooked pork chop. Thank you for a concise step by step!
Shqri says
THANK YOU!!! THANK YOU!! This turned out perfectly on my first try and tasted EXACTLY like a high-end restaurant version we had. Now that we are in the pandemic, these recipes are appreciated all the more!!! Thank you so much!!!!!
Wendy says
This is a great recipe the chops came out so tender!
Christine Mcfarlane says
Did this recipe with 2 inch chop....followed your instructions and it was excelllent...thanks for your help
Vicki says
Love it. Been cooking pork chops for years and first time I made them this way. Husband loved them. I seasoned different, I'm sodium restricted but the searing, then high heat gave a great flavor for thick chops.
Terri Rumsey says
Cooked 4 chops about 1.5 inches thick tonight and they turned out perfectly! My husband said it was the best pork chop he ever had! Thank you!
Blackfeather says
Hello!
This is a great recipe for thick cut pork chops. This was a different method for making a gravy. Nice. I tend to over salt so this was perfect.
I used the convection oven @ 400 degrees F for 20 min to finish them They turned out tough on top, maybe I pan seared too long. Next time I'll regular bake @425 degrees F. Served w/ Spaetzle and sauerkraut. It was delicious.
I do like your explanations for the hows and whys of preparing a dish and how to save money i.e. buying a whole pork roast. Makes sense.
In time I hope to get past the under/oversalting problem.
Thank you.
Dan Mikesell AKA DrDan says
Hi Blackfeather,
Welcome to the blog.
Glad it worked well for you. The gravy method is so much easier than a roux so I rarely do a roux any more.
If the top of the chop was tough, ie overcooked, then you want to cook lower next time, not higher. You need more time for the heat to penetrate and not overcook the surface. So as a general rule, the thicker the meat, the lower the temperature. And as you mentioned, don't over sear.
I hope that helps a little and thanks for the note and rating. Feel free to ask if you have any questions.
Dan
Larry says
I seared 1.5 inch chop on med hi for 2 minutes each side. Transferred to 400 degree oven.
145 internal temp came at 14 minutes. I think folks maybe over cooking at 25 minutes in oven?
Thanks, Larry
Scott says
You lost me at " rest at room temperature for an hour or so ". This is a bad food safety practice, as well as proven silly by science as far as reducing cooking time to ANY appreciable degree. Any extra moisture you find in your meat from laying around for an hour is also a personal observation, rather than quantitative/qualitative data. Basically, it's am wholly exploded myth.
Otherwise, it's a decent enough basic recipe for folks who are new to cooking. Some complain that brining makes meat "mushy", generally more of an issue with poultry. Have you tried dry brining? A much simpler, cleaner method. Salt and rest in the refrigerator, then pull out, season and cook. No messy brine, no rinsing off the flavor you just tried to add, kind of no hassle really.
I appreciated the fact that you pointed out to not use salt in seasoning after brining. I would have probably put it in bold or caps, or repeated it several dozen times(lol) since this is a recipe for beginners who may not catch on that they are double salting the dish that way.
Dan Mikesell AKA DrDan says
Hi Scott,
Welcome to the blog.
I will make a few points.
1) It is safe for up to 2 hours in the 40-90 degree range per the FDA. Food is safe for up to 2 hours generally unless the environmental temperature is 90 degrees or above then it is one hour.
2) The only "studies" I have seen were mainly done individuals on one or two samples. Cooks Illustrated does have a small article about this topic suggest warming steak to 95 degrees in a low oven before cooking steak on the stovetop. A sort of reverse searing method. I find it helps on thick pieces of meat so I'm keeping it for thick cuts. If I see some real science on it, I might change. Nothing I have seen says it hurts.
3) Dry brining. I haven't tried it but will soon. It has come into its own the last 5 years or so. Most of my cooking is quick so the amount of time to dry brine is a lot more and I admit I'm stuck in my ways and can't organize myself that much. I total agree with the theory.
4) The use of salt after brining. Yep, a big mistake people make and I try to repeat it a few times. On turkey recipes, since most are already injected, I repeat the warning a lot... but they still do it. They take an injected turkey, brine and then salt it. You know the results.
Thanks for the note. I (and the FDA) disagree about the safety comment but everything else is very valid.
Dan
Rhonda King says
Hi Dr Dan, “Pan Seared Oven Roasted Pork Chops” very easy & excellent recipe. Used bone-in, 1 1/2" chop. Thank you!
DrDan says
Hi Rhonda,
Welcome to the blog.
I do love a good grilled chop.
Thanks so much for the note and rating.
DrDan
Ann says
I've had two [2"] chops staring at me when I open the freezer for a few months; scared to cook them. I tried this and followed to the letter complete with the brine. I'm a huge cast iron skillet person and these things came out a #10. They were juicy, tender, beautifully browned and hands down, the best chops I have EVER had! I used a leave-in digital thermometer and took them out at 150 F. I served them after basting with some of the drippings. I couldn't believe they reached 150 F. after only 20 minutes. Perfection.
Thank-you for this recipe. Pork is relatively cheap in spring so I'll be cooking this many, many times.
Dan Mikesell AKA DrDan says
Hi Ann,
Welcome to the blog.
I do love a good chop. This recipe is just a logical method of cooking. Glad it worked well for you.
Thanks for the note.
Dan