101 Cooking For Two

  • Recipes
  • About
  • FAQs/Help
  • Shop
  • 📖Emails
menu icon
go to homepage
  • Recipes
  • About
  • FAQs/Help
  • Shop
  • 📖Emails
subscribe
search icon
Homepage link
  • Recipes
  • About
  • FAQs/Help
  • Shop
  • 📖Emails
×
🏠Home » Recipes

How to Grill Peaches

cut grilled peach on a white plate.

Grilled Peaches with vanilla ice cream for dessert make the perfect ending to any meal. Grilling peaches that are juicy and caramelized perfection is just so easy. Learn to pick the right peaches and how to serve.

🍑Ingredients

Peaches—medium or large, freestone preferred
Olive oil or melted butter
Optional topping of sugar and cinnamon


cut grilled peach on a white plate.
[feast_advanced_jump_to]
Blue ribbon divider used for visual effect

I always look for easy-grilled side dishes; these grilled peach halves are perfect. Grill peaches or any fruit will bring out more flavor. With only 100 calories without the extra sugar topping and 150 calories with the sugar topping, they are a great healthy ending to any meal.

The grill surface temperature of about 450° is the same temp as most chicken recipes, pork chops, and pork tenderloins. If cooking on high for beef, you will need to turn down a section of the grill.

👨‍🍳How to Grill Peaches-Step by Step

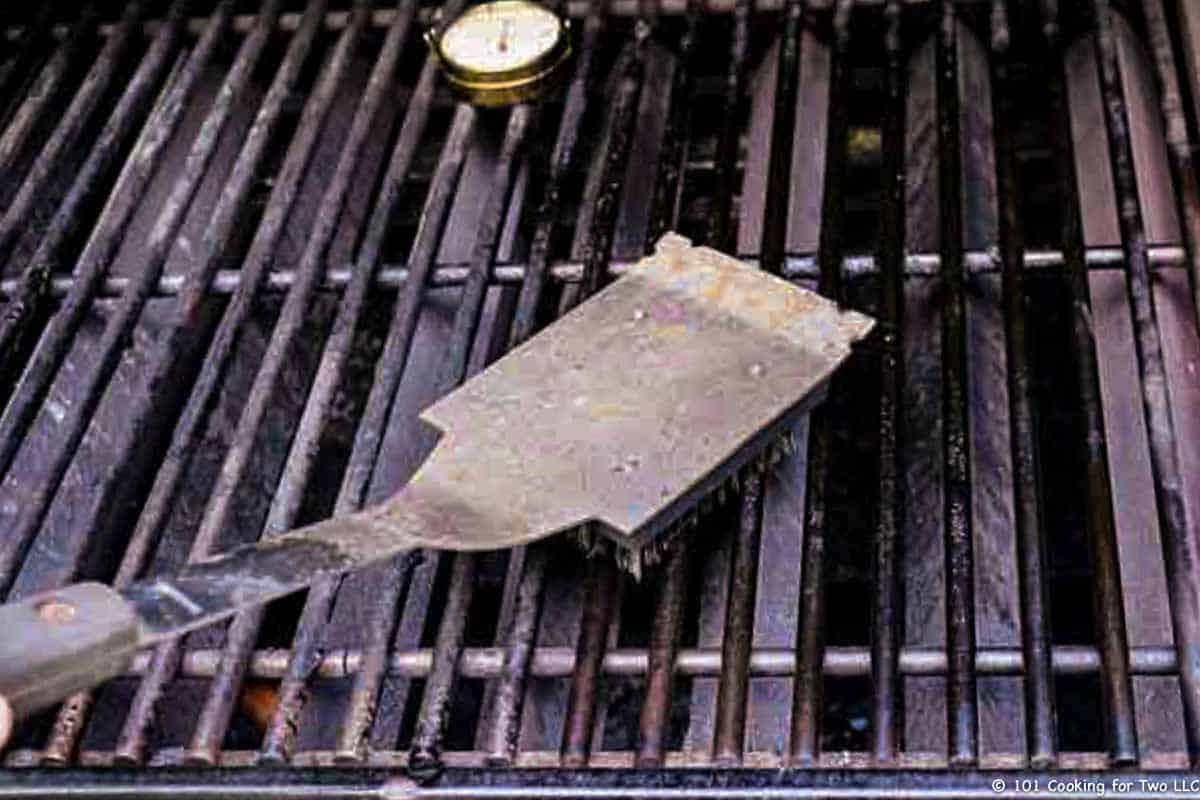
cleaning and oiling grill grates.

1. Preheat the grill to a surface temperature of about 450°. Medium if you don't want to bother with a surface thermometer. The exact temperature for this is not as important as some other recipes, but it is not blazing hot.

removing peach pit from a peach half.

2. Wash peaches well, split along the seam, and remove the pit.

mix sugar and cinnamon in bowl.

3. If using sugar topping, mix 1 teaspoon cinnamon and 2 tablespoons of sugar in a small bowl.

brushing peach halves with oil.

4. Bush all sides with oil or melted butter.

spooning sugar mixture on partly grilled peach half.

5, Place peaches cut side down and grill with the lid closed for about 4-5 minutes until good grill marks are present. Flip peaches and optionally apply ¼ of the cinnamon mixture to each half.

Grilled peaches on a plate.

6. Grill until the peaches are soft and the sugar mixture is melted. About 5 minutes more. Go by firmness and appearance, not by time. If you are obsessive about a thermometer, the internal temperature should be about 165° when done.

For more details, keep reading. See the Recipe Card below for complete instructions and to print.

What peaches to use for grilling?

Freestone peaches that are still moderately firm when squeezed are a good choice here. You don't want unripe nor over very ripe peaches.

Clingstone peaches can also be used, but you need a knife to remove the pit.

The skin may be left, and the fuss will burn away, or you can peel off the skin.

Variations and Options

  • You can do a similar grilling method with other fruits like apricots, nectarines, or plums.
  • You can grill on the grill grates or in a grill pan.
  • You can change the flavor using a pinch of nutmeg, ginger, or other spices. Other flavors like fresh mint or maple syrup are also used.
  • You can use either a gas or charcoal grill.

Grilled side dish recipes

Don't miss these other excellent grill side dishes like Grilled Pineapple, Grilled Stuffed Tomatoes, Grilled Honey Glazed Carrots, Baked Potatoes on the Grill without Foil, and Grilled Biscuits.

🍴Serving

It is a quick and easy grilled side dish for almost any grilled meal. But the temperature makes it a good match on the gas grill for Grilling Pork Chops, Grilling Chicken Breasts, Grilled Ribeye, or Grilling Pork Tenderloin.

You can also adjust part of the gas grill while grilling burgers or Grilled New York Strip Steaks.

Serve hot off the grill, but it is wonderful with a scoop of vanilla ice cream or some low-fat Greek yogurt.

Storing leftovers

Store leftovers in the refrigerator, sealed airtight, for 3-4 days, and you can reheat them in the microwave.

❓FAQs

What grill temperature do you use for grilling peaches?

The grill must be in the medium heat range, maybe a charcoal or gas grill. It matches most chicken, pork chop, and pork tenderloin recipes.

For beef recipes, you must turn down the heat on a section of the grill to get in the 450° range.

Blue ribbon divider used for visual effect

This recipe is listed in these categories. See them for more similar recipes.

Grill Recipes, Grill Side Dish Recipes, Healthy Recipes, Side Dish Recipes

Have you tried this recipe, or have a question? Join the community discussion in the comments.

📖The Recipe Card
cut grilled peach on a white plate.
Print Recipe Add to Collection Go to Collections
4.50 from 2 votes

How to Grill Peaches

Grilled Peaches with vanilla ice cream for dessert make the perfect ending to any meal. Grilling peaches that are juicy and caramelized perfection is just so easy. Learn to pick the right peaches and how to serve.
Prep Time5 minutes mins
Cook Time15 minutes mins
Total Time20 minutes mins
Course: Dessert
Cuisine: American
Keyword: Grilled Fruit, Grilled Peaches, Peaches
Servings: 2 whole peach
Calories: 98.4kcal
Author: Dan Mikesell AKA DrDan

Ingredients

  • 2 peaches-Freestone preferred medium or large
  • 2 teaspoons olive oil or 1 tablespoon butter

Optional sugar topping—will add 50 calories

  • 2 tablespoons sugar
  • 1 teaspoon cinnamon
US Customary - Convert to Metric

Instructions

  • Preheat the grill to a surface temperature of about 450°. Medium if you don't want to bother with a surface thermometer. The exact temperature for this is not as important as some other recipes, but not blazing hot.
    clean and oil grill crates
  • Wash peaches well, split along the seam, and remove the pit.
    removing peach pit from a peach half
  • If using sugar topping, mix 1 teaspoon cinnamon and 2 tablespoons of sugar in a small bowl.
    mix sugar and cinnamon in bowl
  • Bush all sides with oil or melted butter.
    brushing peach halves with oil
  • Place peaches cut side down and grill with the lid closed for about 4-5 minutes until good grill marks are present. Flip peaches and optionally apply ¼ of the cinnamon mixture to each half.
    spooning sugar mixture on partly grilled peach half
  • Grill until the peaches are soft and the sugar mixture is melted. About 5 minutes more. Go by firmness and appearance, not by time. If you are obsessive about a thermometer, the internal temperature should be about 165° when done.
    grilled peaches on a white plate

Notes

Pro Tips

  1. Freestone peaches that are still moderately firm when squeezed are a good choice here.
  2. The grill needs to be in the medium range. So it matches most chicken, pork chop and pork tenderloin recipes.
  3. For beef recipes, you will need to turn down the heat on a section of the grill to get in the 450° range.
  4. Cooked until soft and the sugar starts to melt. If you want, you can check for an internal temperature of about 165°.
  5. Great served with ice cream or Greek yogart

Nutrition

Calories: 98.4kcal | Carbohydrates: 15.2g | Protein: 1.4g | Fat: 4.4g | Saturated Fat: 0.6g | Polyunsaturated Fat: 0.6g | Monounsaturated Fat: 3g | Sodium: 19.6mg | Potassium: 183mg | Fiber: 2.3g | Sugar: 12.6g | Vitamin A: 489IU | Vitamin C: 6.2mg | Calcium: 6mg | Iron: 0.5mg

Editor's Note: Originally Published July 15, 2010. Updated with expanded options, refreshed photos, and a table of contents to help navigation.

Dogs in July

Healthy Chicken Parmesan—Oven Baked

Chicken Parmesan on plate

This Healthy Chicken Parmesan is oven-baked in about an hour with chicken cutlets and pantry ingredients. Perfect for two or a crowd with better-than-restaurant results.

This fancy dish is only 400 calories and 13 grams of fat—a healthy baked recipe using common ingredients and is surprisingly easy to make at home with step-by-step photo instructions. You can do this.

🐓Ingredients

Chicken—breast cutlets
Eggs
Panko bread crumbs
Cheese—Parmesan and mozzarella
Pantry ingredients—AP flour, garlic powder, salt, black pepper
Simple marinara sauce—Tomato (crushed and paste), onion, garlic, dried basil, salt, black pepper, optional crushed red pepper.

Chicken Parmesan on a plate.
Blue ribbon divider used for visual effect
[feast_advanced_jump_to]

Featured comment from Karina:
"This was awesome. My teens are every last bit. Better than a restaurant and easy for someone like me, who isn’t great in the kitchen, to manage. Thanks so much!"

This healthy chicken parm recipe is one of my favorite recipes. It's a wonderful company or date night for two recipe—perfect for casual dining with conversation and wine. I have used it several times as the evening meal before a major holiday like Thanksgiving or Christmas.

👨‍🍳How to Make Healthy Chicken Parmesan—Step-by-Step

Ingredients for a simple marinara sauce.

1. Start by making a simple marinara sauce. You can use another sauce of your choice.

cooking onion in black skillet.

2. Chop one medium onion and cook over medium-high heat with 1 teaspoon of oil until clearing—about 3 minutes. Add 4 cloves of crushed or minced garlic and cook one more minute.

cooking sauce in skillet.

3. Add one large can of crushed tomatoes (28 oz), one small can of tomato paste (6 oz) plus 6 oz water, 1 teaspoon basil, 1 teaspoon salt, and ½ teaspoon of black pepper. ⅛ teaspoon crushed red pepper optional. Let simmer over low heat until needed.

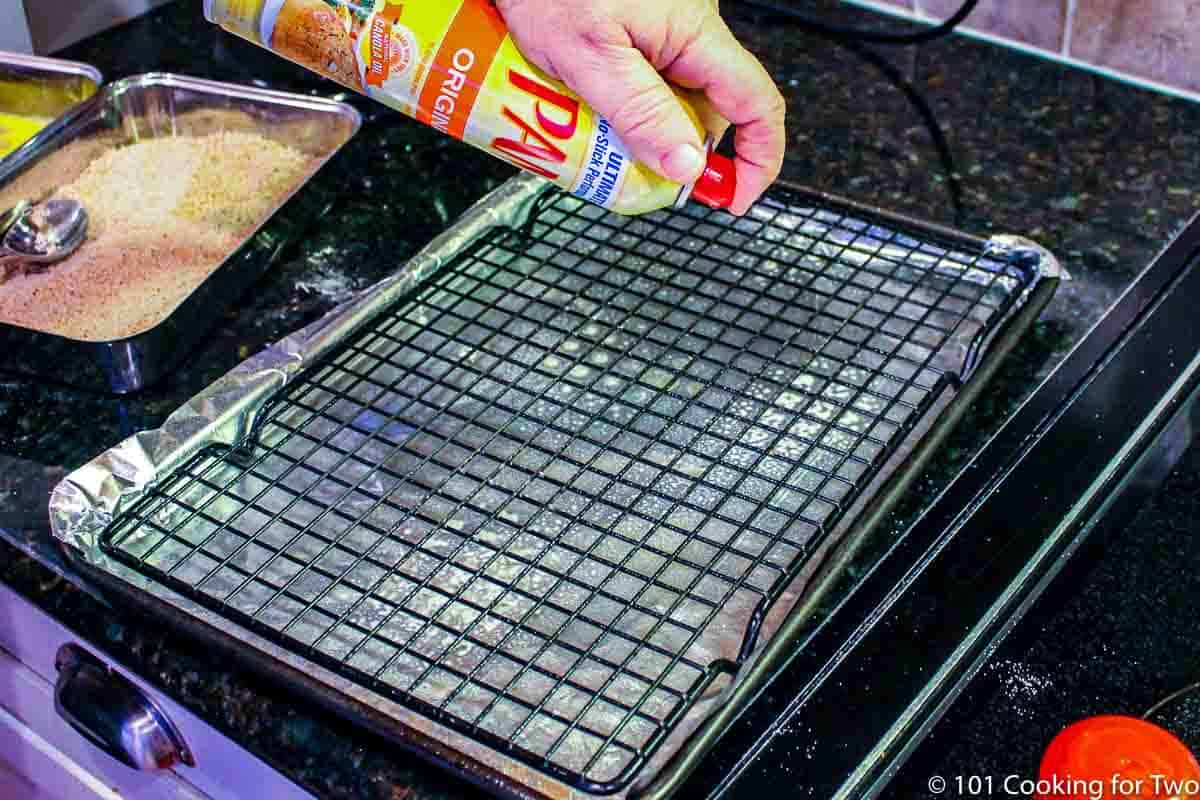
Spraying PAM on a rack on a foil covered tray.

4. Preheat oven to 450°. Prep a sheet pan with aluminum foil and a rack. Coat with PAM cooking spray.

browning bread crumbs in skillet.

5. Over medium heat with 1 teaspoon oil, brown 1 ½ cup panko bread crumbs until brown, about 2 minutes. Remove to cool.

fileting chicken breast.

6.Prepare the chicken cutlets by patting dry three large skinless boneless chicken breasts (about 12 ounces each.) Trim and then cut into cutlets.

three pan dredge line.

7. In three shallow pans, prepare a dredge line.

  1. Pan one: place ½ cup AP flour with 1 ½ teaspoons garlic powder, ½ teaspoon salt, and ½ teaspoon pepper.
  2. Pan two: 3 egg whites with 1 tablespoon water - whipped together.
  3. Pan three: the brown bread crumbs ( not hot) and 1 cup of shredded Parmesan cheese (fresh preferred.)
chicken coated with flour.

8. Be sure the chicken is dry, then coat them through pans 1, 2, and 3, shaking well after pans 1 and 2. Place on prepared pan.

tray of coated chicken in oven.

9. When all are complete, add a little more of the bread/Parmesan mixture on top of each piece to fill any holes. Let rest for 5 minutes. Cook until an internal temp of 165°. It takes about 20 minutes, depending on the thickness of the chicken.

adding cheese topping to chicken with sauce.

10. Remove from oven and top with about 2 tablespoons of your sauce and mozzarella cheese.

cooked chicken parmesan on tray.

11. Place back in the oven for about 5 minutes until browned and 165°—use the broiler if needed. Serve with pasta and the remaining sauce.

For more details, keep reading. See the Recipe Card below for complete instructions and to print.

✔️Tips to make it right every time

  • Be sure the chicken is dried with paper towels before breading to help the breading adhere.
  • You can use your own or jar marinara sauce, but mine is much better and easy to make with common pantry ingredients.
  • Freshly shredded Parmesan is preferred.
  • You can use whole eggs instead of whites if you don't mind a little more fat.
  • Use Panko bread crumbs only; do not use regular bread crumbs. You can use flavored ones, but realize it will affect the flavor.

Easy Italian recipes you will love

For other great Italian meals, try Crock Pot Baked Ziti, Chicken Cordon Bleu, or Baked Pasta and Sausage. Or, for low-fat recipes, try Chicken Marinara Sauce and Skinny Cajun Chicken Alfredo.

How to serve

Serve cooked pasta with sauce and nice bread like Julia Childs French Bread, Easy Dinner Rolls, or Basic White Stand Mixer Bread. Add a green salad or a hot vegetable like green beans with almonds, broccoli, or roasted Parmesan asparagus.

Finish the healthy meal with Healthier Carrot Cake. Or skip the low-fat option for Small Batch Apple Crisp, Chocolate Chip Cheesecake, or my Flourless Chocolate Cake Recipe.

⬇️How to make this a "for two" friendly recipe

This is an easy recipe to cut in half. The full recipe makes six servings using 3 chicken breasts for the breaded chicken cutlets.

  1. Use the recipe card and adjust the number of servings to the number of servings you want.
  2. Use the amount of ingredients in the ingredient list, not the instructions—those do not adjust. All the ingredients will change, but you can make the amount of sauce you want.
  3. Cook for the same amount of time.

Crushed tomatoes usually only come in larger cans, but you can use diced tomatoes or tomato sauce to decrease waste. The tomato paste will freeze well.

❄️Storage of Leftovers

If you know you will have leftovers, don't add the sauce or cheese, but finish cooking the chicken to 165°. Add them back during reheating.

Store in an airtight container and refrigerate for 3 days, or freeze airtight for 3 months.

To reheat leftovers, thaw if frozen, then add the sauce and cheese if needed. Reheat in a 350° oven. Try to avoid the microwave, which can cause the chicken to become rubbery in texture.

❓FAQs

Can I use a jar of sauce to make Chicken Parmesan?

Yes. But please be aware that the suggested sauce is much better than any jar sauce and does not add much work.

Are chicken parmesan and chicken parmigiana the same?

Yes. There are different names for the same dish.

What wine to pair with Chicken Parmesan?

Yes, it is chicken, but it is also tomato-based, so either red or white will do. In the red wines, try Pinot Noir, Merlot, or other fruity red. For white wine, Chardonnay or sparkling white wines are good.

Blue ribbon divider used for visual effect

This recipe is listed in these categories. See them for more similar recipes.

101's Best Recipes, Chicken Breast Recipes, Chicken Recipes, Healthy Recipes, Italian Recipes

Have you tried this recipe, or have a question? Join the community discussion in the comments.

📖The Recipe Card

Chicken Parmesan on plate
Print Recipe Add to Collection Go to Collections
4.41 from 10 votes

Healthy Chicken Parmesan—Oven Baked

This Healthy Chicken Parmesan is oven-baked in about an hour with chicken cutlets and pantry ingredients. Perfect for two or a crowd with better-than-restaurant results.
Prep Time30 minutes mins
Cook Time30 minutes mins
Total Time1 hour hr
Course: Main Course
Cuisine: Italian
Keyword: Baked Italian Chicken, Chicken Parmesan
Servings: 6 servings
Calories: 407.8kcal
Author: Dan Mikesell AKA DrDan

Ingredients

Breaded Chicken Cutlets

  • 3 skinless boneless chicken breasts 12 oz. trimmed and cut into cutlets
  • ½ cup AP flour
  • 1 ½ teaspoon garlic powder
  • ½ teaspoon salt
  • ½ teaspoon pepper
  • 3 egg whites
  • 1 ½ cup Panko bread crumbs
  • 1 cup Parmesan cheese
  • 1 cup mozzarella shredded

Simple Marinara Sauce or Use Yours

  • 1 onion medium chopped
  • 4 cloves garlic crushed or minced
  • 28 oz crushed tomatoes
  • 6 oz tomato paste plus 6 oz water
  • 1 teaspoon dried basil
  • ½ teaspoon salt
  • ½ teaspoon pepper
  • ⅛ teaspoon crushed red pepper optional
US Customary - Convert to Metric

Instructions

  • Start by making a simple marinara sauce. You can use another sauce of your choice.
    Ingredients for a simple marinara sauce
  • Chop one medium onion and cook over medium-high heat with 1 teaspoon of oil until clearing—about 3 minutes. Add 4 cloves of crushed or minced garlic and cook one more minute.
    cooking onion in black skillet
  • Add one large can of crushed tomatoes (28 oz), one small can of tomato paste (6 oz) plus 6 oz water, 1 teaspoon basil, 1 teaspoon salt, and ½ teaspoon of black pepper. ⅛ teaspoon crushed red pepper optional. Let simmer over low heat until needed.
    cooking sauce in skillet
  • Preheat oven to 450°. Prep a sheet pan with aluminum foil and a rack. Coat with PAM cooking spray.
    Spraying PAM on a rack on a foil covered tray
  • Over medium heat with 1 teaspoon oil, brown 1 ½ cup panko bread crumbs until brown, about 2 minutes. Remove to cool.
    browning bread crumbs in skillet
  • Prepare the chicken cutlets by patting dry three large skinless boneless chicken breasts (about 12 ounce each.) Trim and then cut into cutlets.
    fileting chicken breast
  • In three shallow pans, prepare a dredge line.
    Pan one: place ½ cup AP flour with 1 ½ teaspoons garlic powder, ½ teaspoon salt, and ½ teaspoon pepper.
    Pan two: 3 egg whites with 1 tablespoon water - whipped together.
    Pan three: the brown bread crumbs ( not hot) and 1 cup of shredded Parmesan cheese (fresh preferred.)
    three pan dredge line
  • Be sure the chicken is dry, then coat them through pans 1, 2, and 3 shaking well after pans 1 and 2. Place on prepared pan.
    chicken coated with flour
  • When all are complete, add a little more of the bread/Parmesan mixture on top of each piece to fill any holes. Let rest for 5 minutes. Cook until an internal temp of 165°. It takes about 20 minutes, depending on the thickness of the chicken.
    coated chicken on rack
  • Remove from oven and top with about 2 tablespoons of your sauce and mozzarella cheese.
    adding cheese topping to chicken with sauce
  • Place back in the oven for about 5 minutes until browned and 165°—use the broiler if needed. Serve with pasta and the remaining sauce.
    browned chicken parmesan on tray

Notes

Pro Tips

  1. Use your own sauce or jar sauce, but mine is much better and easy. Do it at the beginning of the cooking and let it simmer until needed.
  2. Instructions for making a smaller "for two" recipe are in the recipe post.
  3. Use larger chicken breasts to make the cutlets. About 12 oz is a good size.
  4. A good Parmesan cheese is important for good taste along with the sauce.
  5. Good in refrigerator for 2-3 days.  Good frozen after cooking for 3-4 months. If you know you will be storing leftovers, do not add the sauce or cheese before storing them.
  6. I prefer reheating in the oven at 350*
 
Nutrition is an estimate of the ingredients that actually are used to create the Chicken Parmesan. Extra sauce was not included.

Nutrition

Calories: 407.8kcal | Carbohydrates: 20.4g | Protein: 50.1g | Fat: 13g | Saturated Fat: 5.8g | Polyunsaturated Fat: 1.3g | Monounsaturated Fat: 3.7g | Trans Fat: 0.02g | Cholesterol: 132.7mg | Sodium: 812.2mg | Potassium: 882.6mg | Fiber: 1.9g | Sugar: 3.3g | Vitamin A: 627.2IU | Vitamin C: 6.3mg | Calcium: 302.1mg | Iron: 2.5mg

This is a simplified version of Cook's Illustrated Ligher Chicken Parmesan (subscription required).

Editors Note: Originally Published January 13, 2010, the second week of the blog. I buffed up the discussion with expanded options from a November 2011 version. Photos have been re-edited from several old cooking.

Molly and Lilly running in leaves.

How to Grill Chicken Tenders – Simple 10-Minute Recipe

Grilled chicken tenders on a white plate

Grilled chicken tenders are one of the easiest things you can cook on a grill. They cook in about 10 minutes, stay juicy with simple seasoning, and are perfect for quick weeknight dinners or as a secondary main dish.

This beginner-friendly recipe uses medium-high heat, a quick flip halfway through, and an instant-read thermometer to guarantee tender, flavorful chicken every time. No complicated techniques—just great grilled chicken.

⏱️ Grill Time for Chicken Tenders

  • Grill for about 10 minutes total—about 4–5 minutes per side.
  • Use medium-high heat (about 450°F) for juicy, flavorful tenders.
  • Cook to 165°F in the thickest part with an instant-read thermometer.
Grilled chicken tenders on a white plate
[feast_advanced_jump_to]

📝 TL;DR — Recipe Summary

What: Juicy grilled chicken tenders with simple seasoning in about 10 minutes.

Why: Perfect for quick weeknight dinners, cookouts, meal prep, or picky eaters.

How: Season simply, then grill over medium-high heat (about 450°F) for 4–5 minutes per side until the internal temperature reaches 165°F.

🐓 Ingredients

Raw chicken tenders with oil and seasoning for the grilled chicken tender recipe.
  • Chicken tenders: Or slice boneless skinless chicken breasts into strips across the grain.
  • Oil: A light coating helps the seasoning stick and promotes browning.
  • Seasoning: Keep it simple with salt and pepper or use my All-Purpose Seasoning (salt, pepper, and garlic powder).

👨‍🍳 Quick Overview: How to Grill Chicken Tenders

1. Trim the tenders

Preheat the grill to about 450°F and clean and oil the grates. Trim the tendons from the chicken tenders and pat dry.

Don't skip trimming the tendon—it stays chewy even after cooking.

trimming tendon off a chicken tenderloin.

✅ Pro Tip: If cooking other foods at a higher temperature, keep a cooler area on the grill for the tenders.

2. Season the tenders

Coat the chicken lightly with oil and season with salt and pepper or your favorite seasoning.

adding oil to chicken tenders in metal bowl

3. Grill the tenders

Place the tenders over direct heat on the grates or in a grill pan. Flip after 4–5 minutes and continue grilling another 4–5 minutes until they reach 165°F in the thickest part.

placing chicken tenders on grill grate

✅ Pro Tip: The edges will start turning white when it's time to flip.

4. Rest and serve

Let the tenders rest for about 5 minutes before serving.

pile of grilled chicken tenders

For complete step-by-step instructions, scroll down to the printable recipe card or keep reading for tips, flavor options, and serving ideas.

⏲️ How Long to Grill Chicken Tenders

Chicken tenders take about 10 minutes to grill, but the exact time will vary with their thickness and how evenly your grill cooks.

  • Grill at a surface temperature of about 450°F.
  • Flip once halfway through, around the 4- to 5-minute mark.
  • Chicken is done when it reaches 165°F in the thickest part with an instant-read thermometer.
  • Overcooking will dry out and toughen the chicken.
  • Undercooking is not safe. The USDA recommends cooking all poultry to 165°F.

🧂 Seasoning Options

Start with salt and pepper or my All-Purpose Seasoning. For a different flavor, try:

  • Your favorite chicken seasoning
  • BBQ Dry Rub
  • Blackened Seasoning
  • Black Magic Seasoning

If you have time, marinate the tenders for 30 minutes to 2 hours before grilling. Good choices include:

  • Your favorite chicken marinade
  • Lemon Butter Marinade
  • Italian dressing
  • Easy Chicken Marinade
  •  Buttermilk Marinade

♨️ Grill Temperature

Grill chicken tenders at a surface temperature of about 450°F, which is medium-high heat on most gas grills. Charcoal, pellet, and other grills work just as well if you maintain a similar cooking temperature. Too much heat can dry the outside before the inside reaches 165°F.

A grill surface thermometer is the best way to know your cooking surface is at the right temperature.

📘 See: A Beginner’s Guide to Grill Temperature on a Gas Grill for more information.

❓ FAQs

Can I use chicken breasts instead of chicken tenders?

Yes. Slice boneless, skinless chicken breasts into strips of similar thickness and grill the same way, cooking to 165°F.

What dipping sauces go well with grilled chicken tenders?

Grilled chicken tenders are great with classic dipping sauces like BBQ sauce, ranch, honey mustard, buffalo sauce, or ketchup. For something different, try a homemade garlic aioli or your favorite spicy sauce.

What to do with leftover chicken tenders?

Store leftovers in an airtight container in the refrigerator for up to 4 days or freeze for up to 3 months. Reheat gently to avoid drying them out.

What to serve with grilled chicken tenders?

They pair well with potatoes, rice, pasta salad, green salad, grilled vegetables, corn on the cob, baked beans, or fresh fruit.

Can I grill frozen chicken tenders?

No. Thaw completely before grilling so they cook evenly and safely to 165°F.

🍽️ More Easy Chicken Recipes

Looking for another easy chicken dinner? Here are a few more reader favorites.

More ways to enjoy chicken tenders

  • Baked Chicken Tenders –  – Crispy outside, juicy inside, and oven baked.
  • Crispy Fried Chicken Tenders – A crunchy classic with great flavor.

More easy chicken dinners

  • Oven Baked Chicken Legs – Crispy skin and juicy meat with almost no prep.
  • Grilled Chicken Drumsticks – Another easy grilling favorite.
  • Baked Chicken Nuggets – Homemade nuggets that both kids and adults love.

📖The Recipe Card

Grilled chicken tenders on a white plate
Print Recipe Add to Collection Go to Collections
5 from 1 vote

Grilled Chicken Tenders

Juicy grilled chicken tenders cooked in about 10 minutes with simple seasoning. Includes prep, grill time, temperatures, and easy step-by-step instructions.
Prep Time2 minutes mins
Cook Time10 minutes mins
Total Time12 minutes mins
Course: Main Course
Cuisine: American
Keyword: grilled chicken tenders, how long to gril chicken tenders., how to grill chicken tender
Servings: 6 tenders
Calories: 78kcal
Author: Dan Mikesell AKA DrDan

Ingredients

  • 6 Chicken tenders or as many as needed
  • 1 tablespoon Olive oil
  • ½ teaspoon Kosher salt
  • ¼ teaspoon Pepper
  • ¼ teaspoon Granular garlic powder optional
US Customary - Convert to Metric

Instructions

Prepare the grill and tenders

  • Start with the number of tenders you need, olive oil, and seasoning of your choice.
    Raw chicken tenders with oil and seasoning for the grilled chicken tender recipe.
  • Preheat the grill to a surface temperature of about 450°, medium-high on most gas grills and medium on a hot gas grill. Clean and oil the grill surface well.
    clean and oil grill crates

Seasoning tenders

  • Pat dry the chicken tenders. Trim the tendon off—it doesn't need to be perfect.
    trimming tendon off a chicken tnderloin
  • In a mixing bowl, mix chicken tenders with olive oil, kosher salt, pepper, and granular garlic powder (optional). Adjust spices and oil according to the number of tenders and your taste.
    adding oil to chicken tenders in metal bowl

Grill chicken tenders

  • Place chicken tenders over direct heat on the grill grate.
    placing chicken tenders on grill grate
  • Grill until the chicken turns pink to white along the edge (about 5 minutes). You will see the white moving up the sides. Flip and grill another approximately 4-5 minutes until the internal temperature is 165°.
    edge of grilled chicken tender turning white

Notes

Pro Tips

  1. This recipe is easy to combine with grilling chicken or pork since the grill temperature is the same. For other temperatures, create two zones.
  2. The recommended surface temperature is 450°. If you cook hotter, they will dry.
  3. Use the seasoning of your choice.
  4. The final internal temperature of 165° is important for safety.
  5. You may cut chicken strips out of chicken breasts. They may take a few minutes longer to cook, but you cook them to the final internal temperature.
  6. Kids love to dip, so use a dip if you want. Ranch dressing, BBQ sauce, or mayo are fine.

Nutrition

Serving: 1tender | Calories: 78kcal | Carbohydrates: 1g | Protein: 11g | Fat: 4g | Saturated Fat: 1g | Cholesterol: 32mg | Sodium: 252mg | Potassium: 185mg | Sugar: 1g | Vitamin A: 15IU | Vitamin C: 0.6mg | Calcium: 3mg | Iron: 0.2mg

Editor’s Note: Originally published May 30, 2013. Updated with simplified instructions, seasoning and marinade options, refreshed photos, and improved navigation.

Jake is chewing a ball.

Grilled Bacon Wrapped Pork Tenderloin Medallions

Bacon Wrapped Pork Medallions on a white plate

Grilled bacon-wrapped pork tenderloin medallions are tender, smoky, and surprisingly easy to make. My simple wrapping method keeps the bacon in place and makes evenly sized medallions without wrestling with individual strips.

Skip the bacon for a faster version of grilled pork medallions. Either way, they make a quick dinner for two that's easy to scale up for family or guests.

🤔 Quick Answer — How long to grill pork tenderloin medallions?

Use a 450°F medium-high grill and cook to 145°F internal temperature.

  • Bacon-wrapped medallions: Grill for 10–12 minutes on the flat sides, then 3–5 minutes on the edges to cook the bacon.
  • Plain pork tenderloin medallions: Grill for 10–12 minutes, flipping once.
grilled bacon wrapped pork medaion on white plate
[feast_advanced_jump_to]

quote mark
Featured Comment by Clancy:
⭐⭐⭐⭐⭐
"Better than any restaurant bacon wrapped pork I’ve ever eaten. I followed you steps exactly as written and the rub truly elevated the tenderloin taste."

📝 TL;DR — Recipe Summary

  • What: Bacon-wrapped pork tenderloin medallions grilled for a quick dinner. Skip the bacon for faster prep and cooking.
  • Why: Tender, individually portioned pieces of pork with an easy bacon-wrapping method and simple preparation.
  • How: Wrap the pork tenderloin with bacon, cut and flatten into medallions, season, then grill over medium-high heat to 145°F. Skip the wrapping step for plain medallions.

🐖 Ingredients

Pork tenderloin with bacon and spices
  • Pork tenderloin — The right cut for pork medallions. It is long, lean, and tender. Do not substitute pork loin—it is a completely different cut.
  • Bacon — Use regular-cut bacon for the bacon-wrapped medallions. Thick-cut bacon takes too long to cook. Skip the bacon for plain grilled pork medallions.
  • Seasoning — Salt and pepper are enough, or use your favorite seasoning. I recommend my dry rub with brown sugar, kosher salt, chili powder, black pepper, onion powder, and garlic powder.

🔪 How to Wrap Bacon Around Pork Tenderloin and Make Medallions

This method makes the job easy – no fighting with individual pieces of bacon.

1. Trim the tenderloin – remove the silverskin and loose fat so it wraps cleanly.

Trimmed pork tenderloin with bacon.

2. Lay out the bacon – arrange 4 slices side by side with small gaps, wide enough to cover the tenderloin after removing the thin tail.

Layed out bacon with tenderloin.

3. Even out the thickness – cut off the skinny tail end and place it alongside the thin end of the tenderloin to even out the medallions.

Butterflying the thin end back.

4. Roll and slice – roll the bacon around the tenderloin, then cut between each strip to create medallions. Move the bacon – not the tenderloin.

Wrapping the pork pieces with the bacon

5. Flatten and secure – press each medallion slightly so it sits flush inside the bacon. Pin with a toothpick to hold it in place.

Flattening the meat into the bacon wrapper.

Skipping the bacon? Cut the tenderloin into 1½-inch medallions and gently flatten to about 1 inch thick, pinning the thin end pieces with a toothpick.

👨‍🍳 Quick Overview: How to Grill Bacon Wrapped Pork Tenderloin Medallions

placing pork medalions on grill
  1. Prepare the medallions — Use the bacon-wrapping method above, then slice and gently flatten the medallions. If skipping bacon, prepare the plain medallions as directed above.
  2. Season — Season both sides with your preferred seasoning.
  3. Grill the flat sides — Grill over medium-high heat at about 450°F for 5–6 minutes per side.
  4. Finish the bacon — Stand bacon-wrapped medallions on their edges and grill 3–5 minutes, turning as needed to cook the bacon. Skip this step for plain medallions.
  5. Check doneness and rest — Cook the pork to 145°F, then rest for 5 minutes before serving.

⏱️ How Long to Grill Pork Tenderloin Medallions

At a 450°F medium-high grill, cook pork tenderloin medallions to an internal temperature of 145°F, followed by a short rest, as recommended by the USDA. Cooking time depends mainly on whether you use the bacon wrap.

  • Bacon-wrapped: Grill the flat sides for 10–12 minutes total, then cook on the edges for 3–5 minutes to finish the bacon.
  • Without bacon: Grill for 10–12 minutes total, flipping once.

You can cook to a higher internal temperature if you prefer your pork more done, but it will become less tender as the temperature rises.

Always cook to temperature, not just time. Start checking early with an instant-read thermometer.

🥣 Seasoning

Simple salt and pepper work well, or use your favorite pork seasoning. I prefer my dry rub with brown sugar, kosher salt, chili powder, black pepper, onion powder, and garlic powder.

Season shortly before cooking. If using bacon, remember it adds salt, so season the pork lightly.

Join the Club—Subscribe Today

Stay in the loop with updates—details on the Subscription Page.

Wait a moment

Thank you for signing up! You should receive a confirmation email shortly. You MUST click to confirm your subscription email.

👍 Pro Tips – Cooking

  • Grill temperature: Gas or charcoal both work. Keep the grill surface temperature around 450°–500°F.
  • Bacon thickness: Use regular-cut bacon. Thick-cut bacon takes longer to cook and may stay chewy.
  • Cook the bacon edges: Use tongs to stand the medallions on their edges, turning as needed to cook the bacon.
    👉 Need help? See A Beginner’s Guide to Grill Temperature on a Gas Grill.

📅 Make-Ahead Tips

  • Prepare the bacon-wrapped medallions up to 3 days ahead and refrigerate, or freeze unseasoned for up to 3 months. Thaw frozen medallions completely in the refrigerator before cooking.
  • Season shortly before grilling, especially when using a salted rub.

🔥 Oven Method (Sear and Bake)

  • Sear all sides in a hot oven-safe skillet with a little oil—3–4 minutes on the flat sides and, if using bacon, 1–2 minutes on the bacon edges.
  • Transfer the skillet to a 400°F oven and bake until the pork reaches 145°F.
  • Rest for 5 minutes before serving.

✅ Pro Tip: Any oven-safe skillet will work, but cast iron is best. It holds heat evenly and gives you a great sear.

cut pork medalion on white plate

🍽️ Serving Suggestions

  • Pair with Grilled Baby Potatoes or Grilled Mixed Vegetables for a complete outdoor meal.
  • Something saucy: A drizzle of BBQ sauce, chipotle aioli, or garlic butter works well with these medallions.

❓ FAQs

Should I cook the bacon ahead of time?

Not if you’re using thin or regular-cut bacon – it will cook through just fine. If you’re using thick-cut bacon, precook it partway until it just starts to brown (but isn’t crispy). Drain, let it cool, then wrap the tenderloin as directed.

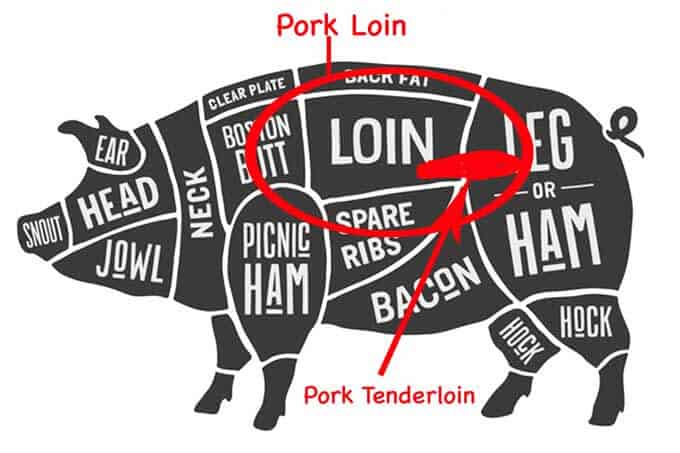
Is pork tenderloin the same as pork loin?

No – and it’s an important difference. This recipe uses pork tenderloin, sometimes called pork filet. It’s long, narrow, and very tender. Pork loin is much larger, firmer, and usually sliced into chops. The texture, flavor, and cook times are completely different, so don’t swap them.Graphic with pork loin and pork tenderloin location. Image licensed May 17, 2017, from Fontolia—copyright by foxysgraphic - Fotolia. Image modified in accordance with the license.

🔗 More Pork Tenderloin Recipes

  • How to Grill Pork Tenderloin
  • Pan Seared Pork Tenderloin
  • Pork Tenderloin with Potatoes and Carrots
  • Memphis Grilled Pork Tenderloin

📖The Recipe Card

grilled bacon wrapped pork medaion on white plate
Print Recipe Add to Collection Go to Collections
5 from 1 vote

Grilled Bacon Wrapped Pork Tenderloin Medallions

Grilled bacon wrapped pork tenderloin medallions with an easy wrapping method. Skip the bacon for faster prep, with simple seasoning and cooking instructions.
Prep Time10 minutes mins
Cook Time20 minutes mins
Total Time30 minutes mins
Course: Main Course
Cuisine: American
Keyword: bacon wrapped pork medallions, grilled bacon wrapped pork medallions, grilled bacon wrapped pork tenderloin medallions
Servings: 4
Calories: 175kcal
Author: Dan Mikesell AKA DrDan

Ingredients

  • 1 pork tenderloin
  • 4 strips bacon – thin or regular cut; optional
  • seasoning of your choice seasoning salt and pepper, dry rub, or your favorite pork seasoning
US Customary - Convert to Metric

Instructions

Making the Pork Medallions

  • Trim pork tenderloin of loose fat, membranes, and silverskin.
    trimmed pork tenderloin on a black board
  • For bacon-wrapped medallions: Lay out 4 bacon slices side by side with small gaps. Trim off the skinny tail and place it alongside the thin end of the tenderloin to even the thickness. Roll the bacon around the tenderloin, then cut between each strip to create medallions. Flatten slightly and secure with toothpicks.
    Without bacon: Cut the tenderloin into 1½-inch medallions, gently flatten to about 1 inch thick, and pin the thin-end pieces with a toothpick.
    processing bacon wrapped medallions in four steps

Seasoning and Preheating

  • Season all sides (your choice is fine; dry rub recommended).
    mixing dry rub in a small glass bowl.
  • Clean/oil grates; preheat to a 450°F surface temp (medium-high).
    Cleaning grill grates.

Grilling

  • 1) Grill the medallions over direct heat for 5–6 minutes per flat side.
    2) If bacon-wrapped: Stand the medallions on their edges and grill for another 3–5 minutes, turning as needed to cook the bacon.
    3) Cook to an internal temperature of 145°F.
    placing pork medalions on grill

Rest

  • Let rest 5 minutes before serving.
    cut pork medalion on white plate

Notes

Pro Tips

Bacon: Use thin or regular-cut bacon. Thick-cut bacon may stay chewy unless partially precooked.
Temperature: Cook to 145°F. Always check with a meat thermometer.
Make-ahead: Assemble bacon-wrapped medallions and refrigerate up to 3 days or freeze unseasoned up to 3 months. Thaw in the refrigerator and season shortly before cooking.

Alternative Sear-and-Oven Method

Sear all sides in a hot oven-safe skillet with a little oil—3–4 minutes on the flat sides and, if using bacon, 1–2 minutes on the bacon edges.
Transfer to a 400°F oven and bake until the pork reaches 145°F.
Rest for 5 minutes.

Optional Dry Rub (makes extra; save the rest)

You will only need a few teaspoons of this if you use it as your seasoning. Seal the remainder of the rub and save for later.
8 tablespoons brown sugar
3 tablespoons kosher salt
1 tablespoon chili powder
1 teaspoon black pepper
1 teaspoon onion powder
1 teaspoon garlic powder

Nutrition

Calories: 175kcal | Carbohydrates: 1g | Protein: 29g | Fat: 6g | Saturated Fat: 2g | Cholesterol: 90mg | Sodium: 495mg | Potassium: 543mg | Calcium: 6mg | Iron: 1mg

Originally Published June 8, 2014.  Updated with expanded options, refreshed photos, and a table of contents to help navigation.

Molly as a deck puppy

How to Make Juicy Lucy Burgers

juicy lusy burger with cheese ozzing

Learn How to Make Juicy Lucy Burgers, a delicious Minnesota bar classic. Quick and easy, make these cheese-stuffed burgers on the grill or stovetop tonight.

Juicy Lucy Burgers with a large bite out of it.
[feast_advanced_jump_to]
Blue ribbon divider used for visual effect

What is a Juicy Lucy burger? An inside-out cheeseburger was invented at one of two bars in Minneapolis—not a fight I'm getting into. But one called them Jucy Lucy Burgers and the other used Juicy Lucy Burgers with the "i". See Wikipedia for more history of this regional delight.

I started with my How To Grill Hamburgers and used 7:2:2 seasoning. The choice of cheese is up to you, but processed American cheese slice is usually used—it melts well and is the classic cheese for this burger.

🐄Ingredients Options

Ground beef—80/20 preferred, but 85/15 ground beef may be used. Leander ground beef and ground turkey or chicken will tend to dry and fall apart since they are lean.

Cheese—American traditional but cheddar or other cheese of your choice.

Seasoning—salt and pepper is enough or use another seasoning like Lawrys or my All-Purpose Seasoning. Even a dry rub like BBQ Dry Rub or Memphis Dry Rub is good.

👨‍🍳How to Make Juicy Lucy Burgers

  1. Work quickly to keep the fat cold while preheating the grill or pan.
  2. Divide ground beef into approximately 3 oz balls and flatten between plastic wrap into about 5-inch diameter and ¼-inch thick patties.
  3. Add American cheese to the center area of half the patties; cover with another patty. Then seal the edges.
  4. Season to taste and dimple center.
  5. For both stovetop and grill: 5 minutes on the first side, then 3-5 on the second side to get to 160° with a meat temperature.

See photo instructions and the printable recipe card for detailed instructions. Use the jump table above to see more discussion and explanation.

♨️Grill or Stovetop

These can be cooked on a stovetop or grill. The grill can be a gas grill or a charcoal grill. It does not matter for this to work. Just get it hot, cleaned, and oiled.

For the stovetop, use a large frypan over medium-high heat with oil for the stovetop. A cast iron skillet works great for even heat, but other frypans are fine.

✔️Tips

  • The edges may leak a little; work on your technique next time.
  • You can use the cheese you want, but American seems popular. I have also used harder cheeses like cheddar or co-jack.
  • Most cheeses, except the hardest cheese, will melt in the 120°-130° range. In other words, it will be liquid after it cooks. So a word to the wise, let it cool a little before biting in.
  • Many will add more cheese on top. Fine if you want, and it is the "classic" way, along with some bacon.
  • I like cooking my burger to 165°, but 160° is safe. I like to know all areas are safe.

Related Recipes

For other great burger recipes, see Low Fat Burgers, Meatloaf Patties, Easy Ground Chicken Burgers, and Smoked Hamburgers. For vegetarians, try Grilled Portobello Mushrooms.

Like all good burgers, a side of fries is needed. Try Easiest French Fries on the Stovetop, Convection Oven French Fries, or Grilled French Fries.

And check out some other Midwest favorites, like Fried Breaded Pork Tenderloin Sandwich—Iowa Style, and Oven Fried Pork Tenderloin Sandwiches.

❓FAQs

Should I put ice in with the cheese to keep it from melting?

No. Most cheese will melt at 120° to 130°. The ice causes two problems. First, it will melt into water which will loosen the meat. Second, and more importantly, it will keep the meat next to the cheese from reaching 160°, which is needed for safety. I have seen this recommended—please do not do this.

How to serve Juicy Lucy burgers?

On a hamburger bun, topped with optional toppings of more cheese, bacon, ketchup, mustard, lettuce, tomato, pickles, and onion.

Add a beer, fries, and lots of napkins for the mess you will have while eating.

Blue ribbon divider used for visual effect
↑Jump to Table of Contents

This recipe is listed in these categories. See them for more similar recipes.

Beef Recipes, Grill Recipes

Have you tried this recipe, or have a question? Join the community discussion in the comments.

Step-by-Step Photo Instructions

raw ground beef with cheese and seasoning

Use the cheese of your choice. American is traditional but use the cheese you prefer.

clean and oil grill crates

Grill: Preheat the grill on high. Clean and oil well. You don't want to rip this open with sticking.
Stovetop: Heat a small amount of oil in a large skillet over medium-high heat. Cast iron is preferred if you have it.

burger under plastic wrap on red board with pan to flatten

Divide ground beef into approximately 3 oz balls. Between two pieces of plastic wrap, flatten the beef into patties about 5 inches in diameter and ¼ inch thick. The bottom of a pan is recommended here.

adding second layer of burger on the cheese

Add cheese. One standard slice of processed American cheese works well by folding the corners. Try to keep the cheese as far from the edge as possible. You can use a different cheese if you want.

adding seasoning to burger with dimple on red board

Add a second flattened patty on top and seal the edges. The final diameter should be about 4 inches. Sprinkle with some salt and pepper. I used my 7:2:2 spice mix. Press a dimple into the middle of one side about ⅛ inch deep and 1 ½ inch diameter.

raw burger on the grill with a bit of smoke

For both stovetop and grill: 5 minutes on the first side, then 3-5 on the second side to get to 160° meat temperature.

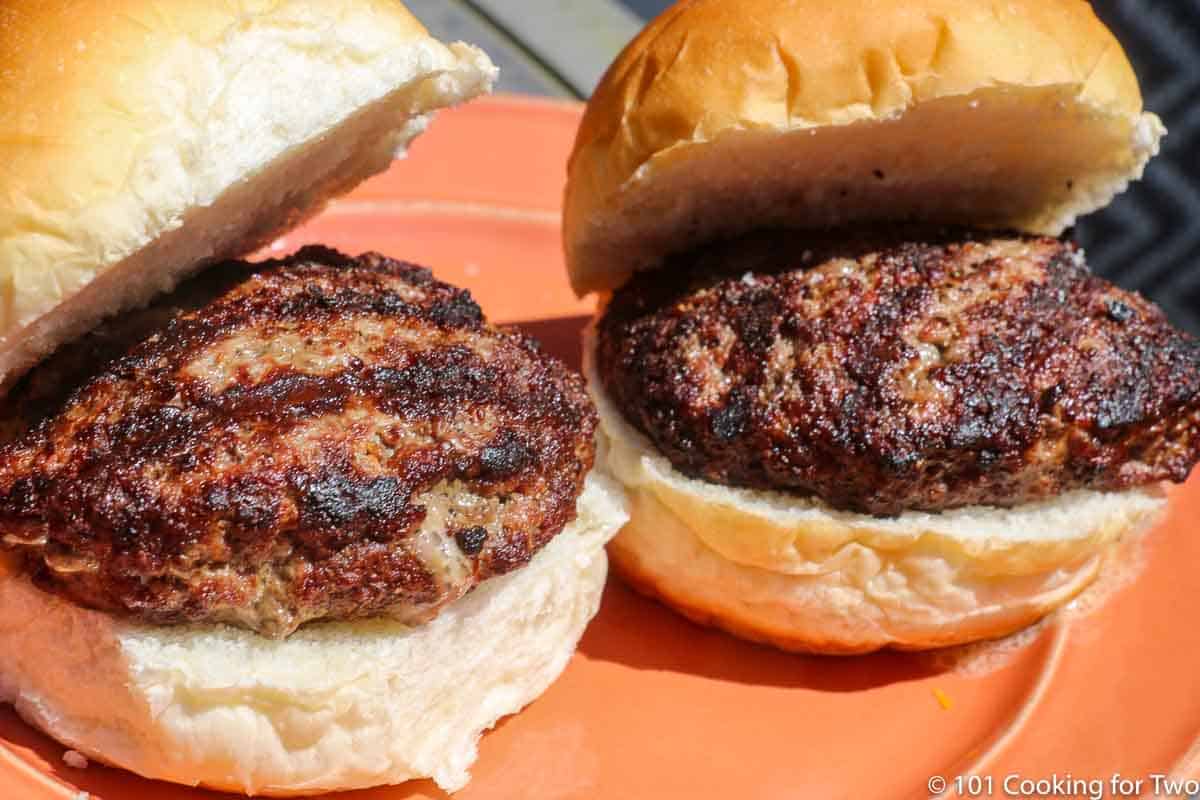
two cooked burgers on buns and orange plate

Let sit for 5 minutes before serving on a bun with lots of napkins.

burger on a bun with bacon
↑Jump to Table of Contents

📖The Recipe Card

juicy lusy burger with cheese ozzing
Print Recipe Add to Collection Go to Collections

How to Make Juicy Lucy Burgers

Learn How to Make Juicy Lucy Burgers, a delicious Minnesota bar classic. Quick and easy, make these cheese-stuffed burgers on the grill or stovetop tonight.
Prep Time10 minutes mins
Cook Time8 minutes mins
Total Time18 minutes mins
Course: Main Course
Cuisine: American
Keyword: Juicy Lucy Burger
Servings: 2
Calories: 507kcal
Author: Dan Mikesell AKA DrDan

Ingredients

  • ¾ pound ground beef
  • 2 slices cheese
  • Salt and Pepper or 7:2:2
US Customary - Convert to Metric

Instructions

  • Use the cheese of your choice. American is traditional but use the cheese you prefer.
    raw ground beef with cheese and seasoning
  • Grill: Preheat the grill on high. Clean and oil well. You don't want to rip this open with sticking.
    Stovetop: Heat a small amount of oil in a large skillet over medium-high heat. Cast iron is preferred if you have it.
    clean and oil grill crates
  • Divide ground beef into approximately 3 oz balls. Between two pieces of plastic wrap, flatten the beef into patties about 5 inches in diameter and ¼ inch thick. The bottom of a pan is recommended here.
    burger under plastic wrap on red board with pan to flatten
  • Add cheese. One standard slice of processed American cheese works well by folding the corners. Try to keep the cheese as far from the edge as possible. You can use a different cheese if you want.
    cheese on raw burger for stuffing
  • Add a second flattened patty on top and seal the edges. The final diameter should be about 4 inches. Sprinkle with some salt and pepper. I used my 7:2:2 spice mix. Press a dimple into the middle of one side about ⅛ inch deep and 1 ½ inch diameter.
    top layer added to cover cheese on red board
  • For both stovetop and grill: 5 minutes on the first side, then 3-5 on the second side to get to 160° meat temperature.
    raw burger on the grill with a bit of smoke
  • Let sit for 5 minutes before serving on a bun with lots of napkins.
    two cooked burgers on buns and orange plate

Notes

Pro Tips

  1. Use the cheese you want but American cheese is traditional and melts well.
  2. Get the edges sealed well to prevent leaking of the cheese.
  3. Just salt and pepper is fine for seasoning but I use my homemade 7:2;2 seasoning that has some garlic.
  4. Use a grill on high or large skillet over medium-high heat.
  5. Safe is 160° but I prefer 165° since you don't check all areas of the meat.
  6. Be sure to let the burger rest for 5 minutes minimum.
  7. The edges may leak a little, just work on your technique next time.
  8. Many will add more cheese on top. Fine if you want, and it is the “classic” way.

Nutrition

Calories: 507kcal | Carbohydrates: 1g | Protein: 49g | Fat: 33g | Saturated Fat: 15g | Cholesterol: 176mg | Sodium: 890mg | Potassium: 621mg | Sugar: 1g | Vitamin A: 281IU | Calcium: 236mg | Iron: 5mg

Editor's note: Originally published July 25, 2015. Updated with expanded options, refreshed photos, and a table of contents to help navigation.

Molly and Lilly on the deck.

Pulled Pork Recipes Without a Smoker

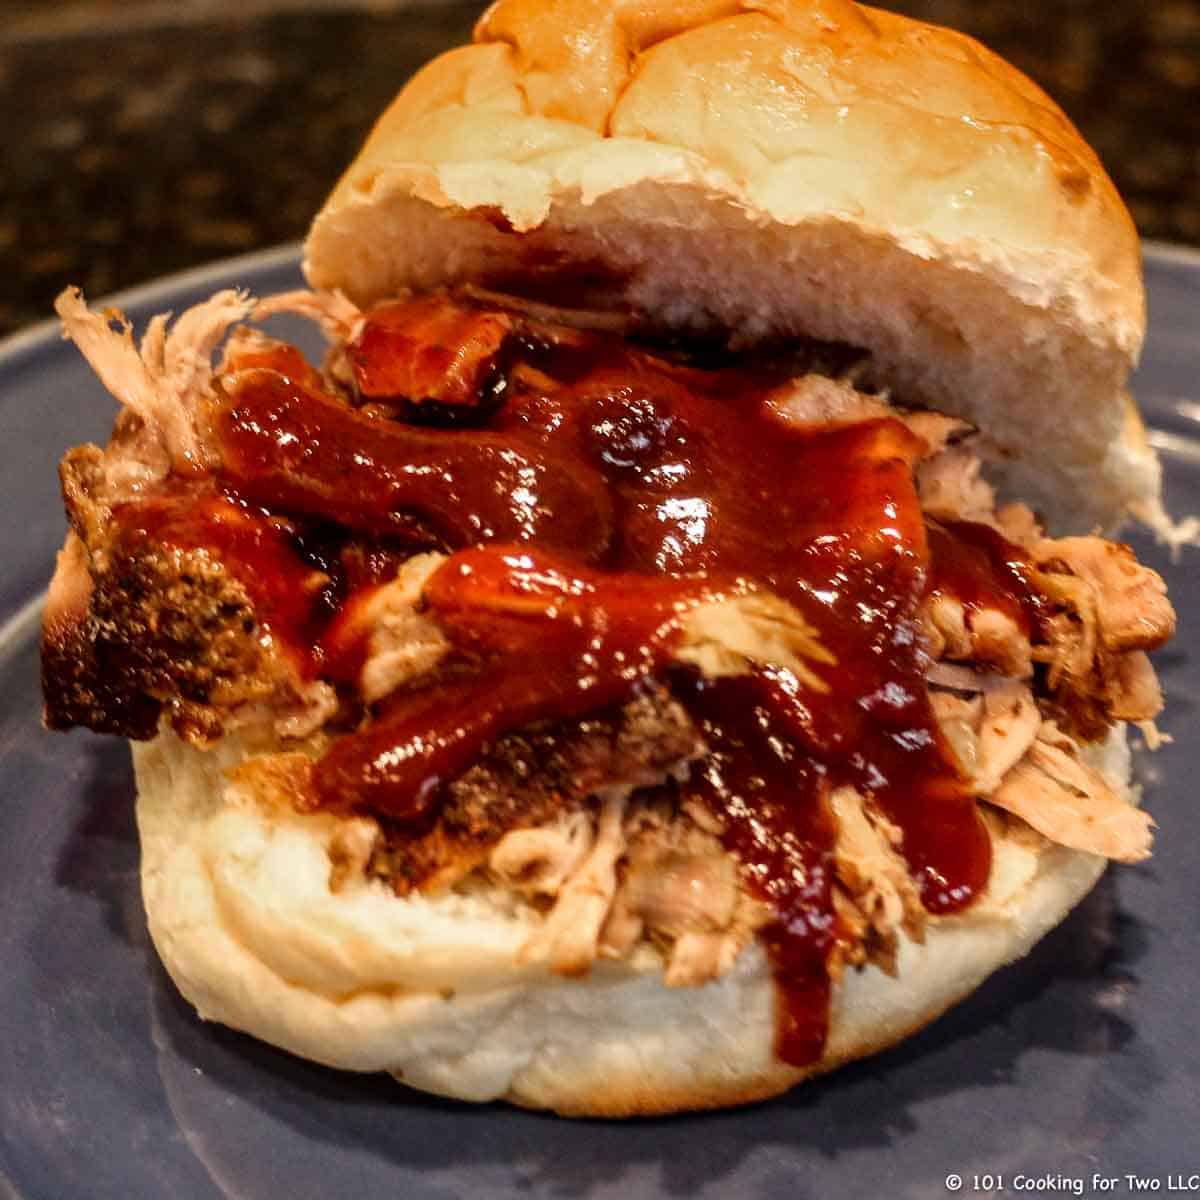
Pulled pork with sauce in a bun on a blue plate

No smoker? No problem. Everyone deserves great pulled pork. Here are six ways to get there without a smoker—three with pork butt and three using other cuts of pork. You can use your oven, slow cooker, or gas grill for juicy, tender results. Whether you're cooking for a crowd or just craving a BBQ sandwich, there's a method here for you.

close up picture of a BBQ Sandwich with sauce on a blue plate
[feast_advanced_jump_to]

Traditional pulled pork comes from pork butt because of its fat and connective tissue—that’s what makes it melt-in-your-mouth tender. However, you can still get tasty results with leaner cuts like pork loin or tenderloin. It won’t have quite the same richness, but it’s quicker, healthier, and still perfect for sandwiches or feeding a crowd.

😊Pork Butt (Boston Butt) Recipes

A classic cut that delivers crispy bark and fall-apart tender meat. Use just a dry rub and cook it your way: oven, crock pot, or smoked on a grill. Great flavor; no smoker needed.

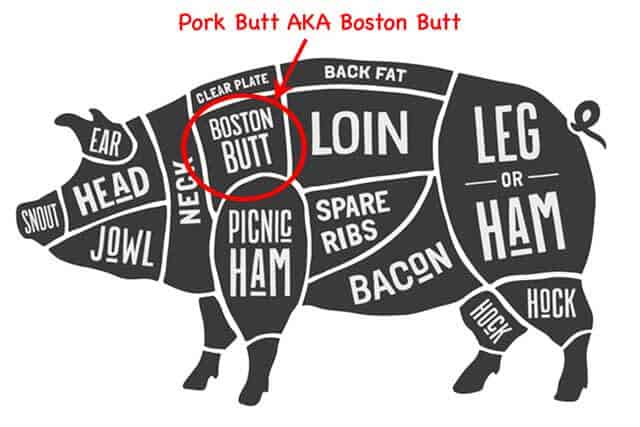
Why is it called a "butt" if it’s from the shoulder?
Because “butt” means thick, and this cut was traditionally packed into barrels (called butts) for shipping. It’s a shoulder cut, not the rear. But let’s not let naming conventions get in the way of dinner.

image of a hog with Location of Pork Butt highlighted - Image licensed May 17, 2017, from Fotolia. Copyright by foxysgraphic - Fotolia. Image modified in accordance with the license.
Image licensed from Fotolia. Copyright by foxysgraphic - Fotolia. Image modified in accordance with the license.
How to Cook Pork Butt in the Oven for Pulled Pork
Make juicy BBQ pulled pork in your oven. Cook pork butt at 250°F until fall-apart tender, with crispy bark and rich, smoky flavor.
Pork Butt in the Oven
pulled pork sandwich with BBQ sauce
Crock Pot Pulled Pork from Pork Butt
Easy crock pot pulled pork with a simple dry rub and pork butt (Boston butt). No liquid or searing—just low and slow cooking for tender, shreddable results.
Crock Pot Pulled Pork
Pulled pork with sauce in a bun on a blue plate
Pulled Pork from Pork Butt on a Gas Grill
Pork butt (Boston butt) cooked low and slow over indirect heat on a gas grill with a dry rub and wood smoke until tender, smoky, and easy to pull.
Grilled Pork Butt
Pulled Pork on a Gas Grill from 101 Cooking for Two

🤔 “Fake” Pulled Pork (Other Cuts, Still Delicious)

Don’t have pork butt? No worries. These recipes use leaner cuts like pork loin and tenderloin to mimic pulled pork—healthier and still tasty.

I have used the oven pork loin method for cooking for groups of 50. And I love the smaller tenderloin version.

graph showing pork loin vs tenderloin-Image licensed from Fotolia. Copyright by foxysgraphic - Fotolia. Image modified in accordance with the license.
Image licensed from Fotolia. Copyright by foxysgraphic - Fotolia. Image modified in accordance with the license.
Pulled Pork Loin in the Oven
Make tender BBQ pulled pork from pork loin in the oven with a simple braising method. The pork loin shreds easily for juicy BBQ sandwiches or feeding a crowd.
Pulled Pork Loin in the Oven
Pulled pork loin on a bun with BBQ sauce.
Crock Pot Pork Loin Pulled Pork
Make tender, juicy shredded pork loin in your crock pot (slow cooker) with simple ingredients. Perfect for BBQ pulled pork sandwiches.
Crock Pot Pulled Pork Loin
shredded pork loin on a bun with sauce
Crock Pot Shredded Pork Tenderloin
This easy crock pot shredded pork tenderloin recipe makes healthy BBQ pulled pork tenderloin. Trim a pork tenderloin, coat it with BBQ rub, and a bit of liquid smoke in your slow cooker for 2-3 hours. You don't need a marinade or braising fluid. We enjoy delicious, moist, smoky pull pork for dinner or sliders for a small party.
Crock Pot Shredded Pork Tenderloin
Shredded pork tenderloin on a bun with BBQ sauce.

🍯 Top It Off: Sauces & Rubs

Homemade Memphis BBQ Sauce
Classic homemade Memphis-style BBQ sauce with tomato, sweetness, and a touch of spice. Ready in about 30 minutes and perfect for ribs, pulled pork, chicken, and more.
Memphis BBQ Sauce Recipe
BBQ sauce on pork
BBQ Dry Rub for Ribs, Pork, Beef, and More
The best BBQ Dry Rub recipes will enhance the meats' taste and complement the sauce's flavors. This easy-to-adjust homemade rub recipe has classic BBQ flavors.
BBQ Dry Rub Recipe
Spice for 8311 BBQ Rub
Memphis Dry Rub Recipe
A classic sweet and spicy Memphis Dry Rub Recipe from Marlowes of Memphis. Bring the great taste of Memphis to your grilled ribs or other BBQ recipes.
Memphis Dry Rub Recipe
Applying Memphis dry rub to baby back ribs

👍References to Help You

A Beginners Guide to Grill Temperature on a Gas Grill
Learn about grill temperatures on a gas grill. The most basic measurement to help you master your grill. Become the "Grill Master" today.
Grill Temperature on a Gas Grill
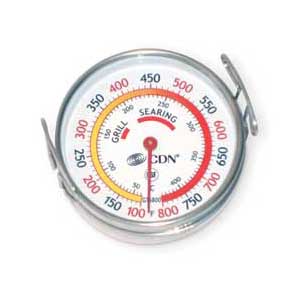
CDN Grill Surface Thermometer
How To Set Up Your Gas Grill for Smoking and Low and Slow Cooking
Let’s learn how to set up your gas grill for great low and slow cooking with smoking. A useful technique you need to master your gas grill.
Smoking on a Gas Grill
How To Set Up Your Gas Grill for Smoking and Low and Slow Cooking

Remember food safety. Check out the USDA Food Safety recommendations.

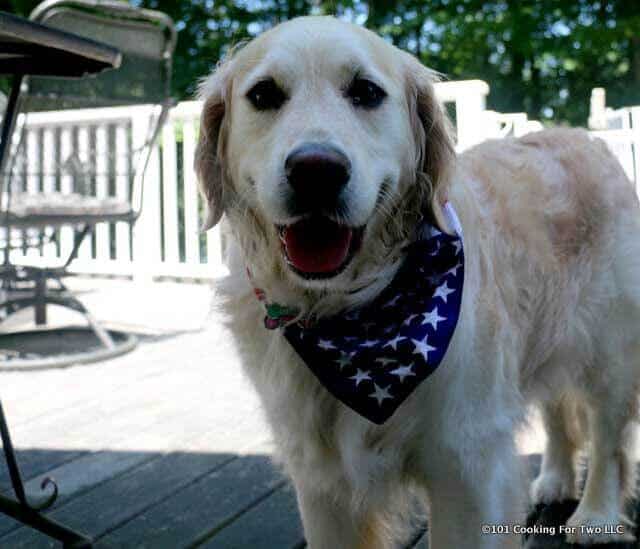
Lilly dog on the deck with a flag bandana
Lilly is on the deck, proudly showing the stars and stripes.

Lilly says, “Have a great summer!”

Wifo, Lilly, Molly, and DrDan

Originally Published April 28, 2019. Update with new recommendations and discussion, usually yearly.

How to Grill Sirloin Steak – Juicy, Quick & Easy

Grilled sirloin steak on a white plate.

Grill sirloin steak that's juicy, tender, and full of flavor with this easy method. Use simple seasoning for a classic grilled steak or an optional marinade for extra tenderness and flavor.

With the right grill temperature, sirloin steak grill time, and a few easy tips, you'll have perfectly grilled sirloin in about 10 minutes on a gas or charcoal grill.

❓Quick Answer: How Long to Grill Sirloin Steak?

Grill a 1-inch sirloin steak over high heat (500°–600°F grill surface temperature), flipping once.

  • Medium-rare (130°–135°F): 7–9 minutes
  • Medium (140°–145°F): 9–12 minutes
Grilled sirloin steak on a white plate.
[feast_advanced_jump_to]

quote mark
Featured Comment by Peter:
⭐⭐⭐⭐⭐
"Tried this recipe exactly as written. I had a sirloin steak that was almost a year old. The result was simply fantastic. Thank you"

🤔 TL;DR – Recipe Summary

What: Learn how to grill economical sirloin steak that's juicy, tender, and full of flavor with simple seasoning or an optional marinade.

Why: Get the right sirloin steak grill time for your preferred doneness and enjoy juicy, tender steaks every time.

How: Preheat a gas or charcoal grill to high heat, then grill to your preferred doneness, checking with an instant-read thermometer.

🐄 Ingredients

  • Sirloin steaks – Top sirloin is preferred, but any sirloin steak may be used. Leaner or tougher cuts benefit from a marinade or mechanical tenderizing. Choose steaks about 6–8 ounces and 1 inch thick.
  • Seasoning – Montreal Steak Seasoning or another steak seasoning mix you like. Salt, pepper, and garlic powder work fine too.

Optional: Bourbon Street–Style Marinade

Adds great flavor and helps tenderize, especially for regular sirloin.

  • Worcestershire sauce
  • Soy sauce
  • Spices – Chili powder, garlic powder, paprika, onion powder, oregano, pepper
  • Cayenne pepper – Optional, for heat
  • Adolph’s meat tenderizer – Optional but helpful for leaner cuts

👨‍🍳Quick Overview: How to Grill Sirloin Steak

1. Preheating

Clean and oil the grates. Preheat your gas or charcoal grill to high heat (500°–600°F surface temperature).
If you're using the marinade, wait to preheat until the steak is ready.

cleaning and oiling grill grates.

2. Preparing the steak

Trim your 1-inch sirloin steak and season to taste if you're not marinating.

Trimming fat from sirloin steak

Optional: If available, use a mechanical meat tenderizer, like a Jaccard tenderizer, to prep the meat.

mechanically tenderizing sirloin steaks.

Optional: Mix marinade. Place meat in marinade and refrigerate for 1-4 hours.

sirloin steak in bag of marinade.

✅ Pro Tip: For leaner or lower-grade cuts, use both a Jaccard and a meat tenderizer like Adolph’s in the marinade. It makes a real difference.

3. Grill

Grill the steak, flipping once halfway through cooking, until it reaches your preferred internal temperature. A 1-inch sirloin steak takes about 7–9 minutes for medium-rare or 9–12 minutes for medium.

sirloin steaks going onto the grill.

Let rest for 5 minutes before serving.

Grilled sirloin steak on a plate.

👇 Scroll down for the full recipe card with step-by-step photos—or keep reading for tips, serving ideas, and seasoning options.

⏰ How Long to Grill Sirloin Steak (Times & Doneness)

A 1-inch sirloin steak usually takes 7–12 minutes to grill over high heat, depending on your preferred doneness. Use these times as a guide, but always cook to the final internal temperature with an instant-read thermometer.

Approximate times by doneness

  • Rare (125°–130°F) – 6–7 minutes total
  • Medium-Rare (130°–135°F) – 7–9 minutes
  • Medium (140°–145°F) – 9–12 minutes
  • Medium-Well (150°–155°F) – 12–14 minutes (not recommended)
  • Well Done (160°F+ ) – 14+ minutes (really not recommended)

✅ Pro Tip: A ¾-inch sirloin steak cooks faster and is easier to overcook. A 1½-inch steak needs a few extra minutes or indirect heat to finish gently.

Keep in mind: These grill times assume the grill is fully preheated and the steak has rested at room temperature for about 20–30 minutes before cooking. A cold steak or cooler grill will usually take a little longer.

Let the steak rest for 5 minutes after grilling. It’ll continue to rise 2–4 degrees.

You can’t uncook a steak—but you can always give it another minute if needed.

👍 Tips for Juicy, Tender Sirloin Steak

  • Top sirloin is already tender enough for most cooks but can benefit from a little extra tenderizing. Lower-grade sirloin should be tenderized for the best results.
  • Don’t overcook sirloin. It’s leaner and cheaper than ribeye or strip steak—but also less forgiving, especially past medium.
  • Go for Prime or Choice grade if possible, and aim for 6–8 ounces per serving. A 1-inch thick steak is more forgiving than the thinner ¾-inch cuts.
  • Let the steak rest at room temp for 20–30 minutes before grilling. It helps cook more evenly, especially for thicker cuts.
  • Gas or charcoal both work. Just get the surface temp hot—around 500°F—and keep the lid closed while cooking.

🤔 How to Tenderize Sirloin Steak

Start with top sirloin if possible—it's naturally the most tender cut.

  • Use a mechanical tenderizer, like a Jaccard.
  • Marinate for 1–4 hours with soy sauce, Worcestershire sauce, and spices.
  • A light sprinkle of Adolph's meat tenderizer in the marinade can help, too.
  • Don't overcook—pull the steak at 130°–135°F for medium-rare or 140°–145°F for medium.
  • Let the steak rest, then slice thin across the grain before serving.

🧂 About the Marinade

This simple marinade boosts flavor and helps tenderize lean sirloin.
It’s inspired by the Bourbon Street Sirloin from Applebee’s™, but even without the branding, it just works.

No additional seasoning is needed if you use the marinade—skip the salt and pepper.

Marinade Ingredients

  • Worcestershire sauce
  • Soy sauce
  • Pantry spices – Chili powder, garlic powder, paprika, onion powder, oregano, black pepper
  • Cayenne pepper – Optional, for a bit of heat
  • Adolph’s meat tenderizer – Optional but recommended

✅ Pro Tip: Adolph’s works with an enzyme from pineapple—not MSG.

How Long to Marinate

You'll see results in as little as 30 minutes, but 1–4 hours provides more tenderness and flavor.

Make sure the meat is fully coated and kept cold in the fridge the entire time.

🧂 Other Seasoning Options

While I recommend the marinade, you can season sirloin like any other steak. A little salt and pepper works fine, or use your favorite mix like Montreal Steak Seasoning.

We often use All-Purpose Seasoning (7:2:1 or 7:2:2), which includes some garlic.

Want something different? Try one of these:

  • Cowboy Coffee Steak Rub – bold, smoky, and totally different
  • Simple Beef Kabob Marinade – great if you want something quick and flexible
  • Steak Kabob Marinade – a little more complex, but loaded with flavor

Join the Club—Subscribe Today

Stay in the loop with updates—details on the Subscription Page.

Wait a moment

Thank you for signing up! You should receive a confirmation email shortly. You MUST click to confirm your subscription email.

🔥 Other Grilled Steak Recipes

If you’re in a grilling mood, try one of these next:

  • Grilled Filet Mignon – tender and quick-cooking
  • Grilled New York Strip Steak – rich and beefy
  • Grilled Porterhouse Steak – big flavor, two cuts in one
  • Grilled Ribeye Steak – juicy, marbled, and full of flavor
  • Marinated Flank Steak – bold and perfect for slicing

🍽️ Serving Suggestions

Serve your grilled sirloin steak with one of these easy sides:

  • Grilled Red Potatoes
  • Grilled Corn on the Cob
  • Grilled Mixed Vegetables

Try a simple dessert like Grilled Pineapple or Apple Berry Crumble.

🥡 Leftovers and Storage

Store leftover steak in an airtight container in the fridge for 3 to 4 days, or freeze for up to 3 months.

Slice it cold across the grain for salads, wraps, or steak and eggs.

To reheat, use a skillet over low heat with a bit of oil. Add a splash of water and cover to keep it from drying out.

❓FAQs

Can I cook a sirloin steak on an indoor grill like a George Foreman?

Yes.
• Rest steaks to room temperature and season.
• Preheat for about 5 minutes.
• Cook a 1-inch sirloin in 4–8 minutes to 130°–135°F for medium-rare. ¾-inch steaks take 3–6 minutes.
• Flip and rotate halfway through cooking for the most even browning.
• Because both sides cook at once, times are shorter than outdoor grills.
• If you used a marinade, check at the 3–4 minute mark to be sure it isn’t scorching.
• Always use an instant-read thermometer, since indoor grills can cook faster than you expect.

What is sirloin steak, and which part is best?

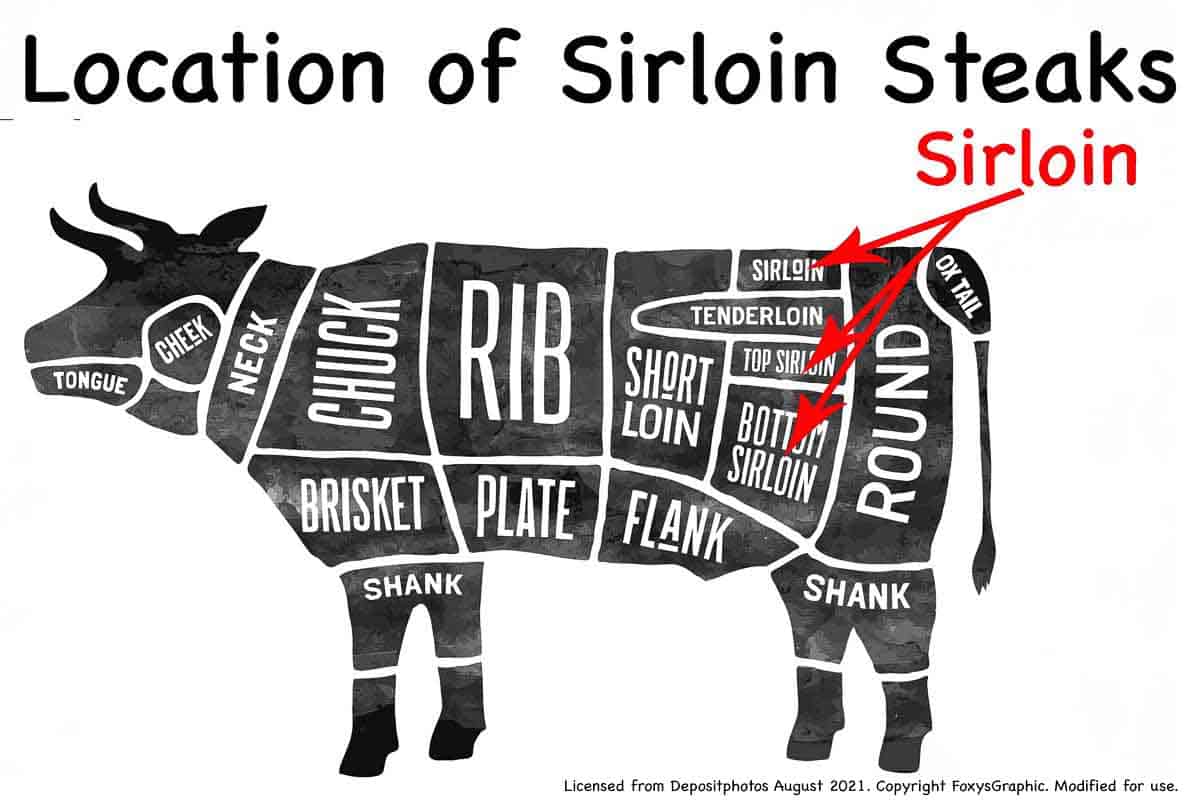
Sirloin comes from a well-used muscle group behind the short loin, so it’s leaner and a bit tougher than ribeye or strip steak. That also makes it more affordable.

Top sirloin is the most tender cut in this section and is usually labeled that way. Bottom sirloin is what most “sirloin steaks” are, and it’s less tender but still tasty when cooked right. The tri-tip roast also comes from the bottom sirloin, and under that is the sirloin tip roast.

If you're outside the U.S., this can get confusing—what Americans call sirloin may be called the rump elsewhere.Location of Sirloin

📖The Recipe Card

Grilled sirloin steak on a white plate.
Print Recipe Add to Collection Go to Collections
5 from 3 votes

How to Grill Sirloin Steak – Juicy, Quick & Easy

Juicy, tender sirloin steak in about 10 minutes on high heat. Season simply or use a quick marinade—either way, it's flavorful and foolproof.
Prep Time2 hours hrs
Cook Time10 minutes mins
Total Time2 hours hrs 10 minutes mins
Course: Beef, Main Course
Cuisine: American
Keyword: Grilled Sirloin Steak, how long to grill sirloin steak, sirloin steak marinade
Servings: 2
Calories: 474kcal
Author: Dan Mikesell AKA DrDan

Ingredients

  • 2 sirloin steaks 6 to 8 oz and 1 inch thick each
  • salt and pepper to taste or seasoning of choice.

Suggested Steak Marinade (do not add other seasoning if used)

  • 2 tablespoons Worcestershire sauce
  • 2 tablespoons soy sauce
  • 4 teaspoons chili powder
  • 2 teaspoons garlic powder
  • 2 teaspoons paprika
  • 2 teaspoons pepper
  • 1½ teaspoons Adolf's meat tenderizer optional
  • 1 teaspoon cayenne pepper optional
  • 1 teaspoon onion powder
  • ½ teaspoon oregano
  • 1 cup water
US Customary - Convert to Metric

Instructions

Preheat the grill

  • Clean and oil the grates. Preheat to high—aim for a surface temp over 500°F. If you're using the marinade, wait to preheat until the steak is ready.
    (This works great on gas or charcoal grills.
    clean and oil grill crates

Prepare the steak

  • Trim your sirloin. If not marinating, season to taste.
    Trimming fat from sirlion steak.
  • Optional: Use a mechanical tenderizer like a Jaccard if you have one.
    mechanically tenderizing sirloin steaks.
  • Optional Marinade: In a 1-gallon zip lock bag, mix 1 cups water, 2 tablespoons Worcestershire sauce, 2 tablespoon soy sauce, 4 teaspoons chili powder, 2 teaspoons garlic powder, 2 teaspoons paprika, 2 teaspoons pepper, 1½ teaspoon Adolf's meat tenderizer, 1 teaspoon cayenne pepper, 1 teaspoon onion powder, and ½ teaspoon oregano.
    Add the steaks and refrigerate for 1 to 4 hours.
    sirloin steak in bag of marinade.

Grill

  • Let the steak rest at room temperature while the grill heats. Grill with the lid closed, flipping every 5 minutes, until the internal temp reaches 140°–145°F for medium-rare—usually 9 to 12 minutes total.
    sirloin steaks on the grill over direct heat.
  • Let rest for 5 minutes before serving.
    Grilled sirloin steak on a plate.

Notes

Pro Tips:

  • Top sirloin is preferred—6 to 8 oz and about 1 inch thick.
  • Regular sirloin should be tenderized for best results. Top sirloin often does fine without.
  • Both mechanical (like a Jaccard) and chemical (Adolph’s) tenderizing can be used. You can skip one or both, but the steak may be less tender.
  • The marinade works in 1 hour but is better at 2–4 hours.
  • Thicker steaks will need more time.
  • Use an instant-read thermometer—never cook steak by time alone.

Nutrition

Calories: 474kcal | Carbohydrates: 2g | Protein: 46g | Fat: 29g | Saturated Fat: 12g | Polyunsaturated Fat: 1g | Monounsaturated Fat: 12g | Cholesterol: 106mg | Sodium: 807mg | Potassium: 750mg | Fiber: 1g | Sugar: 1g | Vitamin A: 1200IU | Vitamin C: 1.7mg | Calcium: 70mg | Iron: 4mg

Originally Published May 1, 2010. Updated with expanded options, refreshed photos, and a table of contents to help navigation.

Lilly dog head shot with toy.

Easy Mexican Rice

Mexican rice on a fork

This Easy Mexican Rice Recipe is ready in 30 minutes with pantry ingredients. Better than many restaurants, it is perfect for your favorite homemade Mexican dinner.

Mexican rice on a fork
[feast_advanced_jump_to]
Blue ribbon divider used for visual effect

Restaurant-quality Mexican Rice, also known as red rice or Arroz Rojo, needs three things. Many restaurant versions lack at least one of these areas — many in 2 or even all three. A few will get it all right.

  1. Texture—not sticky—each grain of rice needs to stand out and not stick together.
  2. Tenderness—soft but not mushy.
  3. Tastiness—it needs excellent taste.

This recipe hits all three requirement and it is easy to make with pantry ingredients in 30 minutes. It uses your favorite salsa as flavoring simplifies the ingredients, and you will love the flavor.

This rice is the perfect side dish for most Tex-Mex recipes like Taco meat from scratch, Sour Cream Chicken Enchiladas, Chicken Quesadillas, Chicken Enchilada Casserole, and Sheet Pan Chicken Fajitas. And check out my Easy Guacamole Recipe and Pineapple Mango Salsa.

🍚Ingredients

  • Long Grain White Rice - If using other rice, adjust the time accordingly.
  • Salsa - Use salsa you like. It will provide much of the taste and replace tomato sauce or diced tomatoes, onion, chili powder, and green chiles.
  • Spices - Cumin and crushed garlic. Garlic powder could be used instead of fresh garlic cloves. Also, no taco seasoning is needed, thanks to the salsa.
  • Broth - Chicken or vegetable stock or broth. You may use bouillon cubes in water, or just water will work with only slightly decreased flavor.
  • Optional Additions - Jalapeno, peas, corn, or carrots.

👨‍🍳How to Make Mexican Rice

  1. Brown the uncooked rice over medium-high heat in a large skillet.
  2. Cook until nicely toasted—no need to rinse the rice before browning. If using fresh garlic, add it at the last minute of browning.
  3. Add the salsa, broth, and other seasonings. Also, if using the additions, add them at the same time.
  4. Bring to a boil and then decrease to a simmer. Cover with a lid and simmer for about 20 minutes until the rice is tender.
  5. Remove from heat and let set for a few minutes, then fluff with a fork.

↕️How to make this a "for two" or "family size" recipe

This is a very easy recipe to cut in half or double. As written, it makes 4 servings.

  1. Use the recipe card and adjust the number of servings to the number of servings you want.
  2. Use the amount of ingredients in the ingredient list, not the instructions—those do not adjust.
  3. Cook for the same amount of time.

What is the difference between Spanish Rice and Mexican Rice?

Many people will use the two terms interchangeably, but there are not quite the same.

The two use similar ingredients, except that the Spanish recipe will usually have firmer rice and frequently saffron giving it more of a yellow color and different taste. Mexican rice is fluffier and uses cumin.

If you want firmer rice, brown it a bit more. I call my Mexican rice but call it what you want.

❓FAQs

How to serve Mexican rice?

Serve on a plate with your favorite Mexican foods and some refried beans with a sprinkle of cheese and chopped cilantro.

You may also use Mexican rice as part of burritos, burrito bowls, or other dishes.

How to make Mexican Rice ahead and store leftovers?

To make Mexican rice ahead, cook as directed and allow it to cool. Seal in an airtight container in the refrigerator for the next day. You may store it for 3-4 days, but the longer it is stored, the poorer the texture.

You may freeze the rice for 2 months airtight in a container or ziplock bag, then thaw it overnight in the refrigerator before reheating. I do find frozen rice loses some texture.

Reheat in the microwave or on the stovetop for a few minutes.

Blue ribbon divider used for visual effect
↑Jump to Table of Contents

This recipe is listed in these categories. See them for more similar recipes.

Mexican Recipes, Side Dish Recipes

Have you tried this recipe, or have a question? Join the community discussion in the comments.

Step-by-Step Photo Instructions

long grain rice with Mexican seasoning

Long-grain rice is preferred. Some people like to rinse the rice but you need to brown the rice and wet rice does not brown well.

adding uncooked rice to hot oil in a skillet

Heat 2 tablespoons oil in a large nonstick pan over medium heat until hot. Add 1 cup of long-grain rice.

browning rice in skillet

Toast until nicely brown, about 8-9 minutes. In the last minute of toasting, add 1-2 cloves of crushed garlic if using fresh garlic.

pouring salsa into browned rice

Add 1 cup of your favorite salsa and 1 cup of chicken broth. Add ½ teaspoon ground cumin, ½ teaspoon garlic powder if not using fresh, and ½ teaspoon salt. You may add optional jalapenos, peas, corn, or carrots. Bring to a boil, then decrease to low heat and cover. Simmer for 20 to 25 minutes until tender.

cooked Mexican rice on a wooden spoon

Remove from heat, let sit for a few minutes, then fluff. Cover until serving.

cooked Mexican rice on a white plate
↑Jump to Table of Contents

📖The Recipe Card

Mexican rice on a fork
Print Recipe Add to Collection Go to Collections
4.46 from 22 votes

Easy Mexican Rice

This Easy Mexican Rice Recipe is ready in 30 minutes with pantry ingredients. Better than many restaurants, it is perfect for your favorite homemade Mexican dinner.
Prep Time10 minutes mins
Cook Time20 minutes mins
Total Time30 minutes mins
Course: Side Dish
Cuisine: Mexican
Keyword: Mexican Rice, Spanish Rice
Servings: 4
Calories: 261kcal
Author: Dan Mikesell AKA DrDan

Ingredients

  • 1 cup long grain rice rinse optional
  • ½ teaspoon ground cumin
  • ½ teaspoon salt
  • 1-2 cloves crushed garlic or ½ teaspoon garlic powder
  • 1 cup salsa
  • 1 cup chicken broth
  • 1-2 tablespoons oil for browning rice

Optional ingredients - add with broth

  • 1 jalapeno diced or minced
  • ⅓ cup peas frozen or fresh
  • 1 carrot small, diced
US Customary - Convert to Metric

Instructions

  • Long-grain rice is preferred. Some people like to rinse the rice but you need to brown the rice and wet rice does not brown well.
    long grain rice with Mexican seasoning
  • Heat 2 tablespoons oil in a large nonstick pan over medium heat until hot. Add 1 cup of long-grain rice.
    adding uncooked rice to hot oil in a skillet
  • Toast until nicely brown, about 8-9 minutes. In the last minute of toasting, add 1-2 cloves of crushed garlic if using fresh garlic.
    browning rice in skillet
  • Add 1 cup of your favorite salsa and 1 cup of chicken broth. Add ½ teaspoon ground cumin, ½ teaspoon garlic powder if not using fresh, and ½ teaspoon salt. You may add optional jalapenos, peas, corn, or carrots. Bring to a boil, then decrease to low heat and cover. Simmer for 20 to 25 minutes until tender.
    pouring salsa into browned rice
  • Remove from heat, let sit for a few minutes, then fluff. Cover until serving.
    cooked Mexican rice on a wooden spoon

Notes

Pro Tips

  1. This recipe adjusts up or down in size easily.
  2. You can use different rice and adjust the cooking time. Always simmer until tender.
  3. Rinsing the rice is felt by some to prevent sticking of rice. To me, the browning takes care of that and it is hard to brown wet rice.
  4. Add the optional jalapeno, peas, corn, and carrot if you want.
  5. Good refrigerated for 3-4 days, but I do not like to freeze rice, but it may be frozen for 3-4 months but may lose some texture.
  6. The serving size is ½ cup.

Nutrition

Calories: 261kcal | Carbohydrates: 42g | Protein: 6g | Fat: 8g | Saturated Fat: 1g | Sodium: 769mg | Potassium: 289mg | Fiber: 2g | Sugar: 3g | Vitamin A: 312IU | Vitamin C: 1mg | Calcium: 32mg | Iron: 1mg

Editor's Note: Originally Published August 10, 2014. Updated with expanded options, refreshed photos, and a table of contents to help navigation.

Lilly with the ball with Molly next to the patio
Lilly is 7 ½ months

30-Minute Chicken Fajitas with Quick Homemade Marinade

Close up image of a chicken fajita on a white plate

These 30-minute chicken fajitas are quick, flavorful, and beginner-friendly. A fast marinade adds bold Tex-Mex flavor, and everything cooks in one pan for easy cleanup. It’s the kind of weeknight dinner that’s ready when you are—no fancy steps, just real results.

chicken fajita on a white plate.
[feast_advanced_jump_to]

quote mark
Featured Comment by Charlene:
⭐⭐⭐⭐⭐
"We had these tonight for dinner, and WOW fantastic! I was really curious about the lime, liquid smoke, and soy sauce together and these were amazing!"

❤️ Why You’ll Love This Recipe

  • Minimal Cleanup: Everything cooks in one pan, so cleanup is fast and painless.
  • Quick & Easy: From prep to plate in just 30 minutes—perfect for busy weeknights.
  • Flavorful Marinade: A zesty blend of lime juice, garlic, and spices adds bold, citrusy taste and a touch of authentic Mexican fajita flavor.
  • Healthy Ingredients: Lean chicken and fresh vegetables keep it light, low fat, and wholesome.
  • Customizable: Make it mild or spicy, and load it up with your favorite toppings or low-carb wraps.

🛒 Ingredients for quick and flavorful fajitas

Chicken wiith veggies and seasoniongs—labeled.

Chicken: Boneless, skinless breasts keep it lean and healthy. Thighs work too if you like a little more richness.

✅ Chicken thighs will be juicier, but chicken breasts keep it lean and low fat.

Vegetables: Classic fajita mix—sliced bell peppers and onions for color, crunch, and natural sweetness.

Marinade: A quick homemade blend of olive oil, lime juice, garlic, and pantry spices—just enough flavor to make it taste like you planned ahead.

✅Pro Tip: One medium lime will yield 2 tablespoons of juice.

Want some heat? Add a pinch of cayenne pepper, a chopped jalapeño (seeds removed), or a splash of hot sauce for a spicy kick.

✅Pro Tip: You can prep the marinade and slice the vegetables ahead of time to save even more time at dinner.

Serving options: Tortillas (flour or corn), sour cream, guacamole, shredded cheese, fresh cilantro, and lime wedges. Keep it simple or make it your own.

✅Pro Tip: Warm tortillas before serving—just a few seconds in the microwave wrapped in a clean towel, or heat them in a dry skillet or oven. It makes them soft, flexible, and a whole lot more enjoyable than straight from the bag.

👨‍🍳Quick Overview: How to Make Marinated Chicken Fajitas

1. Trim and marinate the chicken

Mix up the marinade, then cut the chicken into ½-inch strips. Toss it in the marinade and let it sit for at least 15 minutes. For more flavor, give it up to 2 hours in the fridge—but don’t go over 8 hours.

chicken in the marinade in a bag.

✅Pro Tip: Cutting across the grain (the direction the muscle fibers run) helps keep the chicken tender and easier to chew. Look for the lines in the meat and slice perpendicular to them for best results.

2. Preparing vegetables

Clean and slice the bell peppers and onion. Cook them in a bit of oil over medium-high heat, adding soy sauce and lime juice as they soften. Cook until the onions are clearing and browning—about 8 to 9 minutes. Remove from the skillet and cover to keep warm.

cooking peppers and onions in a cast iron skillet.

3. Cooking the chicken

Add a little more oil to the same pan. Drain the chicken from the marinade and add it to the hot pan. Cook until browned and the internal temperature hits 165°—don’t overcook.

cooking chicken in the skillet.

✅Pro Tip: Always check the largest pieces with a meat thermometer. Chicken needs to hit 165° to be safe to eat—no guessing when it comes to poultry.

4. Combine the chicken and vegetables to serve

Return the vegetables to the pan with the chicken and stir together for a couple of minutes to reheat. Ready to serve.

cooked chicken with peppers and onion in cast iron skillet.

For complete step-by-step instructions, scroll down to the printable recipe card or keep reading for tips, flavor options, and serving ideas.

👍 Tips for Success

  • Marinating Time: Even 15 minutes adds flavor, but up to 2 hours will give you more depth. Don’t go beyond 8 hours—the acid in the marinade can start to break down the chicken and make it mushy.
  • High Heat Cooking: Use medium-high to high heat for a good sear on the chicken and some browning on the vegetables.
  • Use a Cast Iron Skillet: Any large skillet works, but cast iron holds heat well and is ideal for keeping everything warm at the table.
  • Rest the Chicken: Let the cooked chicken sit for a few minutes before slicing. This helps keep the juices in the meat where they belong.

🍽️ Serving Suggestions

Serve with warmed or slightly charred flour or corn tortillas and your favorite toppings. Think shredded cheddar or Mexican cheese blend, diced tomatoes, sliced jalapeños or green onions, fresh cilantro, sour cream—whatever you like. Or let everyone build their own fajitas at the table for a fun, hands-on meal.

For great traditional side dishes, try corn chips with Pineapple Mango Salsa, refried beans, Easy Guacamole, or Mexican Rice.

✅Pro Tip: Keeping it low carb? Skip the tortillas and serve the chicken and vegetables in large lettuce leaves for a fresh, lighter option.

🍗 More Chicken Fajita Recipes

Don’t miss these other easy chicken fajita favorites—there’s a version for every mood and every night of the week:
Sheet Pan Chicken Fajitas, Slow Cooker Chicken Fajitas, Grilled Chicken Fajitas, and Chicken Fajita Quesadillas.

❄️Storage of Leftovers

Store any leftovers in an airtight container in the refrigerator for 3 to 4 days. Reheat gently on the stovetop or covered in the oven. The microwave works in a pinch, but it can change the texture of the chicken.

The chicken freezes well, but the cooked vegetables tend to lose their texture—still tasty, just a little softer.

❓FAQs

How to warm tortillas?

Wrap tortillas in foil and heat in a low oven, or warm them in the microwave. Sprinkle with a few drops of water, wrap in a clean kitchen towel, and microwave a stack for 10–20 seconds.

You can also lightly char them in a dry skillet over medium-high heat—about a minute per side. Warm them through and add a little browning, but don’t cook them too long.

What if I don't have lime juice?

Lemon juice works in a pinch, though the flavor will be slightly different. Orange juice can also be combined with lime or lemon for a sweeter citrus flavor.

Are corn tortillas gluten-free?

Yes, most corn tortillas are gluten-free, but always double-check the label to be sure.

📖The Recipe Card

Close up image of a chicken fajita on a white plate
Print Recipe Add to Collection Go to Collections
5 from 4 votes

30-Minute Chicken Fajitas (One-Pan & Flavor-Packed)

Make sizzling chicken fajitas at home with fresh peppers, onions, and a quick lime-garlic marinade. A one-pan, full-flavor recipe even beginners can master.
Prep Time10 minutes mins
Cook Time20 minutes mins
Total Time30 minutes mins
Course: Main Course
Cuisine: Mexican
Keyword: Chicken Fajitas, Easy Chicken Fajitas, Lime Juice, Traditional chicken Fajitas
Servings: 4 servings
Calories: 293.8kcal
Author: Dan Mikesell AKA DrDan

Ingredients

  • 1½ to 2 pounds Skinless boneless chicken breasts cut into thin slices

Marinade

  • 2 tablespoons Lime juice one lime
  • 4 tablespoons Water
  • 1 tablespoon Olive oil
  • 1 teaspoon Kosher salt
  • ¼ teaspoon Black pepper
  • 1 teaspoon Soy sauce
  • 1-2 cloves Garlic crushed
  • ½ teaspoon Cayenne pepper—optional adjust for heat
  • ¼ teaspoon Liquid smoke—optional

Vegetables

  • 2 Bell peppers-any color
  • 1 Large onion
  • 1 teaspoon Olive oil
  • 1 tablespoon Water
  • 1 teaspoon Soy sauce
  • 1 teaspoon LIme juice (one medium lime)

Serving

  • 4-6 Flour tortillas
  • Shredded cheese (cheddar or Mexican mix)
  • Sour cream
  • Salsa
  • Guacamole
US Customary - Convert to Metric

Instructions

Step 1 — Mixing Marinade

  • Start by mixing the marinade in a 1-gallon zip lock bag: 2 tablespoons lime juice, 4 tablespoons water, 1 tablespoon olive oil, 1 teaspoon kosher salt, ¼ teaspoon liquid smoke (optional), ½ teaspoon cayenne pepper, ¼ teaspoon black pepper, 1 teaspoon soy sauce, 1-2 cloves of garlic crushed.
    Chicken wiith veggies and seasoniongs—labeled.

Step 2 — Chicken Prep

  • Clean and trim about 1½ to 2 pounds of skinless boneless chicken breasts. Cut the chicken into strips about ½ inch thick.
    raw chicken breasts sliced on a white board
  • Add to the marinade and let sit for at least 15 minutes—2 hours in the fridge is better. Don’t exceed 8 hours.
    chicken in the marinade in a bag

Step 3 — Vegetable Prep and Cooking

  • Heat 1 teaspoon of olive oil in a large cast-iron pan over medium-high heat. While heating, slice up a large onion and two peppers. In a small bowl, mix 1 tablespoon water, 1 teaspoon lime juice, and 1 teaspoon soy sauce.
    chopped onion with red and green pepper on a black board
  • Add veggies to the pan. After a few minutes, pour in the lime-soy mixture. Cook until onions are soft and browning—about 8 to 9 minutes. Remove and cover to keep warm.
    cooking peppers and onions in a cast iron skillet

Step 4 — Chicken Cooking

  • Add a little more oil to the pan. When hot, add the drained chicken. Cook until browned and the internal temperature reaches 165°F—about 8 to 9 minutes. Use a meat thermometer to check the largest pieces.
    cooking chicken in the skillet

Step 5 — Combine and Serve

  • Return the vegetables to the skillet and cook for 1 to 2 minutes, just to heat everything through.
    cooked chicken with peppers and onion in cast iron skillet
  • Serve hot in the skillet with warmed tortillas and your favorite toppings, such as sour cream, guacamole, and salsa.
    chicken fajita on a white plate

Notes

Pro Tips

  1. Lime juice is important; liquid smoke is optional. If using it, make sure it’s high quality.
  2. This has a touch of heat—cut back the cayenne for a milder version.
  3. Chicken breasts or thighs both work well.
  4. Use raw chicken only. This recipe is not designed for pre-cooked chicken.
  5. Fajitas will keep in the refrigerator for up to 4 days and reheat well.
Nutrition note: The nutrition is meat and vegetables only, no toppings or tortillas. And ⅓ of the marinade is counted as absorbed, which is probably too high.

Nutrition

Calories: 293.8kcal | Carbohydrates: 3.6g | Protein: 48.8g | Fat: 8.1g | Saturated Fat: 1.5g | Polyunsaturated Fat: 1.3g | Monounsaturated Fat: 3.2g | Trans Fat: 0.03g | Cholesterol: 145.2mg | Sodium: 547.6mg | Potassium: 905.5mg | Fiber: 0.7g | Sugar: 1.3g | Vitamin A: 176.6IU | Vitamin C: 6.3mg | Calcium: 23mg | Iron: 1mg

Originally Published May 3, 2012. Updated with expanded options, refreshed photos, and a table of contents to help navigation.

Molly sunning herself.

Crispy Roasted Baby Red Potatoes

Roasted red potatoes on a white plate.

These roasted baby red potatoes have crisp golden edges and tender centers with just olive oil, garlic, and salt. It’s an easy oven recipe that goes with almost any meal.

Baby reds are my usual choice, but little Yukon Gold or fingerling potatoes work, too. Roast them on a sheet pan at the temperature that fits the rest of dinner.

⏱️ Quick Answer: How Long to Bake Red Potatoes

For baby or small red potatoes cut to 1 inch or less thick:

  • 400°F (375°F convection): about 35 minutes
  • 425°F (400°F convection): about 30 minutes
  • 350°F conventional: about 45 minutes

Done: Golden edges and fork-tender centers, about 200°–210°F. Larger pieces take longer.

Roasted red potatoes on a white plate.
[feast_advanced_jump_to]

quote mark
Featured Comment by Ginny:
"Absolutely love, love these!"

📝 TL;DR — Recipe Summary

  • What: Crispy roasted baby red potatoes with tender centers.
  • Why: Simple ingredients and flexible oven temperatures make them an easy side dish.
  • How: Cut small, soak and dry, season, then roast in the oven in a single layer until fork-tender.

🥔 Ingredients

Red potatoes with garlic and oil—labeled.
  • Small red potatoes — Baby reds work best; other small, thin-skinned potatoes also work. Cut larger ones into 1-inch chunks.
  • Olive oil — Helps the edges brown.
  • Garlic — Fresh or garlic powder.
  • Salt — Kosher or sea salt.
  • Optional — Fresh herbs or grated Parmesan for finishing.

👨‍🍳 Quick Overview: How to Roast Baby Red Potatoes in the Oven

1. Prep: Cut potatoes to 1 inch or less thick; soak, rinse, and dry well.

Chopped little red potatoes on a wooden board.

2. Season: Toss with olive oil, garlic, and salt.

Coating potatoes with oil and garlic in a bowl.

3. Arrange: Spread in one layer on a rimmed sheet pan.

Cut red potatoes spread on a sheet pan.

4. Roast: Bake until golden and fork-tender.

Roasted baby potatoes on a sheet pan.

👇 Scroll for the printable recipe card and full step-by-step photos — or keep reading for tips and variations.

⏲️ How Long to Bake Baby Red Potatoes

For potato pieces 1 inch or less thick, use these oven times as starting points:

  • 350°F conventional: about 45 minutes
  • 375°F (350°F convection): about 40 minutes
  • 400°F (375°F convection): about 35 minutes
  • 425°F (400°F convection): about 30 minutes
  • 425°F convection: about 25 minutes

Oven accuracy, potato size, and the pan can change the timing. Roast until the edges are golden and the centers are fork-tender. If you check with a thermometer, aim for about 200°–210°F; at 190°F, they usually need longer.

👍 Options and Variations

  • Other potatoes: Small Yukon Gold, purple, or fingerling potatoes work. Cut larger thin-skinned potatoes into 1-inch chunks.
  • Seasonings: Add dried herbs or black pepper before roasting. Add fresh rosemary or thyme near the end so they don’t burn.
  • Parmesan: Sprinkle grated Parmesan on the hot potatoes right after roasting.

🍽️ When to Serve

Serve with Baked Bone-In Chicken Breasts, Crispy Oven Baked Chicken Thighs, or Pan Seared Pork Tenderloin.

✅ Pro Tip: They’ll stay hot loosely tented with foil while the main dish finishes, but the edges are crispest straight from the oven.

❄️ How to Store and Reheat

Store leftover roasted baby red potatoes in an airtight container in the refrigerator for 3–4 days. I don’t recommend freezing; the texture suffers.

Reheat in the oven, air fryer, or a skillet to bring back some crispness. The microwave is quickest, but the edges will be soft.

👨‍🍳 Potato Recipes

Love potatoes? Try these other easy sides:

  • Crispy Smashed Potatoes
  • Crispy Parmesan Baked Potatoes
  • Crispy Baked French Fries
  • Cheesy Potatoes (from Scratch with Real Potatoes)

❓ FAQs

Can I prep the potatoes ahead?

Yes. Cut them a day ahead and refrigerate them covered with water. Drain and dry thoroughly before adding oil and roasting.

Can I use larger potatoes?

Cut larger red or Yukon Gold potatoes into 1-inch chunks. I don’t recommend russets for this recipe; their thicker skins and starchier texture give a different result.

📖The Recipe Card

Roasted red potatoes on a white plate.
Print Recipe Add to Collection Go to Collections
5 from 2 votes

Crispy Roasted Baby Red Potatoes

Roast baby red potatoes in the oven until golden and fork-tender, about 30–35 minutes for small potatoes. Simple, crispy, and reliable.
Prep Time5 minutes mins
Cook Time35 minutes mins
soaking time15 minutes mins
Total Time55 minutes mins
Course: Potato
Cuisine: American
Keyword: Roasted Baby Red Potatoes, Roasted Little Red Potatoes, Roasted Small Potatoes
Servings: 4 servings
Calories: 120.5kcal
Author: Dan Mikesell AKA DrDan

Ingredients

  • 1 pound little potatoes red or other thin-skinned potatoes
  • 1 tablespoon olive oil
  • 2 teaspoons crushed or minced garlic about 2 medium cloves
  • 1 teaspoon kosher salt
US Customary - Convert to Metric

Instructions

  • Preheat the oven to 400°F (375°F convection). If baking with other dishes, match their oven temperature and adjust the potatoes’ cooking time as needed.
    Red potatoes with garlic and oil—labeled.
  • Scrub the potatoes and cut into pieces about 1 inch or less thick. Soak in cold water for 15–30 minutes, then rinse to remove surface starch for a crispier surface. Dry completely.
    Copped little rec potatoes on a wooden board.
  • In a mixing bowl, combine the potatoes, 1 tablespoon of olive oil, 2 teaspoons of crushed or minced fresh (or jar) garlic (2 medium cloves), and 1 teaspoon of kosher salt. Stir well until all the potatoes are well covered.
    Coating potatoes with oil and garlic in a bowl.
  • Spread evenly over a large rimmed oiled baking pan. Keep them separated so they can brown nicely. Arrange cut sides up for better browning.
    speading cut potatoes over sheet pan
  • Bake for about 35 minutes, until nicely browned and tender inside. The internal temperature should be 200°–210°F.
    roasted baby potatoes on a sheet pan

Notes

Pro Tips

 
  • Use any little thin-skinned potatoes like baby red potatoes, Yukon Gold, or many others.
  • Easy to scale. Plan about ¼ to ⅜ pound per serving.
  • Cut into pieces, but keep them about 1 inch or less thick. Larger thin-skinned potatoes can be used and cut into smaller pieces.
  • Don't skimp on the oil, and season to your taste.
  • Suggested oven temperature is 400°F, but match other dishes you are cooking and adjust the time.
  • Usually, the color is a good endpoint, but if unsure, a done potato has an internal temperature of at least 200°F.
  • Alternate oven temperatures are discussed in the post.

Nutrition

Calories: 120.5kcal | Carbohydrates: 20.3g | Protein: 2.4g | Fat: 3.6g | Saturated Fat: 0.5g | Polyunsaturated Fat: 0.4g | Monounsaturated Fat: 2.6g | Sodium: 588.5mg | Potassium: 483.6mg | Fiber: 2.5g | Sugar: 0.9g | Vitamin A: 2.4IU | Vitamin C: 22.8mg | Calcium: 16.7mg | Iron: 0.9mg

Editor's note: This recipe was first published on April 10, 2012. It has been re-edited with improved text and pictures for easier navigation.

Dogs with toys lined up on an a brown carpet.
This happened when Molly and Lilly were left home alone for 6 hours while we went to the Eagles concert.

Easy Banana Nut Muffins in 30 Minutes

banana nut mufffin on rack

Banana Nut Muffins are moist and tender with a sweet, crunchy top and nuts. This easy recipe only needs 2 bananas, some nuts, pantry ingredients, and 30 minutes.

These banana nut muffins are delicious, tender, and moist with crunchy walnuts. It's so good you will hide a couple of bananas for muffins later.

🍌Ingredients

Ripe Bananas
Butter
Vanilla extract
Milk
Chopped nuts—walnuts or pecans
Pantry ingredients: All-purpose flour, sugar, baking soda, baking powder, salt, cinnamon, and nutmeg (optional).

banana nut mufffin on rack.
[feast_advanced_jump_to]
Blue ribbon divider used for visual effect

Featured Comment from Beth:
"5 stars. These banana nut muffins are amazing. So moist with great flavor."

They will fit a healthy diet like a low-calorie or low-fat diet. You will have a great start on a healthy breakfast, a special snack, or freeze them for later.

This banana nut muffin recipe only needs a bit of hand mixing—no mixer is required. It uses 2 to 3 ripe bananas and some kitchen staples you already have. Just follow the easy step-by-step photo instructions.

👨‍🍳How to Make Banana Nut Muffins

  1. Mix wet ingredients by mashing 2 large overripe bananas, melted butter, an egg, and vanilla extract. Mix well and add enough milk to make 2 cups of wet ingredients.
  2. Mix all the dry ingredients and chopped walnuts in a large bowl.
  3. Mix wet ingredients into dry ingredients. Do not over-mix.
  4. Pour batter into prepared muffin tin with paper liners, sprinkle top with sugar and optionally additional nuts.
  5. Bake in preheated oven until a toothpick comes out clean.

For more details, keep reading. See the Recipe Card below for complete instructions and to print.

⏰How long to bake muffins?

Standard-size muffins will take 20-25 minutes. Start checking at the low end of the range. There are a few variables, like your exact oven temperature, the pan, and the fullness of the muffin tin.

Three ways to tell when a muffin is done

  • Lightly press on the top of the muffin, and if it pops back quickly and leaves no indentation, it is done.
  • The toothpick test—insert a toothpick in the top center of the muffin. It is done when the toothpick comes out clean.
  • Internal temperature—a fully cooked muffin will have an internal temperature of 200°to 205°.

Other banana nut and muffin recipes

Try these related recipes like Betty Crocker Banana Bread, Oven Baked Banana Pancakes, Banana Nut Cookies, and Banana Nut Cake. Other muffin recipes like Apple Muffins, Strawberry Cinnamon Muffins, and Whole Wheat Blueberry Muffins.

👨‍🍳Making mini or jumbo muffins

This recipe is for 12 standard-size muffins, but you can make different sizes. Make them like you want: mini, regular, or jumbo. Just cook to the endpoint and not by time.

Generally, bake mini muffins for 10 to 15 minutes and jumbo muffins for 25 to 30 minutes.

🖊️Variations and Options

  • Additions and substitutions: I don't usually add anything else. But common suggestions are blueberries, cranberries, and chocolate chips.
  • Nuts: Walnuts are the classic nuts, but pecans are commonly used. Or skip the nuts to make banana muffins.
  • Topping: I suggest a simple sprinkle of sugar or brown sugar, giving a nice crust on top. A sprinkle of chopped walnuts with sugar is a nice touch. You can make a streusel topping, but I don't feel it is needed.
  • Pump it up: A tablespoon or two of strong coffee may increase the "banana taste." Add it to the liquid before topping it off with milk.

✔️Tips for making the best muffins

  • Get the liquid ingredient volume correct. Bananas vary in size—two large or three medium will get the 1 ½ cups you need. A little less will be made up with milk.
  • Do not overmix. Mix until the dry ingredients are all incorporated into the batter, but stop then.
  • Do not overbake. The oven and pan will vary the baking time. For perfect muffins, watch for the endpoints.
  • Never use baking powder with aluminum, which may cause an aftertaste.

Storing banana nut muffins

Good at room temperature for 2 days, refrigerated for 3-4 days, and will freeze nicely for 3-4 months in an airtight container.

❓FAQs

Are banana walnut muffins good for you?

While many muffins are loaded with fat and sugar, this recipe is lower in fat and calories. They are not healthy but can be a nice treat within a low-calorie or low-fat diet with 175 calories and 6 grams of fat.

Can I freeze bananas?

Yes, they are great for baking if you don’t have time to use them now, peel and freeze them until you can bake bread or muffins.

Blue ribbon divider used for visual effect
↑Jump to Table of Contents

This recipe is listed in these categories. See them for more similar recipes.

Breakfast Recipes, Dessert Recipes, Healthy Recipes, Low Fat Recipes

Have you tried this recipe, or have a question? Join the community discussion in the comments.

Step-by-Step Photo Instructions

two bananas with muffin ingredients.
Sugar and Flour are missing from the picture.

Preheat oven to 350°, not convection. Prepare a muffin pan, give them a light spray of cooking spray, and line it with paper liners if desired.

mashing bananas in a measuring cup.

Mash the bananas well in a 2-cup measuring cup. Get as much banana as possible, leaving space for the egg and vanilla—2 large or 3 medium. 1 ½ cups will be perfect, and you won't need milk.

orange cup in a microwave.

Melt ⅓ cup of butter in the microwave—about 20 seconds, depending on your microwave.

2 cup measuring cup with ingredients.

Add 1 egg to the banana and mix. Add the melted butter, 1 ½ teaspoon vanilla extract, and just enough milk to make 2 cups of the "liquid."

chopped walnuts on wooden board.

You need about ¾ cup of chopped walnuts. You may use pecans, or other nuts are fine.

dry ingredients and nuts in large bowl.

Combine the dry ingredients in a large bowl; the walnuts with 1 ½ cup AP flour, ¾ cup sugar, 1 teaspoon salt, 2 teaspoons baking powder, ½ teaspoon baking soda, ½ teaspoon cinnamon, and ½ teaspoon nutmeg (optional).

adding wet ingredients to dry in white bowl.

Mix the wet into the dry and only mix until all the dry is incorporated. Do not over-mix.

filling muffin tin with batter.

Pour the batter into the cups—about ¾ full.

sprinkling sugar on top of uncooked muffins.

Sprinkle the tops with a generous amount of sugar and more nuts if you want. Spray the sugar with PAM.

twelve baked muffins on a wire rack.

Bake for 20-25 minutes. Insert a toothpick in the top to about the center of the muffin. It is done when the toothpick comes out clean. Or check for an internal temperature of 200° to 205°. Cool on a wire rack.

↑Jump to Table of Contents

📖The Recipe Card

banana nut mufffin on rack
Print Recipe Add to Collection Go to Collections
4.78 from 9 votes

Easy Banana Nut Muffins in 30 Minutes

Banana Nut Muffins are moist and tender with a sweet, crunchy top and nuts. This easy recipe only needs 2 bananas, some nuts, pantry ingredients, and 30 minutes.
Prep Time10 minutes mins
Cook Time20 minutes mins
Total Time30 minutes mins
Course: Sweets
Cuisine: American
Keyword: Banana Muffins, Banana Nut Muffins
Servings: 12 servings
Calories: 176kcal
Author: Dan Mikesell AKA DrDan

Ingredients

Wet

  • 2-3 ripe bananas 1 ½ cups of mashed bananas
  • 1 egg large
  • ⅓ cup butter
  • 1 ½ teaspoon vanilla extract
  • milk to make 2 cups of liquid

Dry

  • 1 ½ cup AP flour
  • ¾ cup sugar plus more for the top
  • ¾ cup walnuts or pecans
  • 1 teaspoon salt
  • 2 teaspoons baking powder
  • ½ teaspoon baking soda
  • ½ teaspoon cinnamon
  • ½ teaspoon nutmeg optional

Topping

  • White or brown sugar
  • chopped walnuts or pecans—optional
US Customary - Convert to Metric

Instructions

  • Preheat oven to 350°, not convection. Prepare a muffin pan, give them a light spray of cooking spray, and line it with paper liners if desired.
    two bananas with muffin ingredients
  • Mash the bananas well in a 2 cup measuring cup. Get as much banana as possible, leaving space for the egg and vanilla—2 large or 3 medium. 1 ½ cups will be perfect, and you won't need milk.
    mashing bananas in a measuring cup
  • Melt ⅓ cup of butter in the microwave—about 20 seconds, depending on your microwave.
    orange cup in a microwave
  • Add 1 egg to the banana and mix. Add the melted butter, 1 ½ teaspoon vanilla extract, and just enough milk to make 2 cups of the "liquid."
    2 cup measuring cup with ingredients
  • You need about ¾ cup of chopped walnuts. You may use pecans, or other nuts are fine.
    chopped walnuts on wooden board
  • Combine the dry ingredients in a large bowl; the walnuts with 1 ½ cup AP flour, ¾ cup sugar, 1 teaspoon salt, 2 teaspoons baking powder, ½ teaspoon baking soda, ½ teaspoon cinnamon, and ½ teaspoon nutmeg (optional).
    dry ingredients and nuts in large bowl
  • Mix the wet into the dry and only mix until all the dry is incorporated. Do not over-mix.
    adding wet ingredients to dry in white bowl
  • Pour the batter into the muffin pan—about ¾ full.
    filling muffin tin with batter
  • Sprinkle the tops with a generous amount of sugar and more nuts if you want. Spray the sugar with PAM.
    sprinkling sugar on top of uncooked muffins
  • Bake for 20-25 minutes. Just insert a toothpick in the top to about the center of the muffin. It is done when the toothpick comes out clean. Or check for an internal temperature of 200° to 205°.  Cool on a wire rack.
    twelve baked muffins on a wire rack

Notes

Pro Tips

  1. The bananas should be at least ripe, but overripe is better. 2 large bananas will be about right to make the 1 ½ cups of mashed banana.
  2. A tablespoon or two of strong coffee may increase the "banana taste." Add it to the liquid before topping it off with milk.
  3. The volume of milk varies with the volume of the mashed bananas. More banana is better than more milk.
  4. Never use baking powder with aluminum.
  5. I have increased the baking powder to get a lighter texture.
  6. The nuts and nutmeg are optional.
  7. The sugar and PAM topping form a nice crust and some nuts or use brown suger to make it what you want.
  8. Use the nuts you like. You will need ¾ to 1 cup.
  9. See the post above for a discussion of mini and jumbo-size muffins.
  10. There are some variables, so be sure to check the endpoint. Just insert a toothpick in the top to about the center of the muffin. It is done when the toothpick comes out clean. Or you can press lightly on the top of the muffin, and if it pops back quickly and leaves no indentation, it is done. Lastly, you can check the internal temperature for 200° to 205°.
  11. Good at room temperature for 2 days, refrigerated for 3-4 days, and will freeze nicely for 3-4 months.

Nutrition

Calories: 176kcal | Carbohydrates: 29g | Protein: 2g | Fat: 6g | Saturated Fat: 3g | Cholesterol: 27mg | Sodium: 291mg | Potassium: 160mg | Fiber: 1g | Sugar: 15g | Vitamin A: 190IU | Vitamin C: 2mg | Calcium: 36mg | Iron: 1mg

Editor's Note: Originally Published November 2, 2012. Updated with expanded explanation and options, refreshed photos, and a table of contents to help navigation.

dogs playing in leaf pile.

Crock Pot Chicken Enchilada Casserole

Crock pot chicken enchilada casserole on a spoon.

This Crock Pot chicken enchilada casserole recipe is easier than traditional enchiladas.

  • Cook raw chicken and the enchilada sauce together.
  • Works in mini 2-quart to full-size crock pots.
  • No messy rolling or assembly.
  • Flexible—use precooked chicken, your favorite enchilada sauce, different cheeses, or add beans and other mix-ins.
Crock pot chicken enchilada casserole on a spoon.
[feast_advanced_jump_to]

quote mark
Featured Comment by Anne:
"Thanks for another great recipe… followed your basic recipe and couldn't have been happier with the result. This one's a keeper!"

📝 TL;DR — Recipe Summary

✔️ What: This Crock Pot chicken enchilada casserole combines shredded chicken, cut tortillas, homemade enchilada sauce, and cheese for an easy slow cooker dinner.

✔️ Why: Use precooked or raw chicken, make it ahead, and let the crock pot do most of the work.

✔️ How: Cook the chicken in the crock pot with the sauce ingredients. Shred the chicken, stir in the tortillas and cheese, top with more cheese, and cook for another hour.

🐓 Ingredients

Chicken and Enchilada Sauce

  • Boneless, skinless chicken breasts or precooked rotisserie chicken (covered below)
  • Homemade enchilada sauce (recommended) or canned
    • Tomato sauce
    • Pantry spices: chili powder, paprika, cumin, cayenne (optional), salt, and pepper
    • Onion and garlic—fresh or powdered
  • Optional add-ins: black beans, corn, diced green chiles, or sliced black olives

Tortillas and Cheese

  • Corn tortillas
  • Shredded Mexican blend or cheddar cheese

👨‍🍳 Quick Overview: Crock Pot Chicken Enchilada Casserole

Part 1: Making Shredded Enchilada Chicken and Sauce

Trim the chicken breasts and cut them into three pieces each.

raw chicken trimmed and cut into chunks.

✅ Pro Tip: A 2-quart mini fits a half batch comfortably, or the full recipe without additions. Use a 4-quart or larger if you’re adding extras or doubling.

Combine the sauce ingredients and chicken in the crock pot. Cook on low for 2½ to 3 hours, until the chicken reaches 165°F and shreds easily.

Chicken is added to the homemade enchilada sauce in a crock pot.

Remove the chicken and shred with forks, then return it to the crock pot.

Shredded chicken cooked in enchilada sauce for crock pot casserole.

✅ At this point, you can stop and use the chicken as filling for rolled enchiladas or tacos.


Part 2: Finishing the Enchilada Casserole in the Crock Pot

Chop the corn tortillas into bite-size pieces and stir them into the pot. Mix well to coat all the tortilla pieces—this helps keep them from sticking together.

Corn tortillas chopped for crock pot chicken enchilada casserole.

✅ Pro Tip: Stir the tortilla pieces in well so they're coated with sauce. This keeps them from clumping while they cook—no layering is needed.

Stir in some shredded cheese, then top with more cheese.

Cheese topping added to crock pot chicken enchilada casserole before cooking.

✅ Pro Tip: Use cheese that melts well—Mexican blend or cheddar works best. Pre-shredded bags are fine, but fresh-shredded melts smoothly.

Cook for one additional hour, then serve with your favorite toppings.

Cheesy crock pot chicken enchilada casserole served on a spoon.

👇 Scroll down for the printable recipe card—or keep reading for chicken options, cooking tips, crock pot sizes, and serving ideas.

🐔 Raw, Precooked, or Rotisserie Chicken

  • Boneless, skinless chicken breasts are the go-to—quick, lean, and reliable.
  • Chicken thighs work too. Cook 15–30 minutes longer and to 180°F for easy shredding.
  • Precooked or rotisserie chicken—use 1½ to 2 cups of shredded chicken for every 10–12 ounces of raw chicken replaced. Cook the sauce alone for 1 hour, then stir in the chicken and finish the recipe.

✔️ Tips to Make It Right Every Time

  • Use the homemade sauce.
    It gives the best flavor, better texture, and is more economical than canned. For minimal extra effort, you get a big upgrade. Canned sauce just doesn’t deliver the same results.
  • Corn tortillas work best.
    They hold up during cooking. Flour tortillas tend to get mushy, especially in leftovers.
  • Use a cheese that melts well.
    Shredded Mexican blend or cheddar gives you the best melt and flavor.
  • Customize it.
    Add black beans, corn, or a little cayenne if you want to change up the flavor.

↕️ Crock Pot Sizes (2-qt Mini to 6-qt Full-Size)

👉 From minis to full-size, this recipe scales for two or a family.

  • A 2-quart mini can squeeze in the full recipe (about 4 servings), but it’s more comfortable with a half batch for two.
  • A 3–4 quart small crock pot is a good fit for the full recipe and leaves room for extras like corn or beans.
  • A 6-quart full-size is ideal for doubling the recipe, yielding about 8 servings.

Always keep your crock pot no more than 75% full to ensure even cooking.

❓ FAQs

Do I need to cook the chicken first?

No. Raw chicken cooks fully in the crock pot. It simmers in the sauce until tender and shreds easily—no precooking needed.

Can I use precooked rotisserie chicken?

Yes, use about  1½ to 2 cups of shredded chicken per 10–12 oz of raw chicken you're replacing. Cook the sauce alone for 1 hour before adding the chicken and finishing the recipe.

Can I make this in a small crock pot?

Yes. A 2-quart mini will hold a half batch comfortably or even the full recipe without additions. For extras or doubling, use 4–6 quarts.

What tortillas work best?

Corn tortillas hold up during cooking. Flour tortillas tend to get mushy, especially in leftovers.

Is this chicken enchilada casserole gluten-free?

It should be, but always check your labels. Some canned enchilada sauces, shredded cheeses (especially taco-seasoned), and even corn tortillas may contain gluten or be processed in shared facilities.

🍽️ How to Serve Chicken Enchilada Casserole

Top with your favorites: sour cream, sliced green onion, black beans, fresh cilantro, salsa, pico de gallo, or refried beans. A splash of lime juice adds a fresh kick.

Serve with refried beans, Mexican rice, and tortilla chips with salsa or guacamole.

❄️ How to Store Leftovers

Store leftovers in an airtight container. They’ll keep in the fridge for up to 4 days or can be frozen for up to 3 months. Reheat after thawing using a covered dish in the oven or an air fryer for better texture. A microwave works, too, but the texture suffers.

🔗 Related Recipes

This recipe is a slow cooker version of my Healthier Chicken Enchilada Casserole in 60 Minutes — a stovetop-to-oven layered recipe that uses fresh chicken and homemade enchilada sauce to braise the chicken before baking.

Looking for more easy Tex-Mex casseroles?

  • Easy Taco Casserole
  • Sour Cream Chicken Enchiladas
  • Rolled Chicken Enchilada Casserole
  • Crock Pot Southwest Chicken Casserole.

📖The Recipe Card

Crock pot chicken enchilada casserole on a spoon.
Print Recipe Add to Collection Go to Collections
5 from 1 vote

Crock Pot Chicken Enchilada Casserole

Easy Crock Pot chicken enchilada casserole made with shredded chicken, homemade enchilada sauce, tortillas, and cheese. Use precooked or raw chicken for a simple family dinner.
Prep Time5 minutes mins
Cook Time4 hours hrs
Total Time4 hours hrs 5 minutes mins
Course: Main Course
Cuisine: Mexican
Keyword: crock pot chicken enchilada casserole, Slow cooker chicken enchilada casserole
Servings: 4 servings of 1 ½ cups
Calories: 414.1kcal
Author: Dan Mikesell AKA DrDan

Ingredients

  • 1½ pounds boneless, skinless, chicken breasts 2 breasts

Homemade enchilada sauce (or use 2 cups of canned sauce):

  • 15 oz tomato sauce
  • 1 tablespoon chili powder
  • 1 teaspoon paprika
  • 1 teaspoon onion powder or ½ chopped small onion
  • ½ teaspoon garlic powder or 2 cloves crushed garlic
  • ½ teaspoon cumin
  • ½ teaspoon salt
  • ½ teaspoon pepper
  • ¼ teaspoon cayenne pepper (optional)

Optional add-ins (add with raw chicken):

  • small can of diced green chilis
  • small can of sliced black olives
  • 1 cup canned black beans, drained and rinsed
  • 1 cup canned corn drained

To finish as crock pot casserole

  • 2 cups shredded Mexican or cheddar cheese lower-fat suggested
  • 6 corn tortillas 6-inch
  • Toppings of choice.
US Customary - Convert to Metric

Instructions

Making Shredded Enchilada Chicken

  • Use boneless, skinless chicken breasts (or thighs or precooked chicken—see the post).
    raw chicken with enchilada casserole ingredients
  • Trim and cut the chicken into 2–3 pieces each. Aim for about 1½ pounds total.
    raw chicken trimmed and cut into chunks
  • In a 2 to 4-quart crock pot, add one 15 oz. can of tomato sauce, 1 tablespoon chili powder, 1 teaspoon paprika, 1 teaspoon onion powder (or ½ chopped small onion), ½ teaspoon garlic powder (or 2 cloves crushed garlic), ½ teaspoon cumin, 1 teaspoon salt, and ½ teaspoon pepper. Mix well.
    mixing sauce in the crock pot.
  • Nestle the chicken into the sauce and coat evenly. Cook on low for 2½ to 3 hours, or until the internal temperature reaches 165°F.
    Chicken is added to the homemade enchilada sauce in a crock pot.
  • Remove the chicken and shred with forks. Return the shredded chicken to the crock pot.
    ✅ At this point, you can stop and use the chicken as filling for rolled enchiladas or tacos.
    Shredded chicken cooked in enchilada sauce for crock pot casserole.

Part 2: Finishing the Enchilada Casserole in the Crock Pot

  • Chop the tortillas into bite-sized pieces and stir them into the pot. Mix well to coat everything and break apart any pieces that stick.
    Corn tortillas chopped for crock pot chicken enchilada casserole.
  • Stir in ½ cup shredded cheese and smooth the top.
    mixing shredded chicken into the sauce
  • Top with the remaining 1½ cups of cheese.
    Cheese topping added to crock pot chicken enchiladas before cooking.
  • Cover and cook on low for 1 more hour. Serve with toppings of choice.
    Cheesy crock pot chicken enchilada casserole served on a spoon.

Notes

Pro Tips

  1. This recipe fills a 2-quart mini crock pot right to the 75% mark—the max recommended for proper cooking. If you add extras or some of the options, use a larger crock pot or make a half batch.
  2. A double batch fits well in a 5 to 6-quart crock pot.
  3. If using precooked chicken, cook the sauce alone on low for 1 hour before adding the chicken and tortillas.
  4. Homemade sauce gives the best flavor and texture. You may use canned, but it’s not the same.
  5. The dish isn’t spicy unless you add cayenne.
  6. Great toppings include sour cream and chopped green onions.
  7. Chicken thighs should reach at least 180°F to shred well.
  8. Nutrition is based on chicken breasts and lower-fat cheese.
  9. Skipping added salt reduces sodium by about 300 mg per serving.
  10. Good refrigerated for 3–4 days or frozen for up to 3 months.

Nutrition

Calories: 414.1kcal | Carbohydrates: 26.4g | Protein: 53.9g | Fat: 10.2g | Saturated Fat: 3.7g | Polyunsaturated Fat: 1.7g | Monounsaturated Fat: 2.9g | Trans Fat: 0.02g | Cholesterol: 120.7mg | Sodium: 1389.5mg | Potassium: 1125.1mg | Fiber: 5.2g | Sugar: 4.7g | Vitamin A: 1524.9IU | Vitamin C: 9.7mg | Calcium: 303.2mg | Iron: 3.1mg

Originally Published April 22, 2018. Updated with expanded options, refreshed photos, and a table of contents to help navigation.

Molly sunning herself.

How to Cook Brisket on a Gas Grill

Cooked brisket on a gray board

Cooking beef brisket on a grill is easier than most people think. With indirect heat, a good BBQ dry rub, and optional wood smoke, you can make tender low-and-slow brisket with great bark without a dedicated smoker.

This beginner-friendly guide walks you through gas grill setup, timing, and temperature tips for tender brisket with great bark.

⏰ Quick Answer: How Long to Cook Brisket on a Gas Grill

Cook beef brisket at 225°–250°F with indirect heat on a gas grill.

  • Brisket takes about 1 to 1½ hours per pound, depending on thickness and weight.
  • A 5-pound brisket usually takes about 5–6 hours.
  • Brisket is done at 200°–205°F internal temperature—not by time alone.
Cooked beef brisket on a gray board.
[feast_advanced_jump_to]

quote mark
Featured Comment from Matt:
⭐⭐⭐⭐⭐
"Thanks, this technique and explanation is fantastic! Haven't done it for a few years and these instructions are great."

🐄 TL;DR — Recipe Summary

What it is: A beginner-friendly way to cook tender beef brisket on a gas grill with indirect heat and wood smoke.

Why you’ll love it: Real low-and-slow BBQ flavor and bark without needing a smoker or complicated setup.

How to make it: Season the brisket with dry rub, cook at 225°–250°F with indirect heat and optional real wood smoke, then rest well before slicing.

🐄 Ingredients

brisket flat with spices for rub.
  • Beef brisket – use the size that fits your needs. I usually cook a 4–5 pound point or flat cut, which fits well on a gas grill.
  • Dry rub – a simple mix of brown sugar, paprika, kosher salt, and black pepper. Or use your favorite brisket rub.
  • Wood chips (optional but recommended) – hickory, mesquite, apple, or cherry add smoke flavor on a gas grill.

👨‍🍳 Quick Overview: How to Cook Brisket on a Gas Grill

1. Season: trim some fat if you wish, then coat all sides generously with dry rub.

Apply dry rub to a brisket.

2. Set up the grill: steady 225°–250°F with indirect heat, a drip pan underneath, and a way to generate smoke.

Clean and oil grill grates on a gas grill while setting up indirect heat for low and slow cooking.

✅ Pro Tip: Opening the hood can drop the heat and take up to 30 minutes to recover. Use a remote thermometer to monitor grill temps (225°–275°F).

3. Cook: place the brisket on the indirect side over the drip pan.

Place the beef brisket on the indirect side of the gas grill with a drip pan.

✅ Pro Tip: Keep a backup propane tank handy for this long cook. Always go by final temperature (200°–205°F), never just by time.

4. Add smoke: if using wood chips, replenish as needed. Cook until the internal temp reaches 200°–205°F — about 5–6 hours for a 5-pound brisket.

Smoke coming out of the gas grill while cooking and smoking the brisket.

✅ Pro Tip: Wood smoke is optional but highly recommended. I like 1–2 hours with hickory, mesquite, or fruit woods.

5. Rest: remove, wrap in foil and towels, and rest 1–2 hours.

Wrapping a grilled beef brisket with foil to rest.

✅ Pro Tip: Don’t skip the rest. Even 20 minutes helps, but 1–2 hours is best. Well-wrapped brisket can rest up to 4 hours to fit your timing.

6. Slice or chop to serve: cut thin across the grain for slices, or chop for sandwiches.

Cut a grilled brisket across the grain on a black board.

For more details, keep reading. See the Recipe Card below for complete instructions and to print.

⏰ How Long Does Brisket Take on a Gas Grill?

Brisket takes about 1 to 1½ hours per pound at 225°–250°F. A 5-pound brisket normally needs 5–6 hours on a gas grill. But the stall at 150°–160°F can add extra time, so treat the estimate as a guide—not a promise.

✅ So plan your day accordingly — cook until the internal temp hits 200°–205°F, even if it takes longer than the estimate.

🌡️ What Temperature is Brisket Done?

Brisket is done when the internal temperature reaches 200°–205°F. Below 195°F, it won’t shred or slice as tenderly. Around 203°F is the sweet spot many competition smokers target. 205°–210°F is still acceptable, but beyond 210°F the brisket will start to dry out and lose texture.

🔥 What Temperature to Grill Beef Brisket

Low-and-slow indirect cooking at 225°–250°F gives brisket time to break down connective tissue, become tender, and build bark.

✅ Final internal temperature matters more than cooking time estimates. Brisket is only done when it reaches an internal temperature of 200°–205°F.


Grilling tips for beef brisket

  • Use the grill you have. Gas, charcoal, pellet — any grill works as long as you can keep a steady 225°–250°F and enough space for indirect heat.
  • Keep the lid closed. Every time you open it, the heat drops and can take up to 30 minutes to recover. Use a remote thermometer so you don’t have to peek.
  • Stay in range. Above 275°F brisket can dry out; below 225°F it may never get tender. Aim for steady heat, not perfection.
  • Fuel matters. Brisket cooks take hours. Have a backup propane tank or extra charcoal so you don't run out halfway through.

✅ Pro Tip: HELP — I’m out of gas. All is not lost: move the brisket onto a rimmed baking sheet (with a rack if you have one) and finish in the oven at 250°F until it reaches the final temperature.

You must have a reliable grill surface thermometer to do this correctly, and a continuous-read probe meat thermometer for the brisket itself is very useful.

🛒 Recommended Thermometers 

Here are some suggestions to help you succeed, but you can find many more good products at your local stores. All links below are affiliate links, meaning I make a small profit from your purchases. This commission does not affect your price. We participate in the Amazon Services LLC Associates Program. As an Amazon associate, I earn from qualifying purchases.

Image for Maverick xr-50 remote thermometer from Maverick

Maverick XR-50 4 Probe Remote Thermometer

Maverick Adrenaline Barbecue Company XR-50 Extended Range Digital Remote Wireless 4 Probe. Highly Rated.
Shop at Amazon
Red Thermapen One

Thermapen™ One from Thermoworks™

My personal favorite cooking tool. It will make your a better cook today. More expensive but will last for years.
Shop at Amazon
CDN Grill Surface Thermometer

CDN Grill Surface Thermometer

Cheap and reliable—I still one mine.
Shop at Amazon
Thermopop by Thermoworks

Thermopop™ by Thermoworks™

Super fast and accurate, you can have the quality of Thermoworks on a budget. Highly recommended for the casual cook.
Shop at Amazon

📚Reference posts for more information

  • How To Set Up Your Gas Grill for Smoking and Low and Slow Cooking
  • A Beginner's Guide to Grill Temperature on a Gas Grill
  • BBQ Dry Rub – for a more complicated flavor profile
  • Memphis Dry Rub Recipe
  • Memphis BBQ Sauce Recipe

🐄 What Brisket to Buy (Flat vs Point Cuts)

Brisket is sold either as a whole packer brisket (8–12 pounds) or cut in half into the flat and the point. Unless you’re feeding a crowd, most home cooks will want one of the halves.

  • Flat cut (4–6 pounds): leaner, slices neatly, and the cut you’ll most often find in grocery stores.
  • Point cut (4–5 pounds): more fat and marbling, juicier, and develops an excellent bark.
  • Whole packer (8–12 pounds): great for parties, but usually too big for a standard gas grill.

👉 For two or small families, choose a flat or point in the 4–5 pound range — it fits most gas grills and will cook in about 5–6 hours at 225°–250°F.

Image of whole brisket from Texas A&M. 101 Cooking for Two is not endorsed by the State of Texas, or its agencies. DO NOT COPY
Image from Texas A&M. 101 Cooking for Two is not endorsed by the State of Texas or its agencies.

❄️ Storage and Reheating Leftovers

  • Refrigerate: Store leftovers in an airtight container for up to 4 days.
  • Freeze: Brisket freezes well for up to 3 months.

Reheating: Cover and warm in a 300°F oven until hot. Unlike pulled pork, brisket can handle a splash of BBQ sauce during reheating — the acidity won’t hurt the texture. Add sauce if you like, or reheat plain.

Easiest Oven Baked BBQ Beef Brisket

Learn how simple it is to make smoky and tender oven-baked BBQ Beef Brisket with this never-fake brisket recipe—just two ingredients and 5 minutes of prep time—everybody deserves great BBQ. 

Brisket triple decker sandwich on a black board

🌡️ What is “The Stall”?

“The Stall” happens when brisket (or pork butt) reaches about 150°–160°F. At this point, the meat fibers contract, squeezing water out of the cells. That moisture evaporates from the surface, cooling the meat and slowing (staling) the cooking.

For most meats, this wouldn’t matter — steaks and pork chops are done long before 200°F. But with brisket (and pork butt), it matters because they need to reach 200°+ to become tender.

The stall may last for hours, depending on the size of the cut and other factors — sometimes as long as 6 hours for a large whole brisket.

The stall can be minimized with a classic smoker technique known as “The Texas Crutch.”

📦 The Texas Crutch

The “Texas Crutch” is a classic smoker’s trick to push through the stall. It means tightly wrapping the brisket (usually in butcher paper, though heavy-duty foil is more common at home) to trap moisture and stop evaporation. Around 90% of competition smokers use it — but remember, they’re usually cooking very large whole briskets.

By wrapping, you create a mini-environment with 100% relative humidity next to the meat. The fibers will still contract and release water, but without evaporation, the brisket won’t cool itself down — so the cooking continues instead of stalling.


✅ Pros of the Texas Crutch

  • Time: You can save hours, especially with larger cuts.
  • Moisture: Some juice re-absorbs as the beef passes 180°F, making the meat a little moister (though the effect is modest).
  • Smoke control: On a smoker, wrapping limits smoke exposure if you don’t want it too strong.

⚠️ Cons of the Texas Crutch

  • Bark damage: Steam softens your hard-earned crunchy bark. You can counter this a bit, but not completely.
  • Extra fuss: Wrapping takes work, and many people find it more trouble than it’s worth.
  • Heat loss: Opening the grill to wrap drops the temperature, and it takes effort to get it steady again.

📝 The Texas Crutch: Technique and My Take

  1. Choose your wrap: Butcher paper (the pink kind, not wax-coated) is best for bark, though most people use heavy-duty foil since it’s always on hand.
  2. When to wrap: Start in the 150°–160°F range, once the bark is dark red to black and “set up,” not mushy.
  3. Prep the wrap: Get two large sheets ready so you can double-wrap quickly.
  4. Handle the grill lid: Open only as far as needed and close immediately — every second open costs heat.
  5. Wrap tight: Really tight. Crimp the seams and ends to leave as little space as possible.
  6. Probe access: Crimp snugly around your remote, continuous-read thermometer — it’s required to do this right.
  7. Finish the cook: Return to the grill until the brisket reaches 200°–205°F.
  8. Optional bark boost: If you want a firmer bark, unwrap around 195°–200°F and then finish cooking to 205°F.

Why I don’t usually do this

  • I rarely bother with the Texas Crutch. I’m usually cooking smaller brisket cuts, so the stall isn’t as long.
  • I also love a good crunchy bark, which wrapping tends to soften.
  • The so-called “moisture boost” isn’t huge — much of what people think of as moisture is really melted collagen, which happens naturally between 160° and 180°F.

❓ FAQs

How much brisket to cook?

Plan on about ½ pound per person. For teenage boys, aim for a figure closer to 1–1½ pounds – and always plan for leftovers.

Should I cook brisket fat side up or down?

It doesn’t really matter. The moisture comes from melted connective tissue, not the fat cap. Most competition smokers agree it makes no difference.

Should I trim the fat?

Some pitmasters leave it on, arguing it protects the meat. Others say it makes a greasy mess and that collagen provides most of the moisture anyway.

A compromise is to trim the fat cap to about ¼ inch thick. That’s what I usually do – I want tender brisket with bark, not a chunk of fat on my plate.

Should I inject or brine the brisket?

I usually skip both. A good brisket already has plenty of beef flavor and connective tissue for tenderness. Injecting may add flavor, while brining can slightly change texture, but most backyard cooks won’t notice a major difference.

Can I cook brisket on a grill instead of a smoker?

Yes. A gas grill works very well for brisket if you can maintain indirect heat around 225°–250°F. Optional wood smoke adds traditional BBQ flavor and helps create bark without needing a dedicated smoker. Other grills also work if you can maintain steady low-and-slow temperatures.

📖The Recipe Card

Cooked brisket on a gray board
Print Recipe Add to Collection Go to Collections
4.80 from 20 votes

Brisket on a Gas Grill (Low and Slow BBQ)

Make tender brisket on a gas grill using indirect heat, wood smoke, and a simple dry rub. Beginner-friendly, low-and-slow BBQ beef brisket with great bark.
Prep Time1 hour hr
Cook Time5 hours hrs
Total Time7 hours hrs
Course: Main Course
Cuisine: American
Keyword: Grilled Beef Brisket, Grilled Brisket, How to Grill Brisket on Gas Grill
Servings: 10
Calories: 595kcal
Author: Dan Mikesell AKA DrDan

Ingredients

  • 5 pound beef brisket (or size of your choice)
  • wood chips (ickory, mesquite, or fruit woods suggested)

My rub for a 5-pound brisket. Scale for different size. You may use the rub of your choice.

  • ¼ cup brown sugar
  • ¼ cup paprika
  • 2 tablespoons kosher salt
  • 2 tablespoons black pepper
US Customary - Convert to Metric

Instructions

  • Use a half or whole brisket and rub of your choice.
    brisket flat with spices for rub
  • (Optional) Trim large chunks of fat and the fat cap. Some leave it untrimmed or at ¼ inch thick — it’s a personal choice.
    brisket with flat layer trimmed
  • Use the rub of your choice, or you may use mine. For my rub, mix ¼ cup each of brown sugar and paprika. Add 2 tablespoons each of kosher salt and black pepper and mix well.
    mixing rub in a glass bowl
  • Coat all sides of the brisket heavily with rub. If time allows, wrap in plastic and refrigerate for a few hours or overnight. Remove from the fridge about 1 hour before cooking.
    Apply dry rub to a brisket
  • While the brisket is resting, set up the grill for a steady temperature of about 225°–250°F with indirect heat, a drip pan on the indirect side, and a way to create smoke (optional).
    clean and oil grill crates
  • Place the brisket on the indirect side, over the drip pan.
    placing brisket on indirect side of the grill
  • Add smoke (optional): Use a smoker box or foil packet for 1–2 hours of wood smoke using hickory, mesquite, or fruit woods.
    adding wood chips to smoking box
  • Cook to an internal temperature of 200°–205°F, approximately 6 hours, for a 5-pound brisket.
    cooked brisket on the grill
  • Remove from the grill, wrap in foil and towels, and rest 1–2 hours.
    cooked brisket on foil
  • Remove any fat layer, then cut the meat thinly across the grain or chop it to serve.
    Cut brisket on a black board with knife

Notes

Pro Tips

  1. Grill setup is the most important step – indirect heat and steady low-and-slow temps are key.
  2. Use any rub you like, but the simple one provided works well.
  3. Expect 1–1½ hours per pound as a rough time estimate.
  4. Be sure to wrap and let sit after cooking for 1–2 hours. But the absolute minimum is 20 minutes.
  5. You must cut across the grain or chop to serve.
  6. See the post for details on injecting, brining, the stall, and the Texas Crutch.
  7. For serving size: cook ½ pound per person, but double or triple for teenage boys. And you want leftovers.
  8. Whole packer briskets (8–12 lbs) may take 12–16 hours – see the main post for tips.
  9. Storage: Refrigerate up to 4 days, freeze up to 4 months.
  10. Need help? Please see How to Set Up a Gas Grill for Smoking and A Beginners Guide to Grill Temperature on a Gas Grill for low and slow grill setup instructions if you need help.

Nutrition

Serving: 8oz. | Calories: 595kcal | Carbohydrates: 7g | Protein: 42g | Fat: 43g | Saturated Fat: 17g | Polyunsaturated Fat: 2g | Monounsaturated Fat: 19g | Cholesterol: 154mg | Sodium: 1342mg | Potassium: 676mg | Fiber: 0.4g | Sugar: 6g | Vitamin A: 50IU | Vitamin C: 0.8mg | Calcium: 30mg | Iron: 4.3mg

Editor's Note: Originally Published July 28, 2014. Updated with expanded options, refreshed photos, and a table of contents to help navigation.

Lilly as a deck puppy.

Cinnamon Streusel Muffins

cinnamon roll muffin in white plate

These cinnamon streusel muffins are topped with a buttery brown sugar streusel, nuts, and a sweet glaze for a bakery-style treat that's easy to make at home.

Made with simple pantry ingredients, they're ready in about 30 minutes and can be baked as either standard muffins or jumbo bakery-style muffins.

.Cinnamon Streusel Muffins with nusts and glaze.
[feast_advanced_jump_to]

😊 TL;DR — Recipe Summary

What is it? Cinnamon streusel muffins are soft homemade muffins topped with buttery brown sugar streusel, nuts, and a sweet glaze.

Why you'll love it: They use simple pantry ingredients, have optional walnuts or pecans for extra crunch, and are ready in about 30 minutes. You can make them as 12 standard muffins or 6 jumbo bakery-style muffins.

How to make it: Mix the dry and wet ingredients separately, combine them, fill the muffin pan, add the streusel topping, and bake until golden brown. Drizzle with glaze after cooling briefly.

🧁 Ingredients

Dry ingredients — flour, sugar, baking powder, cinnamon, salt
Wet ingredients — milk, vegetable oil, egg
Optional nuts — walnuts or pecans
Streusel topping — brown sugar, cinnamon, nuts, butter
Glaze — powdered sugar, milk, vanilla

👨‍🍳 Quick Overview: How to Make Cinnamon Streusel Muffins

1. Mixing ingredients

In separate bowls, combine the dry ingredients, wet ingredients, and streusel topping.

mixing nuts into dry ingreditnes in white bowl.

2. Combine batter, fill tin and top

Combine the wet and dry ingredients just until mixed. Fill the muffin cups about ½ to ⅔ full and top with the streusel topping.

dough added to jumbo muffin tin.

3. Bake

Bake until golden brown and a toothpick comes out clean.

golden brown muffin on rack.

4. Add a glaze topping

Mix the powdered sugar, milk, and vanilla for the glaze. Let the muffins cool for a few minutes, then drizzle with the glaze.

sugar and ingredients for glaze.

For more details, keep reading. See the Recipe Card below for complete instructions and to print.

✔️ When Are the Muffins Done?

Standard-size muffins will take about 15 minutes to bake at 400°F. Do not rely on baking time alone. There are three easy ways to tell when your cinnamon streusel muffins are done:

  1. The touch test: Lightly press the top of a muffin. If it springs back quickly and leaves no indentation, it is done.
  2. The toothpick test: Insert a toothpick into the center of a muffin. If it comes out clean, the muffins are done. Yes, it's old-school, but it still works.
  3. Temperature: The most reliable method is an instant-read thermometer. The muffins are done when the center reaches about 200°F.

🧁 Make Jumbo Cinnamon Streusel Muffins

This recipe can be baked as either 12 standard muffins or 6 jumbo bakery-style muffins. Prepare the batter the same way and fill the jumbo muffin cups about ½ to ⅔ full.

Jumbo muffins will usually need 3 to 4 additional minutes of baking time. Since oven performance and muffin pan size vary, check for doneness rather than relying on time alone.

An instant-read thermometer is the most reliable method and should read about 200°F in the center. The touch test and toothpick test also work well.

🍽️ Serving

Enjoy these cinnamon streusel muffins for breakfast with your favorite coffee, plus sides like Convection Oven Bacon and Baked Breakfast Sausage Patties.

If you enjoy homemade muffins, try Apple Fritter Muffins, Strawberry Cinnamon Muffins, Banana Nut Muffins, or Whole Wheat Blueberry Muffins.

🧊 Storage

Store leftover muffins in an airtight container at room temperature for 2 to 3 days.

For longer storage, wrap the muffins individually in plastic wrap and freeze for up to 3 months. Thaw at room temperature or overnight in the refrigerator.

If you use a cream cheese glaze instead of the simple glaze, store the muffins in the refrigerator.

❓FAQs

Do I need to use muffin liners?

No. A good coating of cooking spray is usually enough to prevent sticking. Muffin liners are optional but make cleanup, serving, and storing leftovers easier.

Can I use a cream cheese glaze?

Yes. A cream cheese glaze works well with these cinnamon streusel muffins and can be used instead of the simple powdered sugar glaze. Because cream cheese is perishable, leftover muffins should be refrigerated.

Can I leave out the nuts?

Yes. The walnuts or pecans add flavor and texture, but the muffins can be made without them. Simply omit the nuts from both the batter and streusel topping.

📖The Recipe Card

cinnamon roll muffin in white plate
Print Recipe Add to Collection Go to Collections
4.14 from 22 votes

Cinnamon Streusel Muffins

Easy cinnamon streusel muffins with a buttery brown sugar topping and sweet glaze. Made with simple pantry ingredients and ready in about 30 minutes.
Prep Time15 minutes mins
Cook Time15 minutes mins
Total Time30 minutes mins
Course: Breakfast
Cuisine: American
Keyword: Cinnamon Muffins, cinnamon streusel muffins, streusel muffins
Servings: 12 regular or 6 jumbo muffins
Calories: 286kcal
Author: Dan Mikesell AKA DrDan

Ingredients

Dry Ingredients

  • 1½ cups all-purpose flour
  • ⅓ cup white sugar
  • 1 tablespoon baking powder aluminum-free
  • ½ cup chopped nuts-optional walnuts or pecans
  • ½ teaspoon cinnamon
  • ½ tsp salt

Wet Ingredients

  • ½ cup milk
  • ½ cup vegetable oil
  • 1 egg

Streusal Topping

  • 4 tablespoons butter
  • ¼ cup brown sugar
  • ¼ cup chopped nuts
  • ½ teaspoon cinnamon
  • 1 pinch salt

Frosting

  • ⅔ cup powdered sugar
  • 1-2 teaspoons milk
  • 2 drops vanilla

Instructions

  • Preheat oven to 400 °.
    ingredients for muffins
  • In a large mixing bowl, combine 1½ cups of flour, ⅓ cup of sugar, 1 tablespoon of baking powder, ½ cup of chopped nuts (walnuts or pecans), ½ teaspoon of cinnamon, and ½ teaspoon of salt.
    mixing nuts into dry ingreditnes in white bowl
  • In a second bowl, combine ½ cup milk, ½ cup vegetable oil, and 1 egg. Whisk until the egg is blended.
    Mixing milk, oil and egg in cup
  • In a small bowl, combine 4 tablespoons of butter, ¼ cup brown sugar, ¼ cup chopped nuts, and a pinch of salt.
    mixing strussel topping
  • Mix wet into dry and only mix enough to combine. Prep a muffin pan. You can make 12 standard-size muffins or 6 jumbo-size muffins. Spray generously with PAM or add cupcake papers.
    adding wet ingredeints into dry ingredients
  • Fill the muffin tin with the batter about ½ to ⅔ full. That will be a heaping ¼ cup into the six cups. Top with the brown sugar mixture.
    dough added to jumbo muffin tin
  • Bake until the top is brown and a toothpick comes out clean. It takes about 15 minutes for standard-size muffins or about 18 minutes for jumbo muffins. If not sure, you can check the temperature with an instant-read thermometer for 200° or a little more. Remove the muffins from the pan as soon as they are removed from the oven.
    golden brown muffin on rack
  • Mix ⅔ cup of powdered sugar with 1-2 teaspoons of milk and a few drops of vanilla. Allow the muffins to cool for a few minutes, then top them with the frosting.
    sugar and ingredients for glaze

Notes

Pro Tips

  • Do not overmix the batter. Stir just until the wet and dry ingredients are combined.
  • This recipe makes either 12 standard muffins or 6 jumbo bakery-style muffins.
  • Standard muffins take about 15 minutes to bake. Jumbo muffins usually need 3 to 4 additional minutes.
  • For the most reliable doneness check, use an instant-read thermometer and bake to about 200°F internal temperature.
  • Store leftovers in an airtight container for 2 to 3 days or freeze for up to 3 months.

Nutrition

Calories: 286kcal | Carbohydrates: 31g | Protein: 3g | Fat: 18g | Saturated Fat: 10g | Trans Fat: 1g | Cholesterol: 10mg | Sodium: 141mg | Potassium: 175mg | Fiber: 1g | Sugar: 17g | Vitamin A: 140IU | Vitamin C: 1mg | Calcium: 73mg | Iron: 1mg

Originally Published March 29, 2014. Updated with expanded options, refreshed photos, and a table of contents to help navigation.

Dogs with Kongs.

Pork Tenderloin with Potatoes and Carrots

Pork Tenderloin with Potatoes and Carrots on a blue plate

Super easy sheet pan Pork Tenderloin with Potatoes and Carrots is a near-perfect weeknight pork tenderloin recipe using a sheet pan or large roasting pan for a complete meal.

🐖Ingredients

Pork tenderloin
Vegetables—potatoes, carrots
Aromatics—onion and garlic
Olive oil, salt, black pepper

Sheet pan pork tenderloin on a serving dish with carrots and potatoes.
[feast_advanced_jump_to]
Blue ribbon divider used for visual effect

Featured Comment from Emily:
"Love, love, love this easy recipe!!! Thanks for sharing it. I have used it many times and look like a hero with no fuss!! Our secret!"

This sheet pan pork tenderloin recipe has fantastic flavors, tender meat, roasted potatoes, and carrots that everybody will love. Due to the smaller size, pork tenderloins are great meat for smaller households but are easy to adjust to your needs.

It is easy to make with only 10 minutes of preparation and about 30 minutes in the oven for a complete meal. Just follow the simple step-by-step photo instructions. It is easy to modify to your taste by varying the seasoning or vegetables.

An economical, healthy meal that fits low-caloric and low-fat diets. A perfect weeknight dinner recipe even the kids will love.

Pork tenderloin with with veggies and seasoning.

👨‍🍳How to Bake Pork Tenderloin with Potatoes and Carrots

  1. Preheat the oven and prepare a sheet pan or large baking dish with a coat of olive oil, parchment paper, or a silicon mat.
  2. Trim the pork tenderloin and prep carrots, potatoes, and onion. Coat them with olive oil, crushed garlic, salt, and black pepper.
  3. Spread over the sheet pan and roast until the tenderloin is done to your taste.
  4. When the tenderloin is done, check the potatoes and carrots for tenderness. If not done, remove the tenderloin for a few minutes and tent while they finish—about 30-35 minutes.
  5. Broil for the last few minutes if you want more browning

For more details, keep reading. See the Recipe Card below for complete instructions and to print.

❓When is pork tenderloin done

What is the safe temperature for pork tenderloin?

145° is the minimum safe internal temperature for pork tenderloin, pork chops, or other solid pork cuts. For ground pork, it is 160°. Reference: USDA.

What temperature represents various levels of doneness in pork?

For solid pork cuts like pork chops, tenderloins, or ribs:
Rare—less than 145° is not recommended
Medium rare is145°-150°
Medium is150°-155°
Medium-well is 155°-160°
Well done is 160°+ (will dry)

✔️Pork Tenderloin Tips

  • Be sure to use pork tenderloin and not a pork loin. It should weigh about 1 to 1 ½ pounds. A huge one could push towards 2 pounds.
  • You can speed up the prep. Buy very small potatoes, use "baby carrots," and use crushed garlic or garlic powder and onion powder.
  • The pork tenderloin's internal temperature is highly dependent on its thickness. So you may want to remove and tent it when you reach the desired temperature and finish the vegetables.
  • Cover the baking sheet with aluminum foil before the olive oil for easy cleanup.

Vegetable Tips

  • The vegetables need to be in one layer, and some space around them will help cooking time. So a bigger pan is better than a too-small one.
  • The cooking time for vegetables will vary by the type of vegetable.
  • Root vegetables, like potatoes and carrots, will take longer—about 30 minutes for 1-inch chunks of potatoes and 25 minutes for thinner carrots.
  • The potatoes should be small, like baby, new, or small red or yellow potatoes.
  • To be tender, potatoes must reach an internal temperature of at least 190°, but 200°-210° is much better.
  • Softer vegetables like broccoli, cauliflower, peppers, zucchini, bell peppers, and yellow squash will take about 15 minutes and can be added halfway through cooking.
  • You can easily change the vegetables to mushrooms, sweet potatoes, brussels sprouts, or anything you like roasted. Just know their roasting time.

Related recipes

Check out some easy sheet pan meals, like Sheet Pan Chicken Fajitas, Sheet Pan Chicken Breasts with Vegetables, and Sheet Pan Apple Pork Chops.

Check out other pork tenderloin recipes, like Memphis BBQ Pork Tenderloin, How to Grill a Pork Tenderloin, Grilled Pork Tenderloin Medallions, and Oven Fried Pork Tenderloin Sandwiches.

↕️How to make this a "for two" or "family size" recipe

This is a very easy recipe to cut in half or double. The full recipe makes about four large servings and fits on a quarter (8X12) or half (12X16) sheet pan or in a large roasting pan.

  1. Use the recipe card and adjust the number of servings to half or double.
  2. Use the amount of ingredients in the ingredient list, not the instructions—those do not adjust.
  3. A double recipe needs a half-sheet pan and won't fit well in a roasting pan since the vegetables need to spread out.
  4. A half recipe will work in most sheet pans or shallow roasting pans. You can leave it in the center on bigger pans.
  5. Cook for the same amount of time.

❄️Storage of Leftovers

Store leftovers in an airtight container refrigerated for 3-4 days and can make "freezer meals" that should be good for 3-4 months.

To reheat, thaw it if frozen overnight in the refrigerator, and reheat it covered in the microwave or oven.

Blue ribbon divider used for visual effect

This recipe is listed in these categories. See them for more similar recipes.

Comfort Food Recipes, Healthy Recipes, Low Fat Recipes, Pork Recipes, Pork Tenderloin Recipes

Have you tried this recipe, or have a question? Join the community discussion in the comments.

Step-by-Step Photo Instructions

trimmed pork tenderloin on a red board

Preheat oven to 400° convection or 425° conventional. Trim a pork tenderloin of fat and silverskin.

cutting carrots on a black board.

Peel and slice 3 medium carrots into ½ inch medallions. Clean and cut 1 pound of small potatoes into about 1-inch pieces—roughly chop ½ of a medium onion.

adding oil to bag with tenderloin.

Add the pork tenderloin and the veggies to a 1-gallon ziplock bag. Add 1 teaspoon kosher salt, ½ teaspoon black pepper, 2-4 cloves of crushed garlic, and 2 tablespoons olive oil. Seal the bag and mix well.

pork tenderloin with veggies in baking dish raw.

Prep a sheet pan or large baking dish with olive oil. You can use foil for easy cleanup if you wish. Add the tenderloin and veggies and spread evenly in a single layer.

cooked pork tenderloin with carrots and potatoes in baking dish.

Bake until tenderloin is 145°-160° per your taste, and potatoes are tender—about 30-35 minutes. In the last few minutes, turn on the broiler and get the color you want. Your cooking time may be longer depending on the tenderloin's size, the veggies, and your oven. If the tenderloin is done, but the vegetables are not, remove and tent the pork until the vegetables are done.

pork tenderloin slices on plate with vegetables.

You can use the broiler for a minute or two if you want more browning at the end. Allow the tenderloin to rest for at least 5 minutes before serving.

📖The Recipe Card

Pork Tenderloin with Potatoes and Carrots on a blue plate
Print Recipe Add to Collection Go to Collections
4.59 from 12 votes

Pork Tenderloin with Potatoes and Carrots

Super easy Pork Tenderloin with Potatoes and Carrots is a near-perfect weeknight pork tenderloin recipe using a sheet pan or large roasting pan for a complete meal the family will love.
Prep Time10 minutes mins
Cook Time30 minutes mins
Total Time40 minutes mins
Course: Main Course
Cuisine: American
Keyword: oasted pork tenderloin with potatoes, pork tenderloin with potatoes, pork tenderloin with potatoes and carrots
Servings: 4 servings
Calories: 475kcal
Author: Dan Mikesell AKA DrDan

Ingredients

  • 1 - 1 ½ pound pork tenderloin
  • ½ medium onion or one small
  • 3 medium carrots
  • 1 pound small potatoes
  • 2 tablespoons olive oil
  • 1 teaspoon kosher salt
  • ½ teaspoon pepper
  • 2-4 cloves crushed garlic 2 for most people. 4 for my wife.
US Customary - Convert to Metric

Instructions

  • Preheat oven to 400° convection or 425° conventional.
    Pork tenderloin with with veggies and seasoning
  • Trim a pork tenderloin of fat and silverskin.
    trimmed pork tenderloin on a red board
  • Peel and slice 3 medium carrots into ½ inch medallions. Clean and cut 1 pound of small potatoes into about 1-inch pieces—roughly chop ½ of a medium onion.
    cutting carrots on a black board
  • Add the pork tenderloin and the veggies to a 1-gallon ziplock bag. Add 1 teaspoon kosher salt, ½ teaspoon black pepper, 2-4 cloves of crushed garlic, and 2 tablespoons olive oil. Seal the bag and mix well.
    adding oil to bag with tenderloin
  • Prep a sheet pan or large baking dish with olive oil. You can use foil for easy cleanup if you wish. Add the tenderloin and veggies and spread evenly in a single layer.
    pork tenderloin with veggies in baking dish raw
  • Bake until tenderloin is 145°-160° per your taste, and potatoes are tender—about 30-35 minutes. In the last few minutes, turn on the broiler and get the color you want. Your cooking time may be longer depending on the tenderloin's size, the veggies, and your oven. If the tenderloin is done, but the vegetables are not, remove and tent the pork until the vegetables are done.
    cooked pork tenderloin with carrots and potatoes in baking dish
  • You can use the broiler for a minute or two if you want more browning at the end. Allow the tenderloin to rest for at least 5 minutes before serving.
    pork tenderloin slices on plate with vegetables

Notes

Pro Tips:

  1. Trim the pork tenderloin well and get the silverskin off if possible.
  2. Use a sheet pan or shallow baking sheet.
  3. Easy to double on a full ½ sheet pan.
  4. Use baby carrots and small potatoes to save time.
  5. You need to use thin-skin potatoes cut into about 1-inch chunks or smaller. If you are using russets, please peel them first.
  6. The pork is "overcooked" by some standards (not in our house). If you want some pink in your pork, then remove the pork when 145° and tent while the veggies finish.
  7. Do not be shy about using the broiler at the end of cooking to brown the meat and vegetables.
  8. Good refrigerated for 3-4 days or frozen as "freezer meals" for 3-4 months.

Nutrition

Calories: 475kcal | Carbohydrates: 24g | Protein: 62g | Fat: 13g | Saturated Fat: 3g | Cholesterol: 184mg | Sodium: 784mg | Potassium: 1814mg | Fiber: 4g | Sugar: 4g | Vitamin A: 7643IU | Vitamin C: 13mg | Calcium: 44mg | Iron: 4mg

Editor's Note: Originally Published December 17, 2017. Updated with expanded options, refreshed photos, and a table of contents to help navigation.

Lilly running in the snow.
Molly running in the snow.

Baked Mac and Cheese with Breadcrumb Topping

Mac and cheese on a large spoon.

This baked mac and cheese has a creamy cheese sauce, tender pasta, and a golden, buttery Parmesan breadcrumb topping. Add an egg for extra richness, and use your favorite cheese sharp cheddar, Velveeta, or a mixture for a bold, comforting flavor.

🧀Ingredients

Pasta—usually traditional elbow macaroni
Butter, Milk, Egg (optional)
Cheese—sharp cheddar, Velveeta, or other
Pantry ingredients—all-purpose flour, dry mustard, paprika, salt, and pepper
Topping—Panko breadcrumbs, Parmesan cheese, butter

Mac and cheese on a large spoon.
[feast_advanced_jump_to]

quote mark
Featured Comment by Chris:
"I'd love this. Had to start taking a statin so I shouldn't, but I love it."

This classic baked mac and cheese recipe uses eggs to create a silky, creamy custard texture. Because of the egg, some might refer to it as Southern-style mac and cheese.

It's a hardy comfort food recipe that's perfect for family dinners, "take-a-dish" events, or make a smaller half recipe if cooking for two.

👨‍🍳How to Make Baked Mac and Cheese with Breadcrumb Topping—Step-by-Step Instructions

Elbow macaroni with cheese and seasoning-labeled.
Adding dry pasta to boiling water.

1. Cook the pasta to al denta, drain, and set aside.

Making a roux with flour and butter.

2. Make a roux with melted butter and flour over medium heat. Whisk until browned, about 3 minutes.

Whisking milk into the roux.

3. Slowly add milk, whisk until smooth and thickened.

Pouring hot liquid into a whipped egg.

4. Optional: Temper a beaten egg by slowly adding some hot roux mixture. Then mix into the sauce.

Mixing cooked pasta into the cheese sauce.

5. Mix in the cheese, seasoning, and cooked pasta. Move to a casserole dish.

Mixing the topping in a small bowl.

6. Mix topping of Panko bread crumbs, grated Parmesan cheese, and melted butter.

Adding the topping to the casserole.

7. Top the casserole with a little shredded cheese, then add the Parmesan Panko topping.

A large spoonful of baked mac and cheese.

8. Cook until nicely brown, at 165° internal temperature, and the edges bubbling, about 30 minutes.

For more details, keep reading. See the Recipe Card below for complete instructions and to print.

👍Ingredient options and variations

Pasta variations

While elbow macaroni is classic, any smaller bite-size pasta, like shells, is a good choice. Always cook to al denta to prevent overcooking in the casserole.

Milk or substitutes

You can use any fat level of milk you have, but cream, evaporated milk, or half and half may be used to replace the milk. More butter fat will increase the creaminess somewhat.

Cheese options

I suggest a mixture of Velveeta and sharp cheddar cheese, but Colby Jack, Monterey Jack, or Gouda are good choices. Brand-name shredded cheese will work better than generic. For best results, use freshly grated cheese for better melting.

Other options

Steam vegetables, like broccoli, may be added with the cooked macaroni.

Add some bacon or ¼ teaspoon of cayenne pepper for mild heat.

🥣Topping notes

We love the buttery Parmesan bread crumb topping. I have accused my wife of using a bigger pan, so there could be more topping. I would call the topping a feature of this recipe—it is just that good.

The panko bread crumbs will be crispy, but for extra crispiness, toast the bread crumbs for a few minutes in a skillet before using.

I like to add a bit of shredded cheese to the mac and cheese before adding the topping, which holds the topping in place after cooking.

Broken-up potato chips are a simple topping. Other choices include Ritz crackers, Panko breadcrumbs, cheddar cheese, or skip the topping.

⬇️Making a half size recipe

This is an easy recipe to cut in half to make it suitable for cooking for two or smaller households. The full recipe makes about 8 large servings, while a half recipe makes only 4 and fits nicely in a standard 6 by 9 casserole dish.

  1. Use the recipe card and adjust the servings from 8 to 4.
  2. You can use the whole egg or, after whipping, discard half the egg.
  3. Use the amount of ingredients in the ingredient list, not the instructions—those do not adjust.
  4. The half recipe will fit a 6 by 9 baking dish, but you can also use a 9-inch round or 8-inch square dish.
  5. Cooking time will be a little less. Watch for good browning and bubbling edges.

📅Making ahead

To make ahead, cover it tightly and refrigerate for 2 days, as long as the sauce reaches 165°F after the egg is added. If you are not sure, 24 hours is the limit. Or it may be frozen for 3 months.

You may add the topping before storing, but it will have a better texture if added just before cooking.

Bake as the recipe directs, but it may take a few minutes longer since it is cold. There will be a slight decrease in the texture.

😊Mac & cheese and other kid-friendly recipes

Other mac and cheese recipes you may enjoy are Creamy One-Pot Mac and Cheese, Roadhouse Mac and Cheese, Uncooked Macaroni Crock Pot Mac and Cheese, and Creamy Crock Pot Mac and Cheese.

A perfect kid recipe to serve with Grilled Chicken Tenders, Baked Chicken Tenders, Healthy Homemade Chicken Nuggets, or Oven Baked Chicken Drumsticks.

❄️Storing leftovers

Store leftovers in an airtight container and refrigerate them for 4 days. The quality will deteriorate slowly. Freeze the leftovers for up to 4 months, but they may have texture issues.

❓FAQs

Why add egg to mac and cheese?

Eggs make mac and cheese creamier and give it a silky, custardy texture, adding flavor. The egg also helps the mac and cheese hold together more.

What is tempering an egg, and why do it?

To temper an egg, slowly add some hot liquid from a recipe to the egg before adding the egg to a hot liquid.

If you add a cold egg to a hot liquid, you will frequently get the proteins coagulated (think cooked scrambled egg), and it won't mix in a liquid. So, to add an egg to the hot cheese sauce, you will need to raise the temperature to prevent coagulation.

📖The Recipe Card

Mac and cheese on a large spoon.
Print Recipe Add to Collection Go to Collections

Baked Mac and Cheese with Breadcrumb Topping

This baked mac and cheese has a creamy cheese sauce, tender pasta, and a golden, buttery Parmesan breadcrumb topping. Add an egg for extra richness, and use your favorite cheese like sharp cheddar, Velveeta, or a mixture for a bold comforting flavor.
Prep Time25 minutes mins
Cook Time30 minutes mins
Total Time55 minutes mins
Course: Main Course
Cuisine: American
Keyword: Baked Mac and Cheese, Creamy mac and cheese, Mac and Cheese with Eggs
Servings: 8 servings
Calories: 546kcal
Author: Dan Mikesell AKA DrDan

Ingredients

  • 1 pound pasta
  • 1 egg tempered
  • 4 tablespoons butter
  • 4 tablespoons flour
  • 2½ cups milk
  • 16 oz cheese of choice I used sharp cheddar and Velveeta
  • 2 teaspoons dry mustard
  • 1 teaspoon salt
  • ½ teaspoon pepper
  • ½ teaspoon paprika

Topping-optional but recommended

  • 1 cup Panko bread crumbs
  • ½ cup grated Parmesan cheese
  • 4 tablespoons butter
US Customary - Convert to Metric

Instructions

  • Preheat oven to 350° if cooking now. Prepare a 9 by 12 baking dish with a light coat of butter.
    Elbow macaroni with cheese and seasoning-labeled.
  • Cook and drain 1 pound of elbow macaroni or other pasta, cooking it to al dente according to the package instructions.
    Adding dry pasta to boiling water.
  • While cooking pasta, melt 4 tablespoons of butter over medium heat in a large pan. Add 4 tablespoons of flour to the melted butter and whisk continuously until it begins to brown, about 3 minutes.
    Making a roux with flour and butter.
  • Add 1 cup of milk and whisk until smooth, then add the remaining 1½ cups of milk. Whisk continuously until thickened.
    Whisking milk into the roux.
  • In a small bowl, lightly beat one egg. Remove ¼ cup of the hot roux mixture and slowly mix it into the egg.
    Pouring hot liquid into a whipped egg.
  • Add the egg to the thickened milk mixture while continuing to whisk. Add 2 teaspoons of dry mustard, 1 teaspoon of salt, ½ teaspoon of pepper, and ½ teaspoon of paprika. Add 3½ cups of shredded cheese and mix until smooth. Bring to 165° for safety.
    Whisking cheese into the sauce
  • Mix in the cooked pasta and then pour the mixture into the casserole dish.
    Pouring the mixed mac and cheese into a casserole pan.
  • Mix topping: In a medium bowl, mix 1 cup Panko breadcrumbs with ½ cup grated Parmesan cheese. Add 4 tablespoons of melted butter and mix.
    Mixing the topping in a small bowl.
  • Top the casserole with ½ cup of shredded cheese, then add the Parmesan Panko topping.
    Adding the topping to the casserole.
  • Cook until nicely browned, with an internal temperature of 165 °, and edges bubbling—about 30 minutes.
    Golden baked mac and cheese in a baking dish.

Video

Notes

Pro Tips

  1. This uses a 12X9 casserole dish.
  2. Instructions for a half recipe are in the post.
  3. Use the pasta of your choice, but elbow macaroni is recommended. Cook to al dente.
  4. Use the cheese of your choice, but sharp cheddar cheese and Velveeta are recommended.
  5. If using the egg, be sure to temper the egg according to the instructions.
  6. I always make more topping. I love the topping.
  7. Making ahead instructions and ingredient options are discussed in the recipe post.
  8. Good refrigerated for 4 days.

Nutrition

Calories: 546kcal | Carbohydrates: 36g | Protein: 25g | Fat: 33g | Saturated Fat: 19g | Polyunsaturated Fat: 0.3g | Monounsaturated Fat: 1g | Cholesterol: 126mg | Sodium: 916mg | Potassium: 168mg | Fiber: 1g | Sugar: 5g | Vitamin A: 1350IU | Vitamin C: 0.1mg | Calcium: 580mg | Iron: 0.7mg

Originally Published March 20, 2017. Updated with expanded options, refreshed photos, and a table of contents to help navigation.

Dogs running hard in snow.

Crispy Smashed Potatoes

A smashed potato with beans.

These crispy smashed potatoes have golden, crunchy edges with soft, fluffy centers. They’re made with small, thin-skinned potatoes and a few simple pantry ingredients.

This easy smashed potato recipe starts on the stovetop and finishes in a hot oven for maximum crispiness. Simple enough for beginners and good enough for company.

🤔 Quick Answer: How Long to Cook Smashed Potatoes

  • Boil: Cook until fork-tender (200°F to 210°F), about 15–20 minutes, depending on size.
  • Bake: After smashing, bake for 20–25 minutes until golden and crispy. Add a minute or two for ultra-crispy edges.
  • Total time: Allow about 40–50 minutes, including smashing and seasoning.
A smashed potato with beans.
[feast_advanced_jump_to]

quote mark
Featured Comment by Sandra:
⭐⭐⭐⭐⭐
"These are the grandkids all time faves. They can’t get enough of them."

📝 TL;DR — Recipe Summary

🥔 What: An easy smashed potato recipe using small, thin-skinned potatoes like red or gold for delicious, crispy potatoes.

Why: Boiling softens the potatoes for smashing, creating a rough surface that gets crispy when baked at high heat.

How: Boil until fork-tender, smash, brush with butter or oil, season, and bake until golden and crisp.

For extra crispy: Smash them fairly thin with rougher edges and give them plenty of space on a hot baking sheet. Broil for a few minutes at the end for ultra-crispy edges.

🥔 Ingredients

Red potatoes with olive oil and seasonings—labeled.
  • Potatoes — small red, baby/new, or Yukon Gold potatoes.
  • Butter or olive oil — I prefer butter for flavor and browning; olive oil also works well.
  • Seasoning — kosher salt and black pepper, or 7:2:1 seasoning for some garlic. Add rosemary, thyme, paprika, Parmesan, or other seasonings you like.

👨‍🍳 Quick Overview: How to Make Smashed Potatoes

1. Boil

Scrub and boil potatoes in salted water until fork-tender.

Red potatoes in boiling water.

✅ Pro Tip: "Fork-tender" means you can easily stick a fork in the potato, which will fall off under its own weight. Alternatively, use a thermometer to check for a temperature of 200°F to 210°F.

2. Smash

Place on the hot pan with olive oil and press with a potato masher or fork.
Note: Thinner smashed potatoes get crispier, while ragged edges create more crispy surface area.

Smashing soft potatoes with a potato masher on an oiled tray.

✅ Pro Tip: If you preheat the tray, smash the potatoes on a sheet of parchment paper and then slide them onto the pan.

3. Season

Brush with olive oil or melted butter, then season with salt, pepper, garlic powder, or your favorite seasonings.

Brushing a smashed potato with oil.

4. Roast

Bake at 450°F (425°F convection) for about 20–25 minutes until golden and crisp. For extra crunch, roast longer or broil briefly at the end.

A smashed potato on a plate with beans.

👇 Scroll down for the printable recipe card and complete step-by-step photo instructions—or keep reading for tips and variations.

🥔 What Potatoes Are Best for Smashed Potatoes?

Small, thin-skinned potatoes work best. I prefer small red potatoes, but baby/new potatoes and Yukon Golds also work well. About 1 to 1½ inches is ideal—they cook evenly, smash easily, and hold together while developing crispy edges.

For larger, thin-skinned potatoes, cut them into smaller pieces before boiling. Small, thin-skinned potatoes still give the best results. Thick-skinned potatoes, such as russets, are not recommended—the thicker skin interferes with the texture of the smashed potatoes.

🤔 Tips and Variations

🔥 Oven Temperature

450°F (425°F convection) works best. Adjust as needed to match other dishes — the goal is golden, crispy potatoes.


🥔 Maximum Crispiness

  • Preheat the pan – Hot surface = faster browning.
  • Give them space – Prevents steaming and soggy edges.
  • Ragged tops – More ridges = more crunch; use a masher or large fork.
  • Use enough oil – Coat tops well with oil or butter; butter browns best.
  • Want ultra-crispy? Broil for a few minutes at the end of baking.

🌿 Variations & Add-Ins

  • Cheesy smashed potatoes – Add Parmesan or cheddar.
  • Herb-infused – Try rosemary, thyme, or chives.
  • Spicy kick – Chili flakes, paprika, or cayenne.

❄️ How to Store & Reheat

Store leftovers in an airtight container in the refrigerator for up to 3 days.

Reheat in a 400°F oven or air fryer for about 10 minutes until hot and crisp. Microwave if needed, but expect softer potatoes.

🥔 More Crispy Potato Recipes

Love that crunch? Try these other crispy potato favorites made right in your kitchen:

  • Crispy Home Fries (with Bacon) – classic diner-style potatoes, golden and crispy in 30 minutes.
  • Crispy Oven-Baked French Fries – perfectly seasoned oven fries without the grease.
  • Roasted Baby Potatoes – simple, bite-sized, and crisp on the outside.
  • Parmesan Baked Potatoes – buttery garlic flavor and golden edges.

❓ FAQ

How are smashed potatoes different from mashed potatoes?

Mashed potatoes are usually peeled and creamed with milk and butter until smooth. Smashed potatoes are cooked, flattened, seasoned, and roasted until the edges are crispy and the insides are fluffy.

What potatoes make the crispiest smashed potatoes?

Small, thin-skinned potatoes work best, including baby reds, new potatoes, and Yukon Golds. They hold together when smashed while developing plenty of crispy edges.

Can I make these ahead of time?

Yes. Boil and smash the potatoes ahead, refrigerate, and roast later. They’ll crisp up beautifully when reheated in the oven or air fryer.

📖The Recipe Card

A smashed potato with beans.
Print Recipe Add to Collection Go to Collections
4.75 from 4 votes

Crispy Smashed Potatoes

Crispy smashed potatoes with fluffy centers and golden, crunchy edges. Boil, smash, season, and bake for an easy potato side dish.
Prep Time5 minutes mins
Cook Time40 minutes mins
Total Time45 minutes mins
Course: Potato
Cuisine: American
Keyword: crispy mashed potatoes, crispy new potatoes, crispy smashed potatoes
Servings: 4 servings
Calories: 166kcal
Author: Dan Mikesell AKA DrDan

Ingredients

  • 4 Thinned-skin potatoesBaby, New, Red, or Yukon Gold Baby, New, Red, or Yukon Gold—1 to 1½ inches
  • Olive oil or butter
  • Salt in water
  • Salt and pepper or seasoning of your choice
US Customary - Convert to Metric

Instructions

Boil

  • Add 3-4 cups of water and 1 teaspoon salt to a saucepan. Bring to a boil over high heat.
    adding salt to water
  • Scrub 1 to 1½-inch baby, new, red, or Yukon Gold potatoes (or your preferred variety)
    Clean potatoes under running water with a brush.
  • Add them to the boiling water, fully covering them. Reduce heat to low, cover, and simmer for 15-20 minutes (longer if larger) until “fork-tender.”
    Red potatoes in boiling water.

Preheat

  • While potatoes cook, preheat oven to 425°F convection (450°F conventional). Preheat the baking sheet for added crispiness.

Smash

  • Add olive oil to a baking pan with edges — non-stick is preferred. Use enough oil to create a shallow pool in the pan.
    Once cooked, transfer potatoes to the pan and gently smash to about ½ inch thick with a potato masher or fork.
    Smashing soft potatoes with a potato masher on an oiled tray.

Season

  • Brush with more olive oil or melted butter. Sprinkle with salt, pepper, and any seasonings you like (I recommend my All-Purpose Seasoning Mix).
    Brushing a smashed potato with oil.

Roast

  • Bake 20–25 minutes until golden and crispy. For extra crisp, bake longer or broil 1-2 minutes at the end.
    Cooked smashed potato on a spatula.

Notes

Pro Tips:

Potato Variety: Red, Yukon Gold, baby, or new potatoes around 1½ inches are ideal.
"Fork-tender" means you can easily stick a fork in the potato, which will fall off under its own weight. Alternatively, use a thermometer to check for a temperature of 200°F to 210°F.
Make it Loaded: Add crumbled bacon, cheese, and green onions.
Smashing & Texture: Thinner smashed potatoes are crisper; thicker ones are fluffier. More ragged surfaces = more crunch, which is why I don’t use flat-bottomed items like a glass or pan.
Adjust for Crispiness: Extend baking or broil briefly for more browning.
More tips and options in the recipe post.

Nutrition

Calories: 166kcal | Carbohydrates: 33g | Protein: 4g | Fat: 2g | Saturated Fat: 0g | Cholesterol: 0mg | Sodium: 38mg | Potassium: 969mg | Fiber: 3g | Sugar: 2g | Vitamin A: 15IU | Vitamin C: 18.3mg | Calcium: 21mg | Iron: 1.5mg

Originally Published July 4, 2012. Updated with expanded options, refreshed photos, and a table of contents to help navigation.

Molly and Lilly are playing in the snow.

Lunch Lady Rolls—Small Batch Version

closeup of Lunch Lady Rolls still on tray

Old fashioned 60s school Lunch Lady Rolls, those wonderful hot rolls everybody loved in the cafeteria. You can now be made with this small batch recipe mixed by hand or in a stand mixer at home.

🥣Ingredients

All-purpose flour
Sugar
Yeast—rapid-rise or instant yeast
Butter, egg, milk
Salt

closeup of Lunch Lady Rolls still on tray.
[feast_advanced_jump_to]
Blue ribbon divider used for visual effect

Featured Comment from Debbi:
"These came out fabulous! Thank you for taking the time to break everything down and to reduce the recipe size. Whole family loved them!"

Most lunch lady recipes will feed a whole school, but this reduced version is home-friendly and can be easily increased or decreased for your needs. Plus, this versatile dough works well for cinnamon rolls.

You can make these classic yeast rolls with a stand mixer or by hand mixing, and they can be made ahead, and the dough can be frozen.

Inspired by School Lunchroom Cafeteria Rolls from Allrecipes.com but simplified, reduced in size, and butter substituted for lard.

👨‍🍳How to Make Lunch Lady Rolls

Flour with milk and other roll ingredients and a black stand mixer.

Add 3 ½ cups of all-purpose flour, ¼ cup of sugar, and 1 ½ teaspoon of salt to the stand mixer bowl or large mixing bowl.

yeast proofing win a measuring bowl.

Start with one cup of 105°-110° water. Stir in 1 teaspoon of sugar and 1 package of rapid-rise yeast. Allow to set for a few minutes until foaming (proofing.)

adding the yeast mixture to the stand mixer.

Add the yeast mixture to the flour mixture along with 2 tablespoons of milk, 1 egg, and ¼ cup of melted butter.

ball of dough in the stand mixer bowl covered with plastic wrap.

Mix in the stand mixer with a dough hook on two or in the bowl with a wooden spoon until the wet and dry are thoroughly combined. Then knead for 5 minutes in the mixer or by hand. Form into a ball, cover, and allow to rise in a warm spot until doubled in size—about 45 minutes.

cutting the dough into 16 pieces on a floured surface.

Place dough on a floured surface and hand-knead for 2 minutes. Form into a roll and cut into 16 equal pieces with a scraper or knife. Preheat oven to 400°.

Balls of raw dough on a baking tray with a mat.

Prep a baking sheet with a baking mat or parchment paper. Or use a baking dish. Roll into balls and place on the baking tray. Cover with plastic wrap sprayed with PAM to prevent sticking and allow to rise again for 40-45 minutes until almost double size.

baked lunch lady rolls on the baking tray.

Bake until golden brown—about 15 minutes. If you are unsure or change the size of the roll, then an internal temperature of 195° to 200° is done.

For more details, keep reading. See the Recipe Card below for complete instructions and to print.

↕️How to make this recipe smaller or bigger

Before adjusting the recipe smaller:

  1. Realize you can change the size of the rolls—the 16 smaller rolls can become 10-12 bigger rolls and be cooked a bit longer using internal temperature for an endpoint.
  2. You can also freeze the individual rolls before the second rise.
  3. Use a whole egg.

How to adjust:

  1. Use the recipe card and adjust the number of servings to half, double, or any amount you want.
  2. Use the amount of ingredients in the ingredient list, not the instructions—those do not adjust.

When to Serve Lunch Lady Rolls

These rolls go well with any meal, but for that cafeteria feel, try American Goulash, Chicken Broccoli Rice Casserole, Old Fashioned Meatloaf, Creamy Smoked Sausage Pasta, or Tuna Noodle Casserole.

Check out these other roll recipes: Whole Wheat Rolls and Easy Dinner Rolls.

Make them ahead

  1. Follow the recipe to the point of cutting individual rolls and placing them on the pan. 
  2. Seal tightly with plastic wrap and refrigerate for up to 48 hours.
  3. Remove from the refrigerator and let them set at room temperature while still covered.
  4. Bake as directed.

Freezing dough

You can freeze the raw dough before the final rise. Form little balls and freeze them separately on a cookie sheet, then store them airtight. You could also refrigerate at this point for a day.

They should be good for about 3 months. To bake, remove and thaw in the refrigerator, then spread on the baking tray, let rise, and bake.

Storage of leftovers

Store airtight at room temperature. But, there are no preservatives, so you will start seeing mold at 3-4 days.

If you want to freeze after baking, seal it tight for up to 3 months.

FAQs

What is the difference between rolls and bread?

The dough is the same, but they are baked differently leaving the rolls with a crispier crust and softer middle.

Blue ribbon divider used for visual effect

This recipe is listed in these categories. See them for more similar recipes.

Bread Recipes

Have you tried this recipe, or have a question? Join the community discussion in the comments.

📖The Recipe Card

Stand Mixer Lunch Lady Rolls from 101 Cooking for Two
Print Recipe Add to Collection Go to Collections
4.84 from 6 votes

Lunch Lady Rolls—Small Batch Version

Old fashioned 60s school Lunch Lady Rolls, those wonderful hot rolls everybody loved in the cafeteria. You can now be made with this small batch recipe mixed by hand or in a stand mixer at home.
Prep Time1 hour hr 45 minutes mins
Cook Time15 minutes mins
Total Time2 hours hrs
Course: Bread
Cuisine: American
Keyword: Dinner Rolls, Lunch Lady Rolls
Servings: 16
Calories: 146kcal
Author: Dan Mikesell AKA DrDan

Ingredients

  • 1 cup water warm
  • 1 package rapid rise yeast
  • 1 teaspoon sugar
  • 3 ½ cup AP flour
  • ¼ cup sugar
  • 1 ½ teaspoon salt
  • ¼ cup butter melted
  • 2 tablespoons milk
  • 1 egg
US Customary - Convert to Metric

Instructions

  • Add 3 ½ cups of all-purpose flour, ¼ cup of sugar, and 1 ½ teaspoon of salt to the stand mixer bowl or large mixing bowl.
    Flour with milk and other roll ingredients and a black stand mixer
  • Start with one cup of 105°-110° water. Stir in 1 teaspoon of sugar and 1 package of rapid-rise yeast. Allow to set for a few minutes until foaming (proofing.)
    yeast proofing win a measuring bowl
  • Add the yeast mixture to the flour mixture along with 2 tablespoons of milk, 1 egg, and ¼ cup of melted butter.
    adding the yeast mixture to the stand mixer
  • Mix in the stand mixer with a dough hook on two or in the bowl with a wooden spoon until the wet and dry are thoroughly combined. Then knead for 5 minutes in the mixer or by hand. Form into a ball, cover, and allow to rise in a warm spot until doubled in size—about 45 minutes.
    ball of dough in the stand mixer bowl covered with plastic wrap
  • Place dough on a floured surface and hand-knead for 2 minutes. Form into a roll and cut into 16 equal pieces with a scraper or knife. Preheat oven to 400°.
    cutting the dough into 16 pieces on a floured surface
  • Prep a baking sheet with a baking mat or parchment paper. Or use a baking dish. Roll into balls and place on the baking tray. Cover with plastic wrap sprayed with PAM to prevent sticking and allow to rise again for 40-45 minutes until almost double size.
    Balls of raw dough on a baking tray with a mat
  • Bake until golden brown—about 15 minutes. If you are unsure or change the size of the roll, then an internal temperature of 195° to 200° is done.
    baked lunch lady rolls on the baking tray

Notes

Pro Tips:

  1. I make 16 rolls with this recipe. You can make them a bit bigger and do 12 rolls but baking time will change, so use internal temperature.
  2. A stand mixer is recommended but not required. If you don't use one, knead at the beginning for 5-6 minutes.
  3. Proof the yeast to be sure it is good.
  4. There are no preservatives like commercial bread. This will be good for about 3 days.
  5. Frozen dough instructions and size adjustment suggestions are in the post.

Nutrition

Calories: 146kcal | Carbohydrates: 25g | Protein: 4g | Fat: 4g | Saturated Fat: 2g | Polyunsaturated Fat: 0.3g | Monounsaturated Fat: 1g | Cholesterol: 21mg | Sodium: 189mg | Potassium: 50mg | Fiber: 1g | Sugar: 4g | Vitamin A: 100IU | Calcium: 10mg | Iron: 1.4mg

Originally Published March 26, 2016. Updated with expanded options, refreshed photos, and a table of contents to help navigation.

dogs playing in leaf pile.

Roasted Asparagus in the Oven

asparagus on white platter.

Learn how to roast asparagus in the oven for crisp and tender results. This easy roasted asparagus recipe includes tips on trimming and choosing the best spears.

With simple seasoning and optional Parmesan, it’s a quick side dish that works with thick or thin asparagus.

🤔 Quick Answer: How Long to Bake Asparagus

Approximate baking times for medium-thick spears:

  • 425°F (400°F convection): 12–15 minutes — recommended
  • 400°F (375°F convection): 1–2 minutes longer
  • Thin asparagus: 2–3 minutes less
  • Thick asparagus: 2–5 minutes longer

Asparagus is done when it’s fork-tender and lightly browned, but not mushy.

Parmesan baked asparagus on a white platter.
[feast_advanced_jump_to]

quote mark
Featured Comment by Jenne:
⭐⭐⭐⭐⭐
"Tonight I needed a quick convection roasted recipe for asparagus…My husband said it was SOOO good!! He pointed at the empty pan and said "THAT was good! Wow!" So thank you for a great, quick and very delicious recipe."

👍 TL;DR — Recipe Summary

What it is: Easy roasted asparagus cooked in a hot oven until crisp and tender.

Why you’ll love it: Simple ingredients, quick prep, and easy adjustments for thick or thin spears.

How to make it: Trim, toss with oil and seasoning, then bake until lightly browned and fork-tender.

🥣 Ingredients

Asparagus with Parmesan and garlic-labeled.

Asparagus – fresh, medium-thick spears work best
Olive oil – for roasting and browning
Garlic – fresh minced or crushed, or use garlic powder
Salt and pepper
Optional Parmesan cheese – adds extra flavor and light browning

👨‍🍳 Quick Overview: How to Roast Asparagus

1. Cut about 1 inch from the base of the spears, then toss with olive oil, garlic, salt, and pepper.

Mixing garlic into the olive oil.

2. Spread the asparagus in a single layer on a baking sheet. Sprinkle with Parmesan if desired.

Coating asparagus with oil and garlic.

✅ Pro Tip: Preheat the oven fully before adding the asparagus. Starting in a cold oven increases cooking time and can make the asparagus softer and less crisp.

3. Bake until fork-tender and lightly browned.

Roasted asparagus on the tray.

👇 For more details, keep reading. See the recipe card below for complete instructions and to print.

🤔 How Long to Roast Asparagus and When Is It Done?

At 425°F (400°F convection), medium-thick asparagus usually takes 12–15 minutes.

Cooking time depends mainly on thickness:

  • Thin spears: about 9–10 minutes
  • Medium spears: about 12–15 minutes
  • Thick spears: about 15–20 minutes

Asparagus is done when the thick end is fork-tender and lightly browned, but not soft or mushy. If you’re unsure, aim for about 135°F in the thickest part of the spear.

Lower oven temperatures can be used, but they will take longer and usually produce softer, less crisp asparagus.

😊 How to Choose the Freshest Asparagus

Look for asparagus with:

  • Bright green color with a little violet at the tips
  • Firm spears that are not limp
  • Fresh-looking ends that are not dried out
  • Medium thickness for the easiest roasting; very thin spears can overcook, while very thick ones may be woody

Buy asparagus as fresh and local as possible. In Michigan, peak season is usually early May through mid-to-late June; warmer areas may start earlier.

🔪 How to Trim Asparagus—Snap or Cut?

For years, cooks were told to snap asparagus where it naturally breaks. But Cook’s Illustrated found that snapping often removes more of the tender stalk than necessary.

Instead, cut about 1 inch from the base of the spears. If the stalks are very thick, peel the lower portion to remove some of the tougher outer layer.

I’ve used this method for years because it’s simple, consistent, and wastes less asparagus.

🍽️ What to Serve with Roasted Asparagus

Roasted asparagus works with almost any main dish. It’s especially good with strip steak, chicken breasts, pork chops, ham, prime rib, or turkey.

❄️ Storage

Store leftover roasted asparagus in an airtight container in the refrigerator for up to 3 days.

Reheat in a hot oven in a single layer for the best texture. The microwave works, but the asparagus will be softer.

Grilling Asparagus on a Gas Grill

Tender and smoky grilled asparagus is an ideal vegetable side dish for most grilled entrees. Grilling asparagus on a gas grill is easy and quick, needing only a few ingredients.

Grilled asparagus with Parmesan with ham.

❓ FAQs

Do I need to soak or blanch asparagus before roasting?

No. Just trim the ends, rinse, and pat dry. There’s no need to soak or blanch asparagus before roasting.

How should I store fresh asparagus?

Store fresh asparagus upright in a container with about 1 inch of water. Trim the ends slightly, don’t wash it first, and loosely cover with a plastic bag before refrigerating.

📖The Recipe Card

baked Parmesan asparagus on a white platter
Print Recipe Add to Collection Go to Collections
5 from 1 vote

Roasted Asparagus (Easy Oven Recipe)

Learn how to roast asparagus in the oven for crisp and tender results with simple seasoning and optional Parmesan.
Prep Time5 minutes mins
Cook Time15 minutes mins
Total Time20 minutes mins
Course: Vegetable
Cuisine: American
Keyword: Baked Asparagus, Garlic Roasted Asparagus, Parmesan Asparagus
Servings: 4 servings
Calories: 152kcal
Author: Dan Mikesell AKA DrDan

Ingredients

  • 1 pound asparagus
  • 3 tablespoons olive oil
  • 2-4 cloves garlic (or ½ teaspoon garlic powder)
  • ½ teaspoon kosher salt to taste
  • ¼ teaspoon pepper
  • ¼ cup grated Parmesan cheese (optional)
US Customary - Convert to Metric

Instructions

  • Preheat the oven to 425°F (400°F convection). Trim about 1 inch from the base of the asparagus.
    Asparagus with Parmesan and garlic-labeled.
  • Combine 3 tablespoons olive oil, 2-4 cloves crushed garlic (or ½ teaspoon garlic powder), ½ teaspoon kosher salt, and ¼ teaspoon pepper.
    Mixing garlic into the olive oil.
  • Place asparagus on a baking sheet and toss to coat evenly.
    Coating asparagus with oil and garlic.
  • Spread in a single layer. Sprinkle with Parmesan if desired.
    Sprinkle the asparagus with grated Parmesan.
  • Roast for 12–15 minutes for medium-thick spears, until fork-tender and lightly browned. Thin asparagus may take 9–10 minutes; thick spears may need 15–20 minutes. If unsure, aim for about 135°F in the thickest part.
    Roasted asparagus on the tray.

Notes

Pro Tips

  • Pick the best fresh asparagus. See the discussion in the post for tips.
  • Use 2–4 cloves of garlic, depending on taste.
  • You can substitute garlic powder if you don’t have fresh garlic.
  • Trim about 1 inch from the base; peel thick stalks if needed.
  • Coat both the asparagus and the pan lightly with oil.
  • Make it with sesame seeds or bread crumbs: Add some toasted sesame seeds or Panko bread crumbs with the Parmesan cheese.

Nutrition

Calories: 152kcal | Carbohydrates: 6g | Protein: 5g | Fat: 13g | Saturated Fat: 3g | Polyunsaturated Fat: 1g | Monounsaturated Fat: 9g | Cholesterol: 6mg | Sodium: 345mg | Potassium: 248mg | Fiber: 2g | Sugar: 2g | Vitamin A: 900IU | Vitamin C: 9.9mg | Calcium: 100mg | Iron: 2.5mg

Editor's Note: Originally Published March 6, 2017. Updated with expanded options, refreshed photos, and editing for easier navigation.

Dogs in the basement.

Crock Pot Baked Ziti (Easy Cheesy Pasta)

baked ziti on a white plate

This easy crock pot baked ziti recipe cooks uncooked pasta right in a rich homemade meat sauce with plenty of melted cheese. Ricotta gives it the creamy flavor of lasagna without the work.

With about 20 minutes of prep, everything cooks together in the slow cooker for an easy cheesy pasta dinner with no need to boil the pasta first.

baked ziti on a white plate.
[feast_advanced_jump_to]

quote mark
Featured Comment by Kathleen:
⭐⭐⭐⭐⭐
"I have made this several times for my Husband. He is a very picky eater…he absolutely loves this!!! It is a 5-star rating for us!!"

📝 TL;DR — Recipe Summary

What: Easy baked ziti in a crock pot is made with uncooked pasta, homemade meat sauce, ricotta, mozzarella, and Parmesan.

Why: Cheesy comfort food with no need to boil the pasta first, and only about 20 minutes of prep.

How: Add the sauce, uncooked pasta, ricotta mixture, and mozzarella to the crock pot in steps, then cook on LOW for about 4 hours.

🥣 Ingredients

burger with egg and ingredients for ziti.
  • Pasta – Use regular uncooked ziti or penne, not oven-ready or no-boil pasta. It cooks directly in the sauce.
  • Mozzarella cheese – Provides the melted, gooey cheese throughout the baked ziti.
  • Ricotta, Parmesan, and egg white – Ricotta gives the dish its creamy lasagna-like flavor. Parmesan adds flavor, while the egg white helps the ricotta mixture hold together.

For the Homemade Meat Sauce

  • Crushed tomatoes – The tomato base for the homemade sauce.
  • Ground beef or Italian sausage – Use either one or a mix of both. Brown and drain before adding to the sauce.
  • Onion and garlic – Cook with the meat to build the flavor of the sauce.
  • Seasonings – Basil, salt, pepper, and optional red pepper flakes.

👨‍🍳 Quick Overview: Crock Pot Baked Ziti

1. Prepare the meat sauce

Brown the meat with the onion and garlic; drain. Add the meat to the seasoned crushed tomatoes.

adding cooked meat to the sauce.

2. Mix the ricotta cheese

Mix the ricotta with Parmesan, egg white, parsley, and salt.

mixing ricotta cheese with an egg.

3. Add to the crock pot

In order, add half of the meat sauce, uncooked pasta, ricotta mixture, and mozzarella to the crock pot. Repeat, finishing with sauce and mozzarella.

adding cheeses to the first layer of pasta.

4. Cook

Cover and cook on LOW for about 4 hours. Check at 3 hours and stop when the pasta is tender.

spoonful of baked ziti over the crock pot.

👇 Scroll down for the printable recipe card with step-by-step photos — or keep reading for cooking tips, options, and storage.

⏲️ How Long to Cook

  • LOW (recommended): About 4 hours. Start checking at 3 hours since crock pots vary.
  • HIGH: About 2 hours. Start checking at 1 hour.
  • Doneness: Stop cooking when the pasta is tender but not mushy.

🍝 Pasta Tips

  • Use regular uncooked pasta—not oven-ready or no-boil. Ziti and penne work well.
  • Pasta shapes cook at different rates. Smaller shapes cook faster, so check for tenderness early.
  • Be cautious with whole-wheat or gluten-free pasta. Cooking times and results can vary by brand.

✔️ Sauce Options & Variations

  • Sauce: Homemade sauce gives the best results, but jarred marinara works as a shortcut.
  • Meat: Use ground beef, Italian sausage, or a mixture of both. Brown with onion and garlic, then drain before adding to the sauce.
  • Vegetables: Add mushrooms, spinach, or bell peppers if you like.
  • Seasoning: Adjust basil, oregano, or red pepper flakes to taste.

↕️ Scaling for Two or Family Size

  • Half recipe: Use a 2-quart mini crock pot and check the pasta early.
  • Full recipe: Use a 3- to 4-quart crock pot.
  • Double recipe: Use a 6-quart or larger crock pot.
  • Cooking time stays about the same. Cook until the pasta is tender.

Scaling the ingredients: In the recipe card, change the number of servings. Use the adjusted amounts in the ingredient list—the instructions do not adjust automatically.

🍅 Crock Pot Italian Recipes

You may also like these crock pot Italian favorites:

  • Crock Pot Pizza Casserole
  • Crock Pot Chicken Cacciatore

Crock Pot Italian Chicken Pasta

Delicious Crock Pot Italian Chicken Pasta is loaded with mozzarella and Parmesan cheese, tender chicken, and pasta. It is cooked in an easy homemade marinara sauce that cooks the dry pasta and chicken while it simmers. You will love this cheesy Italian bake.

Crock pot Italian chicken pasta on a spoon.

🥗 Serving and Storage

  • Serve with a green salad and garlic bread.
  • Refrigerate leftovers in an airtight container for up to 4 days.
  • Freeze for up to 3 months.
  • Reheat in the microwave or covered in the oven. Thaw frozen baked ziti overnight in the refrigerator before reheating.

❓ FAQs

What is baked ziti?

Baked ziti is an Italian-American pasta dish made with tomato sauce, cheese, and ziti pasta. It often includes ground beef or Italian sausage but can also be made without meat.

What is the difference between ziti and penne pasta?

Ziti has straight-cut ends and is slightly larger, while penne has angled ends. Either works well in this recipe, and penne is often easier to find.

Can I make crock pot baked ziti without meat?

Yes. Skip the meat and use the tomato sauce and cheeses. You can also add mushrooms, spinach, or bell peppers.

📖The Recipe Card

baked ziti on a white plate
Print Recipe Add to Collection Go to Collections
4.80 from 10 votes

Crock Pot Baked Ziti Recipe (Easy Cheesy Pasta)

Easy crock pot baked ziti with uncooked pasta, rich homemade sauce, and plenty of cheese—all cooked right in your slow cooker.
Prep Time20 minutes mins
Cook Time4 hours hrs
Total Time4 hours hrs 20 minutes mins
Course: Main Course, Main dish
Cuisine: Italian
Keyword: Crock Pot Baked Ziti, easy cheesy crock pot pasta, slow cooker baked ziti recipe*
Servings: 4 servings
Calories: 730.9kcal
Author: Dan Mikesell AKA DrDan

Ingredients

  • 1 pound ground beef or Italian sausage
  • 1 small onion chopped
  • 2 cloves garlic crushed
  • 1 cup ricotta cheese
  • 1 egg white
  • ¼ cup Parmesan cheese grated
  • 1½ teaspoons salt divided
  • ½ teaspoon dry parsley
  • 28 oz crushed tomatoes
  • 1½ teaspoons basil
  • ½ teaspoon black pepper
  • ⅛ teaspoon crushed red pepper optional
  • 2 cups dry ziti noodles or penne
  • 2 cups mozzarella cheese shredded
US Customary - Convert to Metric

Instructions

  • Brown the Meat — Chop 1 small onion. In a large skillet over medium-high heat, brown 1 pound ground beef (or Italian sausage). Add the onion after 3–4 minutes. Add 2 crushed garlic cloves in the last minute. Cook until no longer pink, about 9–10 minutes total. Drain excess fat.
    adding chopped onion to burger in a fry pan
  • Mix the ricotta mixture — In a bowl, combine 1 cup (8 oz) ricotta, 1 egg white, ¼ cup grated Parmesan, ½ teaspoon dried parsley, and ½ teaspoon salt; do not overmix.
    mixing ricotta cheese with an egg
  • Make the sauce — In a medium bowl, mix 28 oz crushed tomatoes, 1½ teaspoons dried basil, 1 teaspoon salt, and ½ teaspoon black pepper.
    mixing crushed tomatoes with spices in a bowl
  • Stir in the drained cooked meat to finish the meat sauce. Add ⅛ teaspoon crushed red pepper if you like a little heat.
    adding cooked meat to the sauce.
  • Layering — Spray a 3- to 4-quart (or larger) slow cooker with nonstick cooking spray. Spread about 1½ cups of meat sauce over the bottom. Add 1 cup uncooked ziti (or penne).
    pouring uncooked pasta on the meat sauce
  • Dot with half of the ricotta mixture. Sprinkle ½ cup shredded mozzarella.
    adding cheeses to the first layer of pasta
  • Second layer and top — Repeat: 1½ cups meat sauce, 1 cup uncooked pasta, the remaining ricotta, and ½ cup mozzarella. Top with the remaining meat sauce and 1 cup mozzarella.
    top with more cheese before cooking
  • Cook — Cover and cook on LOW for about 4 hours. Start checking the pasta at 3 hours—crock pots vary. Stop when the pasta is tender to prevent overcooking.
    spoonful of baked ziti over the crock pot

Notes

Pro Tips

For scaling and crock pot sizes (half-batch in a 2-quart mini, double in a 6–7 quart), see the Scaling section in the post.
The pasta goes in uncooked. Standard ziti or penne works best. Very small shapes, whole-wheat, or gluten-free pastas can be unpredictable.
Crock pot temperature and pasta shape affect cooking time. Start checking at 3 hours and stop when the pasta is tender—pasta can go from undercooked to overcooked quickly.

Nutrition

Calories: 730.9kcal | Carbohydrates: 43.8g | Protein: 59.2g | Fat: 35.6g | Saturated Fat: 18.1g | Trans Fat: 1.1g | Cholesterol: 169.3mg | Sodium: 1741.8mg | Potassium: 1225.1mg | Fiber: 5.3g | Sugar: 11.6g | Vitamin A: 1043.5IU | Vitamin C: 20.8mg | Calcium: 751.1mg | Iron: 6.5mg

Inspired by a Pioneer Woman recipe for Baked Ziti, which is more lasagna-like with ricotta and Parmesan. I adapted it for the crock pot.

Editor's note: Originally published December 5, 2013. Updated with expanded options, refreshed photos, and a table of contents to help navigation.

Molly smiling into the camera.

Small-Batch Guacamole Recipe with 2 Avocados

guacamole on a chip over a bowl

This small-batch guacamole recipe uses 2 avocados and 4 simple ingredients for delicious homemade guacamole in about 10 minutes. It's easy to customize with your favorite add-ins or scale up for a crowd.

guacamole on a chip.
[feast_advanced_jump_to]

quote mark
Featured Comment from Sue:
⭐⭐⭐⭐⭐
"Today I made your guacamole, and talk about “knock your socks off!” It’s the best."

🥣 TL;DR — Recipe Summary

What is it? A small-batch guacamole recipe using 2 avocados, with easy adjustments for larger or smaller batches.

Why you'll love it: Fresh, delicious guacamole in 10 minutes with only 4 ingredients, plus many options to make it your way.

How to make it: Mash ripe avocados with lime juice, garlic, and salt. Add your favorite extras and adjust the texture to your liking.

🥑 Ingredients

Ingredients for guacamole — labeled.
  • Avocados — ripe but not mushy.
  • Lime juice — fresh preferred.
  • Salt — to taste.
  • Garlic — highly recommended.
  • Optional ingredients — red onion, tomato, jalapeño, cilantro, or pepper.

👨‍🍳 Quick Overview: How to Make Small-Batch Guacamole

1. Mince the garlic and prep any additional ingredients.

chopped onion with tomato and jalapeno on a black board.

2. Remove the pit and scoop the avocado from the skin.

scooping the inside of the avacodo out with a large spoon.

✅ Pro Tip: Rolling the lime on the counter will free up some juice before cutting.

3. Combine the avocado and prepared ingredients. Add the lime juice and salt, plus pepper if desired.

squezing a lime onto other ingredients in a bowl.

4. Mash with a fork or potato masher to your desired consistency.

mixing the guacamole together in a bowl.

✅ Pro Tip: Guacamole is delicious right away, but a few hours in the refrigerator allows the flavors to meld.

For more details, keep reading. See the recipe card below for complete instructions and to print.

🥑 Buying the Best Avocados

Hass avocados are the most common variety and work well for guacamole. Here's what to look for:

  • Color: Dark green to nearly black.
  • Firmness: The avocado should yield slightly to gentle pressure but not feel mushy.
  • Under the stem: Green is good; brown may indicate overripeness.

✅ Pro Tip: To ripen hard avocados faster, place them in a paper bag with a ripe banana. The banana releases ethylene gas, which helps the avocados ripen in a few days.

🥑 How to Make Guacamole with 2 Avocados (Or Scale the Recipe)

This small-batch recipe starts with 2 avocados, but you can easily make more or less.

  • 1 avocado: Cut the ingredients in half for a smaller batch.
  • 2 avocados: Follow the recipe as written.
  • More avocados: Increase the ingredients proportionally for larger batches.

Use the serving adjustment in the recipe card to change amounts automatically in the ingredient list, but not the instructions. Adjust the seasonings to your taste.

❄️ How to Store Guacamole and Prevent Browning

Guacamole turns brown when exposed to air. To keep it fresh, limit contact with oxygen.

  • Method 1 — Plastic wrap: Press plastic wrap directly against the surface of the guacamole, then cover the container.
  • Method 2 — Water: Smooth the surface and add about ¼ inch of water. Refrigerate, then pour off the water and stir before serving.

Refrigerate promptly. Guacamole is best within 2 days, although it may last a third day with some loss of quality.

❓ FAQs

Can I make guacamole without tomatoes?

Yes. Tomatoes are optional and are not included in this basic 4-ingredient guacamole recipe. Many people prefer guacamole made with only avocado, lime juice, garlic, and salt, while others add tomato, onion, jalapeño, cilantro, and other ingredients for extra flavor and texture.

How can I make guacamole milder or spicier?

For milder guacamole, reduce or omit the jalapeño. For more heat, add extra jalapeño, include some of the white membranes, or use a hotter pepper. Start small—you can always add more heat, but you can't take it out.

Can I use garlic powder instead of fresh garlic?

Yes. Fresh garlic provides the best flavor, but garlic powder works well if that's what you have available. Start with about ¼ teaspoon of garlic powder for each clove of fresh garlic and adjust to taste.

📖The Recipe Card

guacamole on a chip over a bowl
Print Recipe Add to Collection Go to Collections
4.79 from 14 votes

Small-Batch Guacamole Recipe with 2 Avocados

Make delicious homemade guacamole with 2 avocados and 4 simple ingredients in about 10 minutes. This easy small-batch recipe is customizable to your taste and can be scaled up or down.
Prep Time10 minutes mins
Cook Time0 minutes mins
Total Time10 minutes mins
Course: Appetizer
Cuisine: Mexican
Keyword: Guacamole, Guacamole Dip
Servings: 6 servings
Calories: 118kcal
Author: Dan Mikesell AKA DrDan

Ingredients

  • 2 avocados ripe
  • 1 lime
  • 1 clove garlic
  • ½ teaspoon kosher salt

Optional Ingredients

  • 1 Roma tomato
  • 1 jalapeno pepper
  • ½ red onion medium
  • ¼ teaspoon pepper
  • 2-3 tablespoons minced cilantro optional
US Customary - Convert to Metric

Instructions

  • If using, chop the red onion and tomato. Devein the jalapeño and chop it finely. Mince the garlic.
    chopped onion with tomato and jalapeno on a black board
  • Cut the avocado lengthwise around the pit and twist the halves apart. Carefully remove the pit.
    scooping the inside of the avacodo out with a large spoon
  • Scoop the inside of the avocado into a bowl and add the prepared ingredients.
    removing the pit of the avacado with a knife
  • Roll the lime on the counter to free up some juice, then cut the lime in half and squeeze all the juice you can out.
    squezing a lime onto other ingredients in a bowl
  • Add ½ teaspoon kosher salt and ¼ teaspoon pepper. Mash to the consistency you want using a fork or a potato masher. Optional: Add 2-3 tablespoons of minced cilantro.
    mixing the guacamole together in a bowl

Notes

Pro Tips

  • The basic recipe uses avocados, lime juice, garlic, and salt. Tomato, onion, jalapeño, pepper, and cilantro are optional.
  • Adjust the jalapeño to control the heat, and mash the guacamole to your preferred consistency.
  • Choose ripe avocados that yield slightly to gentle pressure.
  • To prevent browning, press plastic wrap directly against the surface or cover with a thin layer of water. Refrigerate promptly and use within 2 days.

Nutrition

Calories: 118kcal | Carbohydrates: 8.5g | Protein: 1.7g | Fat: 9.9g | Saturated Fat: 1.4g | Sodium: 199.8mg | Potassium: 383.2mg | Fiber: 5.2g | Sugar: 1.4g | Vitamin A: 215.3IU | Vitamin C: 15mg | Calcium: 16.5mg | Iron: 0.5mg

Editor's Note: Originally Published September 8, 2012. Updated with expanded options and refreshed photos.

Molly and Lilly dogs supervising.

Baked Parmesan Crusted Chicken

bite of Parmesan crusted chicken on a fork

Baked Parmesan Chicken has a wonderful crispy Parmesan crust full of great flavor over moist and tender chicken. So easy and so good.

You can never have too many great chicken recipes. This is one of my best. It has a crispy, crunchy crust loaded with paprika, garlic, and Parmesan cheese.

🐓Ingredients

Chicken—skinless boneless chicken breasts
Egg
Parmesan cheese—grated - fresh if possible
Panko bread crumbs
Pantry ingredients—all-purpose flour, paprika, garlic powder, salt, and black pepper

bite of Parmesan crusted chicken on a fork.
[feast_advanced_jump_to]
Blue ribbon divider used for visual effect

Featured Comment from KK Taylor:
"5 stars—We love this recipe. So easy and always delicious."

Quick enough for an easy weeknight dinner or impress everybody at fancier meals. It uses common pantry ingredients and has simple step-by-step photo instructions.

👨‍🍳How to Bake Parmesan-Crusted Chicken

raw chicken with Parmesan and spices.

Preheat the oven to 350° convection or 375° conventional oven.

trim and pat dry chicken breasts.

Trim and pat dry 3-4 skinless boneless chicken breasts.

spray tray with rack with PAM.

Prep a baking pan. Aluminum foil for easy cleanup, a rack to help crisp all sides, and a good spray of PAM. If you don't have the rack, spray or oil the foil.

grating Parmesan into a pan.

Grate ½ cup of fresh Parmesan. Fresh is better, but use pre-grated if necessary. Set up a dredge line with one egg whipped in pan one. In pan two, add ¼ cup AP flour, ¼ cup Panko breadcrumbs, ½ cup grated Parmesan cheese, 2 teaspoons paprika, and ½ teaspoon of each salt, pepper, and garlic powder.

dipping chicken breast in the egg coating.

Dip the chicken breast in the egg, coat well, and shank off excess.

dipping chicken breast in the final coating.

Dip the chicken in the breading mixture and pat it on. Shake off the excess. Place on the prepared rack

coated chicken breasts on the rack while adding more coating.

Add a little extra topping to each breast. Give them a light spray of PAM. Let them rest for about 5 minutes before cooking to help the coating stick better.

parmesan crusted chicken on a white plate.

Bake until an internal temp of 165°—about 35 minutes. Rest for a few minutes before cutting.

For more details, keep reading. See the Recipe Card below for complete instructions and to print.

✔️Tips and options to make it right every time

The chicken

  • Try to use chicken breasts that are all about the same size. The results overall will be better since they will cook more evenly.
  • Pat dry, and do not rinse. See Chicken... To Rinse or Not To Rinse? for a safety discussion about rinsing.
  • Some breasts are just too thick to cook well. Thin those fatter chicken breasts to about ¾ inches in the thickest parts. You can use a meat mallet or even the bottom of a heavy pan. Please be sure to cover the breasts while doing this to prevent unsafe splatter. I like to use a freezer bag for safety.

The coating

  • This recipe requires grated Parmesan cheese+—freshly grated is preferred for a much better taste.
  • The Panko bread crumbs add a great texture but come in flavors—pick what you like.
  • Add more coating to the top before going into the oven to thicken the crust.
  • A light spray of PAM (oil) will prevent dried bread crumbs that can happen in the oven.
  • Letting the chicken rest for 5 to 10 minutes after coating before cooking will help the coating to stick better.

Cooking method

  • This recipe uses a 350* convection oven temperature (375° conventional) for about 35 minutes. That is lower and a little longer than many chicken breast recipes. This allows the center to cook to a safe temperature while not overcooking the crust.
  • Always place the thicker part of the breast towards the outside of the tray when baking chicken breasts.
  • Cook the chicken on a rack if you have one. You will get airflow under the chicken and better crispier results.
  • Be sure to reach an internal temperature of 165° and rest the chicken for 5 minutes before serving.

Serving

Serve with rice, potatoes, or noodles as a starch—hot vegetables like broccoli, brussels sprouts, or asparagus. A side salad and some crusty bread will round out a complete meal.

Check out these recipes for ideas: Roasted Asparagus with Parmesan, Oven Roasted Baby Potatoes, and Easy Dinner Rolls.

Baked Chicken Recipes

For other oven-based chicken recipes you will like, see Baked Chicken with Mayonnaise, Roasting Chicken Breasts in a Convection Oven, Pan Seared Oven Baked Chicken Breast, Oven Fried Chicken with Gravy, and Oven Fried Chicken - Is it KFC?.

🍽️Storing leftovers.

Storage: Store in an airtight container in the refrigerator for 3-4 days or frozen for 3 months.

Reheating: Thaw overnight in the refrigerator. Reheat in an air fryer or an oven on a baking sheet with a tray, if available, at about 300° for 15-20 minutes until hot.

❓FAQs

When is chicken done and safe to eat?

Chicken needs to reach 165° to be safe to eat, according to the USDA

How do you prevent chicken breasts from drying in the oven?

The three steps you can take to prevent dry chicken breast are:
1) Don't try to cook chicken breasts that are thicker than ¾ inch. Thin them with a meat mallet, rolling pin, or the bottom of a heavy pan.
2) Don't cook at an oven temperature not recommended by the recipe.
3) Use an instant-read or meat thermometer and stop cooking at 165° internal temperature.

Should chicken be covered in the oven?

No. Not if there is skin or a coat that needs to crisp.

Blue ribbon divider used for visual effect

This recipe is listed in these categories. See them for more similar recipes.

101's Best Recipes, Chicken Breast Recipes, Chicken Recipes

Have you tried this recipe, or have a question? Join the community discussion in the comments.

📖The Recipe Card

bite of Parmesan crusted chicken on a fork
Print Recipe Add to Collection Go to Collections
4.50 from 2 votes

Baked Parmesan Crusted Chicken

Baked Parmesan Chicken has a wonderful crispy Parmesan crust full of great flavor over moist and tender chicken. So easy and so good.
Prep Time10 minutes mins
Cook Time35 minutes mins
Total Time45 minutes mins
Course: Main Course
Cuisine: American
Keyword: Parmesan Chicken
Servings: 4 servings
Calories: 225.8kcal
Author: Dan Mikesell AKA DrDan

Ingredients

  • 4 skinless boneless chicken breasts trimmed

Coating - enough for 4 breasts

  • 1 egg
  • ½ cup Parmesan cheese grated - fresh if possible
  • ¼ cup AP flour
  • ¼ cup Panko bread crumbs
  • 2 teaspoons paprika
  • ½ teaspoon salt
  • ½ teaspoon pepper
  • ½ teaspoon garlic powder
US Customary - Convert to Metric

Instructions

  • Preheat the oven to 350° convection or 375° conventional oven.
    raw chicken with Parmesan and spices
  • Trim and pat dry 3-4 skinless boneless chicken breasts
    trim and pat dry chicken breasts.
  • Prep a baking pan. Aluminum foil for easy cleanup, a rack to help crisp all sides, and a good spray of PAM. If you don't have the rack, spray or oil the foil.
    spray tray with rack with PAM
  • Grate ½ cup of fresh Parmesan. Fresh is better, but use pre-grated if necessary. Set up a dredge line with one egg whipped in pan one. In pan two, add ¼ cup AP flour, ¼ cup Panko breadcrumbs, ½ cup grated Parmesan cheese, 2 teaspoons paprika, and ½ teaspoon of each salt, pepper, and garlic powder.
    grating Parmesan into a pan
  • Dip the chicken breast in the egg, coat well, and shank off excess.
    dipping chicken breast in the egg coating
  • Dip the chicken in the breading mixture and pat it on. Shake off the excess. Place on the prepared rack
    dipping chicken breast in the final coating
  • Add a little extra topping to each breast. Give them a light spray of PAM. Let them rest for about 5 minutes before cooking to help the coating stick better.
    coated chicken breasts on the rack while adding more coating
  • Bake until an internal temp of 165°—about 35 minutes. Rest for a few minutes before cutting.
    Parmesan coated chicken on a white plate

Notes

Pro Tips

  1. An easy recipe to scale up or down.
  2. The quality of the cheese is very important for a great result.
  3. Use chicken breasts of about the same size. If needed, flatten them a bit to about ¾ inches by using a meat mallet or the bottom of a heavy pan. Please cover the chicken to prevent splatter—I like to use a freezer bag.
  4. Always place the thicker part of the breast towards the outside of the tray when baking chicken breasts.
  5. Always make sure the chicken is very dry before starting to coat. Nothing will stick to wet chicken.
  6. The rack helps with the underside crisping. If you don't have one, you can flip the chicken halfway through using a fork. You might want to flip anyway to be sure the bottom is crispy.
  7. If you let the chicken sit for 5-10 minutes after coating, before baking, the coating will stick better.
 

Nutrition

Calories: 225.8kcal | Carbohydrates: 10g | Protein: 30g | Fat: 6.6g | Saturated Fat: 2.8g | Trans Fat: 0.1g | Cholesterol: 80.8mg | Sodium: 650.6mg | Potassium: 476mg | Fiber: 0.8g | Sugar: 0.5g | Vitamin A: 625.4IU | Vitamin C: 1.4mg | Calcium: 165.6mg | Iron: 1.3mg

Based on an allrecipe.com recipe. I added some panko bread crumbs and garlic since all chicken must have garlic at our house.

Editor's Note: Originally Published January 26, 2013. Updated with expanded options, refreshed photos, and a table of contents to help navigation.

Happy Lilly.

Parmesan Baked Potatoes

parmesan baked potato on a white plate

Quick and easy Parmesan Baked Potatoes halves have a creamy center and a crispy Parmesan cheese crust with butter and garlic—perfect for steaks or chicken dinners.

Easy to adjust both in number and serving size. With a skill level of 2/10, follow these easy step-by-step photo instructions.

🥔Ingredients

Potatoes—Russet, red potatoes, or Yukon Gold potatoes
Parmesan cheese—grated - fresh if possible
Butter
Pantry ingredients—Kosher salt, black pepper, garlic powder, and other seasonings.

parmesan baked potato on a white plate.
[feast_advanced_jump_to]
Blue ribbon divider used for visual effect

Featured Comment from Cindy D.:
"5 stars—I have made this recipe many times. It is so tasty as a side dish to many proteins."

With an incredible crust of Parmesan cheese, butter, and garlic, it's a near-perfect side dish that goes with almost any meal. But it is filling enough to be the main dish.

👨‍🍳How to Bake Parmesan-Crusted Baked Potatoes

potatoes with cheese and seasoning.

Preheat oven to 400° convection (425° in regular ovens).

butter in a glass bowl in the microwave.

Melt butter in a microwave (about 30 seconds). This is 4 tablespoons in a five-by-nine glass baking dish.

spreading Parmesan cheese over melted butter in a glass bowl.

Spread the butter over the bottom of the pan. Sprinkle with ½ teaspoon of coarse salt with ¼ teaspoon each of granular garlic and pepper. Sprinkle ½ cup of grated parmesan.

cutting a russet potato in half.

Scrub and cut in half lengthwise. I used russets, but red potatoes or Yukon Gold are good choices.

setting cut halves of raw potato on the prepared pan.

Lay the cut potatoes flat on the Parmesan mixture, cut side down.

checking the temperature of the potatoes.

Bake the potatoes to an internal temperature of 200°-210°—about 40 minutes for these medium-sized russets, but for thinner potatoes, it will be 30-35 minutes.

cutting between the potatoes to release them from the pan.

Remove from oven and allow to cool for 5 minutes to let a crust form. Then, run a sharp knife around the potatoes, cutting the crust so it does not pull off.

Parmesan Baked Potatoes held over pan with tongs.

Remove from the pan carefully and serve. They will stay hot for a while.

For more details, keep reading. See the Recipe Card below for complete instructions and to print.

✔️Tips and options to make it right every time

Potatoe choice

Any potatoes should be fine. Potatoes will all cook the same. I chose to use russets, but red potatoes or Yukon Gold would be excellent choices. The size of the potatoes will determine the baking time.

You will find that half of a large baking potato will be plenty for a serving size. These are very filling.

Parmesan and seasoning tips

Good Parmesan cheese will go a long way to making this dish spectacular. A cheap cheese will give inferior results.

The seasoning is to your taste. Use herbs and spices like thyme and rosemary. Seasoning salt with paprika or specialty seasonings like Cajan, Italian, or any seasoning blend you like or matches the meal.

Baking tips

The glass baking dish will help prevent this from sticking. Parchment paper will help if you have sticking issues.

The potatoes must fit flat in the dish. Pick a dish size that fits the amount you need and adjust the crust ingredients to cover the bottom well.

↕️How to make this a "for two" or "family size" recipe

This is a relatively easy recipe to adjust to exactly what you need, but it differs slightly from other recipes.

To adjust the size of this recipe, a little math is needed. You want the "topping" to be about the same thickness. Just close is fine; exact is not needed.

  1. Choose the potatoes, amount, and size you want to bake.
  2. Pick a pan size that allows all the potato halves to sit flat on the bottom.
  3. Adjust the crust ingredients to the pan size. The recipe uses a 9X5 dish, which is 45 square inches. To use a 9X9, which is 81 square inches, double the topping ingredients, which is close enough. A  9X13 is 117 square inches, about 2.5 times the area of a 9X5, so increase the ingredients by that much.
  4. To make smaller amounts is dependent on the cookware size you have available. You may end up using a bigger baking dish than you truly need and "wasting some topping.... but it makes a crunchy snack.

Serving

These baked potatoes are perfect with Seared Filet Mignon, Seared and Baked Strip Steaks, Baked Parmesan Crusted Chicken, and Pan Roasted Pork Tenderloin.

Other great potato recipes

Check out some other great potato-sided dishes that will work with most meals—like Oven Roasted Red Potatoes, Smashed Potatoes, and Cheesy Potato Casserole from raw potatoes.

❄️Leftover storage and reheating

Seal leftovers airtight and store them in the refrigerator for 3-4 days. Or freeze for 3 months.

Leftovers, while good, will never be as good as freshly baked. If frozen, thaw overnight in the refrigerator. Reheat in the microwave. They can also be reheated in a 350° oven.

FAQs

What is the best final internal temperature for baked potatoes?

The final internal temperature for baked potatoes should be over 200° and 205° to 210° is better for creamy results.

Blue ribbon divider used for visual effect

This recipe is listed in these categories. See them for more similar recipes.

101's Best Recipes, Potato Recipes, Side Dish Recipes

Have you tried this recipe, or have a question? Join the community discussion in the comments.

📖The Recipe Card

parmesan baked potato on a white plate
Print Recipe Add to Collection Go to Collections
4.89 from 9 votes

Parmesan Baked Potatoes

Quick and easy Parmesan Baked Potatoes halves have a creamy center and a crispy Parmesan cheese crust with butter and garlic.
Prep Time5 minutes mins
Cook Time40 minutes mins
Total Time45 minutes mins
Course: Potato
Cuisine: American
Keyword: Fancy Potatoes, Parmesan Baked Potatoes
Servings: 4 servings
Calories: 209.9kcal
Author: Dan Mikesell AKA DrDan

Ingredients

  • 2 medium russet potatoes or other potatoes like red or Yukon Gold
  • 4 tablespoons butter
  • ½ cup Parmesan cheese grated - fresh if possible
  • ½ teaspoon Kosher salt
  • ¼ teaspoon pepper
  • ¼ teaspoon garlic powder
US Customary - Convert to Metric

Instructions

  • Preheat oven to 400° convection (425° in regular ovens).
    potatoes with cheese and seasoning
  • Melt 4 tablespoons butter in a 5 by 9 glass baking dish. Adjust the size and amount of ingredients to fit your needs.
    butter in a glass bowl in the microwave
  • Spread the butter over the bottom of the pan. Sprinkle with ½ teaspoon of coarse salt with ¼ teaspoon each of granular garlic and pepper. Sprinkle ½ cup of grated parmesan.
    spreading Parmesan cheese over melted butter in a glass bowl
  • Scrub and cut in half lengthwise. I used russets, but red potatoes or Yukon Gold are good choices.
    cutting a russet potato in half
  • Lay the cut potatoes flat on the Parmesan mixture, cut side down.
    setting cut halves of raw potato on the prepared pan
  • Bake the potatoes to an internal temperature of 200°-210°—about 40 minutes for these medium size russets, but for thinner potatoes, will be 30-35 minutes.
    checking the temperature of the potatoes
  • Remove from oven and allow to cool for 5 minutes to let a crust form. Then run a sharp knife around the potatoes, cutting the crust, so it does not pull off.
    cutting between the potatoes to release them from the pan
  • Remove from the pan carefully and serve. They will stay hot for a while.
    Parmesan Baked Potatoes held over pan with tongs

Notes

Pro Tips

  1. Use russet, red, or Yukon Gold potatoes.
  2. A good quality Parmesan is a must.
  3. Cooking time will vary by the thickness of the potatoes, your pan, and the oven. Cook to a final internal temperature of 200- 210°.
  4. We use our All Purpose Seasoning - 7:2:1 and 7:2:2 instead of individual seasonings. As always, season to your taste, not mine.
  5. Glass or ceramic baking dish is recommended.
  6. It may be cooked at different oven temperatures, but the time will need to be adjusted.
  7. Be sure to wait 5 minutes after removing from the oven for the crust to firm up, or it will just come off. Do not short the time. And be sure to cut through all the coating just before removing it from the pan.
  8. To adjust the size of this recipe, a little math is needed. You want the "topping" to be about the same thickness. See the discussion in the post, but the adjustment is by the size of the pan you are using instead of the number of potatoes used.
  9. This reheats very well in a microwave.
  10. Nutrition calculation includes only half of the topping since there is a lot of waste.

Nutrition

Calories: 209.9kcal | Carbohydrates: 19.7g | Protein: 4.7g | Fat: 13.1g | Saturated Fat: 8.2g | Trans Fat: 0.5g | Cholesterol: 34.4mg | Sodium: 350.9mg | Potassium: 457.1mg | Fiber: 1.4g | Sugar: 0.7g | Vitamin A: 400.4IU | Vitamin C: 6.1mg | Calcium: 92mg | Iron: 1mg

Editor's Note: Originally Published May 18, 2013. Updated with expanded options, refreshed photos, and a table of contents to help navigation.
dogs supervising in the kitchen.

Creamy Tomato Basil Soup Recipe (Quick and Easy)

image of a bowl of tomato basil soup in a white bowl on orange plate

This creamy tomato basil soup recipe delivers rich tomato flavor and a smooth, creamy texture in under 30 minutes. It's an easy homemade soup made with canned tomatoes, basil, and simple pantry ingredients.

Choose evaporated milk for a healthier, lower-fat soup, or cream for a richer version. Both fresh and dried basil work well.

A bowl of tomato basil soup in a white bowl on orange plate.
[feast_advanced_jump_to]

quote mark
Featured Comment from Carol :
"Wow, so easy and so good!"

🤔 TL;DR — Recipe Summary

What is it? Homemade creamy tomato basil soup using canned tomatoes, your choice of dairy, and fresh or dried basil.

Why you'll love it: Ready in under 30 minutes, with evaporated milk for a lower-fat soup or cream for extra richness.

How to make it: Simmer tomatoes with basil and seasonings for 15 minutes, stir in your choice of dairy, and simmer 5 more minutes.

🍅 Ingredients

tomatoes with basil for soup.
  • Tomatoes— Use canned crushed tomatoes, not fresh tomatoes, for this recipe. Whole or diced canned tomatoes also work but will need blending for a smooth soup.
  • Dairy— evaporated milk for lower fat, or cream for a richer soup. Half-and-half, milk, or dairy substitutes also work.
  • Basil— fresh or dried.
  • Seasonings— garlic powder, onion powder, baking soda, salt, pepper, and optional sugar.

👨‍🍳 Quick Overview: How to Make Creamy Tomato Basil Soup

1. Simmer crushed tomatoes, basil, seasonings, and baking soda for 15 minutes.

adding spices to tomatoes in a black pan.

2. Stir in your choice of dairy. Taste and add sugar if needed. Simmer for 5 more minutes, then serve.

adding evaperated milk to the soup.

For more details, keep reading. See the recipe card below for complete instructions and to print.

✔️ Tips and Variations

  • Tomatoes: Canned crushed tomatoes work best. Whole or diced canned tomatoes also work, but you'll need an immersion blender for a smooth soup.
  • Dairy options: Cream or half-and-half makes a richer soup. Fat-free evaporated milk reduces fat and calories. Regular milk or dairy substitutes also work.
  • Baking soda: Reduces the acidity of the tomatoes for a smoother taste and helps prevent the dairy from curdling. Don't skip it.
  • Dairy-free or vegetarian: Use vegetable broth or a dairy-free milk substitute.
  • Lower sodium: Omit the added salt. The baking soda also contributes sodium.

🌿 Fresh Basil Option

Fresh basil adds a delicious flavor, but dried basil works well, too. If using fresh basil, stack 5 medium leaves, roll them tightly, and slice into thin ribbons before adding them to the soup.

three steps of cutting basel leaves into ribbons.

❄️ Storage

Store in an airtight container in the refrigerator for 3–4 days or freeze for 3–4 months.

Reheat gently on the stovetop over low heat, stirring occasionally. Avoid boiling to prevent the dairy from separating.

🥣 More Easy Soup Recipes

Try more homemade favorites like Broccoli Cheese Soup, Crock Pot Chicken Noodle Soup, Vegetable Beef Soup, and Crock Pot French Onion Soup. Find even more ideas in Our Best Soups.

❓ FAQ

Is tomato basil soup healthy?

Yes. Tomato basil soup provides nutrients from tomatoes, and you can make it lower in fat and calories by using fat-free evaporated milk instead of cream. The cream version is richer and higher in calories.
For lower sodium, omit the added salt. The baking soda also contributes sodium.

Why use baking soda in homemade tomato soup?

Baking soda reduces the acidity of tomatoes, giving the soup a less acidic taste. It also helps prevent the milk or cream from curdling when added to the hot soup.

Why use sugar in homemade tomato soup?

Tomatoes vary in sweetness and acidity. Taste the soup after adding the dairy, and add sugar only if needed. Start with ¼ teaspoon, taste again, and adjust to your preference.

Can I use evaporated milk in tomato soup?

Yes. Evaporated milk makes tomato soup creamy without using heavy cream. Fat-free evaporated milk is a good choice for a lower-fat soup. Add it after simmering the tomatoes, then heat gently without boiling.

📖The Recipe Card

image of a bowl of tomato basil soup in a white bowl on orange plate
Print Recipe Add to Collection Go to Collections
4.50 from 2 votes

Creamy Tomato Basil Soup Recipe

Make this easy, creamy tomato basil soup in under 30 minutes with canned tomatoes and basil. Use evaporated milk for a lower-fat version or cream for a richer soup.
Prep Time5 minutes mins
Cook Time20 minutes mins
Total Time25 minutes mins
Cuisine: American
Keyword: Tomato Basil Soup, Tomato Soup, Zero Fat Soup
Servings: 4 1 ¼ cup serving
Calories: 83.3kcal
Author: Dan Mikesell AKA DrDan

Ingredients

  • 28 oz crushed tomatoes one large can
  • 1½ cup fat-free evaporated milk, cream, or other dairy
  • 1 teaspoon dry basil or 5 leaves fresh
  • ½ teaspoon kosher salt
  • ½ teaspoon pepper
  • ½ teaspoon garlic powder
  • ½ teaspoon onion powder
  • ½ teaspoon baking soda
  • sugar optional if needed
US Customary - Convert to Metric

Instructions

  • If using fresh basil, prep 5 medium leaves of basil by pinching off the stem, forming a stack with the largest on the bottom and the smallest on top. Roll from the stem end into a small "cigar." Cut into narrow ribbons by pulling the knife through the basil and not crushing it.
    three steps of cutting basel leaves into ribbons
  • Add 28 oz canned crushed tomatoes to a large non-reactive saucepan. Add 1 teaspoon of dry basil or the prepared fresh basil, ½ teaspoon each of onion powder, garlic powder, kosher salt, and pepper. Also, add ½ teaspoon of baking soda. Cover and simmer for 15 minutes.
    adding spices to tomatoes in a black pan
  • Stir in 1½ cups of fat-free evaporated milk or your preferred dairy. Taste and add ¼ teaspoon of sugar if needed. Cream, half-and-half, or regular milk also work.
    adding evaperated milk to the soup
  • Simmer for 5 minutes more and serve.
    spoonful of tomato soup

Notes

Pro Tips

  1. Tomatoes: This recipe is designed for canned crushed tomatoes, not fresh tomatoes. Use a good-quality brand for the best flavor. Whole or diced canned tomatoes also work, but you'll need an immersion blender for a smooth soup.
  2. Fresh basil is excellent, but dried basil works well.
  3. Use fat-free evaporated milk for a lower-fat soup or cream for a richer version.
  4. Refrigerate leftovers for 3–4 days or freeze for 3–4 months. Reheat gently without boiling.
Nutrition is calculated using fat-free evaporated milk.

Nutrition

Calories: 83.3kcal | Carbohydrates: 13.5g | Protein: 7.3g | Fat: 0.3g | Saturated Fat: 0.1g | Polyunsaturated Fat: 0.1g | Monounsaturated Fat: 0.1g | Cholesterol: 3.4mg | Sodium: 582.1mg | Potassium: 423.9mg | Fiber: 1g | Sugar: 11.6g | Vitamin A: 429.7IU | Vitamin C: 5mg | Calcium: 269.2mg | Iron: 1.1mg

Originally Published January 13, 2019. Updated with expanded options, refreshed photos, and edits to improve navigation.

Smiling dogs in the yard.

Crock Pot Beef and Broccoli

beef and broccoli with rice and toppings on blue plate

This easy Crock Pot Beef and Broccoli recipe lets you have great Chinese takeout at home. With only ten minutes of preparation, let your crock pot do the work.

It is super easy to make at home with these simple step-by-step photo instructions.

🐄🥦Ingredients

Beef—chuck or sirloin roast
Beef broth—low sodium
Soy sauce—low sodium
Sesame oil
Garlic
Brocolli—frozen or fresh
Pantry ingredients—brown sugar, cornstarch, and crushed red pepper flakes

beef and broccoli with rice and toppings on blue plate.
[feast_advanced_jump_to]
Blue ribbon divider used for visual effect

Beef and broccoli is a popular dish we all love in every Chinese restaurant, with its melt-in-your-mouth tender beef with vegetables simmered in a flavorful sauce.

It will become one of your go-to dinner recipes the whole family will love.

👨‍🍳How to Make Beef and Broccoli

beef roast with ingredients for beef and broccoli.

No special sauces are needed.

thinly sliced beef on red board.

Trim 1 to 1 ½ pound beef chuck roast or sirloin. Slice into ⅛ inch slices across the grain.

pouring beef broth into crock pot with other ingredients.

In a crock pot (3 quarts or larger), add one 14-ounce can of low-sodium beef broth, ½ cup low-sodium soy sauce, ⅓ cup brown sugar, 1 tablespoon sesame oil, ¼ teaspoon crushed red pepper flakes, and 4 cloves crushed or minced garlic—mix well.

adding sliced beef to the crock pot.

Add the beef to the crock pot and cook for 5 hours on low.

pouring cornstarch slurry into crock pot.

At the 5-hour mark, whisk 2 tablespoons of cornstarch with ¼ cup cold water in a small bowl until smooth. Pour the cornstarch slurry into the crock pot and mix well.

adding frozen broccoli to crock pot.

Add about 2-3 cups of frozen or fresh broccoli florets. You can also add other vegetables like drained water chestnuts or snap peas.

beef and broccoli in ladle.

Increase crock pot to high and cook until the broccoli is tender before ending—about 30-60 minutes. If the sauce does not thicken, remove it to a saucepan, boil it for a few minutes, and it should thicken.

beef and broccoli with rice on blue plate.

Serve over rice and garnish as you wish.

For more details, keep reading. See the Recipe Card below for complete instructions and to print.

✔️Tips and options to make it right every time

Beef

  • The beef needs to have some marbling but is otherwise reasonably lean. Sirloin steak, chuck roast, or flank steak are good choices. Stew meat can be used in smaller cubes and will not need to be sliced.
  • The most important thing for the meat is to cut your beef thinly across the grain—⅛ inch or a bit more is a good thickness. Your beef needs to be nicely trimmed.

Broccoli

  • Frozen broccoli florets will work well—anywhere from 12 to 16 oz is just fine. There is no need to thaw the frozen broccoli before adding it to the crock pot.
  • Fresh broccoli also works for this recipe. When cleaned and cut up, one medium to large bunch of broccoli will produce approximately 3 cups.

Sauce and optional ingredients

  • This recipe uses a minimum number of ingredients for great flavor. The primary tastes are soy sauce, sesame oil, garlic, and crushed red pepper flakes.
  • The soy sauce contains plenty of sodium, so no salt is added. Low-sodium soy sauce and beef broth are recommended to keep the sodium level reasonable.
  • This recipe is great for adding other ingredients like a can of drained water chestnuts or some snap peas. Add them at the same time as the broccoli.

↕️How to make this a "for two" or "family size " recipe

This is a very easy recipe to cut in half or double to fit your needs

The full recipe makes about six servings. Perfect for our "for two" household since we overeat and love leftovers. But make it a "for two" recipe by cutting it in half or double for a larger family.

  1. Use the recipe card and adjust the number of servings to half or double.
  2. Use the amount of ingredients in the ingredient list, not the instructions—those do not adjust.
  3. The half recipe will fit in a 2-quart mini crock pot.
  4. A double recipe fits in a 6-quart or larger crock pot.
  5. The cooking time will stay the same.

How to serve

Top with crispy rice noodles and slices of green onions. Serve with Easy Egg Fried Rice or Baked Rice.

Other Chinese recipes to check out

Try some other easy make-at-home Chinese dishes. Sesame Pork Ribs, General Tso Chicken, Slow Cooker Honey Garlic Chicken, Cashew Chicken, and Chicken Stir Fry.

How to store leftovers

Store airtight in the refrigerator for 3-4 days. It can also be frozen for 3-4 months.

❓FAQs

What size of Crock Pot to Use?

This recipe fits in a 3-quart or larger crock pot. Use 6 quarts or a bigger slow cooker for a double batch. A half recipe works in a 2-quart mini crock pot.

Crock pots can vary some, so the endpoint is when the vegetables are tender and not the time.

How to make Beef and Broccoli gluten-free?

One of the main ingredients, soy sauce, is made with soy and crushed wheat. So, it is loaded with gluten.

Japanese tamari is a perfect substitute for soy sauce. It is usually made with only fermented soy, but some traditional versions may have a small amount of wheat, so check the label.

Blue ribbon divider used for visual effect

This recipe is listed in these categories. See them for more similar recipes.

Chinese Recipes, Crock Pot Recipes, Mini Crock Pot Recipes, Small Crock Pots Recipes

Have you tried this recipe, or have a question? Join the community discussion in the comments.

📖The Recipe Card

beef and broccoli with rice and toppings on blue plate
Print Recipe Add to Collection Go to Collections
4.23 from 9 votes

Crock Pot Beef and Broccoli

This easy Crock Pot Beef and Broccoli recipe lets you have great Chinese takeout at home. With only ten minutes of preparation, let your crock pot do the work.
Prep Time10 minutes mins
Cook Time6 hours hrs
Total Time6 hours hrs 10 minutes mins
Course: Main Course
Cuisine: Chinese
Keyword: Beef and Broccoli, Crock Pot Beef and Broccoli
Servings: 6
Calories: 245kcal
Author: Dan Mikesell AKA DrDan

Ingredients

  • 1 to 1½ pound beef roast chuck or sirloin
  • 14 oz beef broth low sodium
  • ½ cup soy sauce low sodium
  • ⅓ cup brown sugar
  • 1 tablespoon sesame oil
  • ¼ teaspoon crushed red pepper to taste
  • 4 cloves garlic
  • 2 tablespoons corn starch
  • 2-3 cups broccoli frozen or fresh
  • 8 oz sliced water chestnuts optional
US Customary - Convert to Metric

Instructions

  • Trim 1 to 1 ½ pound beef chuck roast or sirloin. Slice into ⅛ inch slices across the grain.
    trimmed and sliced beef roast
  • In a crock pot (3 quarts or larger), add one 14-ounce can of low-sodium beef broth, ½ cup low-sodium soy sauce, ⅓ cup brown sugar, 1 tablespoon sesame oil, ¼ teaspoon crushed red pepper flakes, and 4 cloves crushed or minced garlic—mix well.
    pouring beef broth into crock pot with other ingredients
  • Add the beef to the crock pot and cook for 5 hours on low.
    adding sliced beef to the crock pot
  • At the 5-hour mark, whisk 2 tablespoons of cornstarch with ¼ cup cold water in a small bowl until smooth. Pour the cornstarch slurry into the crock pot and mix well.
    adding a corn starch slurry to the cooked meat
  • Add about 2-3 cups of frozen or fresh broccoli florets. You can also add other vegetables like drained water chestnuts or snap peas.
    adding frozen broccoli to the cooked meat in the crock pot
  • Increase crock pot to high and cook until the broccoli is tender before ending—about 30-60 minutes. If the sauce does not thicken, remove it to a saucepan, boil it for a few minutes, and it should thicken.
    ladle of beef and broccoli
  • Serve over rice and garnish as you wish.
    beef and broccoli with rice and toppings on blue plate

Notes

Pro Tips

  1. You can use the beef you want, but I suggest a sirloin or chuck beef roast.
  2. This fits in a 3-quart crock pot, while a half recipe will work in a 2-quart mini crock pot. A double recipe needs 6 quarts or larger.
  3. Trim the beef well and cut across the grain about ⅛ inch thick. No more than ¼ inch, please.
  4. Use low-sodium products since the sodium will get out of control here. Add more salt only if you need it.
  5. Add other vegetables with the broccoli if you like. Drained sliced water chestnuts or snow peas are suggested.
  6. Top with rice noodles, toasted sesame seeds, or sliced green onions.
  7. Crock pots can vary some, so be sure the broccoli is tender before ending the cooking.
  8. If the sauce does not thicken, but the vegetables are tender, move to a saucepan and boil for a few minutes.
  9. Good refrigerated for 3-4 days or frozen for 3-4 months.

Nutrition

Calories: 245kcal | Carbohydrates: 19g | Protein: 27g | Fat: 6g | Saturated Fat: 2g | Cholesterol: 62mg | Sodium: 911mg | Potassium: 673mg | Fiber: 1g | Sugar: 13g | Vitamin A: 214IU | Vitamin C: 28mg | Calcium: 54mg | Iron: 3mg

Google will give you many examples, most of which are nearly identical. Food.com Crock Pot Beef and Broccoli recipe will be the inspiration piece—only a few minor adjustments for more sauce, taste, and options.

Originally Published April 18, 2016. Updated with expanded options, refreshed photos, and a table of contents to help navigation.

dogs wanting food.

Healthy White Chicken Chili

chicken chili on a spoon.

This healthy white chicken chili is loaded with tender chicken, white beans, and bold chili spices in a delicious, slightly spicy broth. It's a satisfying, low-fat, low-calorie meal without sacrificing taste.

Make it on the stovetop in about an hour, or use your crock pot for an easy dump-and-go dinner. Both methods give you the same delicious results, with only about 250 calories and 2 grams of fat per serving.

Low Fat Chicken Chili on a spoon.
[feast_advanced_jump_to]

quote mark
Featured Comment by Vanessa:
"Love this recipe. I found and started making this last winter (2015-2016). We had it almost every week."

🤔 TL;DR — Recipe Summary

What: Healthy white chicken chili with tender shredded chicken, white beans, and bold chili spices in a slightly spicy broth.

Why: A delicious, satisfying chili that's naturally low in fat and calories without sacrificing taste.

How: Cook on the stovetop in about an hour or in a crock pot for an easy, mostly hands-off meal. Both methods give excellent results.

🐓 Ingredients

Raw chicken with ingredients for white chicken chili.
  • Chicken—skinless boneless chicken breasts
  • Broth—low-sodium chicken broth
  • Aromatics—onion, garlic, and optional jalapeño pepper
  • White beans—cooked Great Northern beans preferred
  • Green chiles—diced canned green chiles
  • Seasonings—cumin, paprika, chili powder, optional cayenne pepper, salt, and black pepper

👨‍🍳Quick Overview: Healthy White Chicken Chili

1. Trim the chicken and prepare the onion, jalapeño, and garlic.

chopped onion on a black board.

2. Sauté the onion, then add the garlic in the last minute (optional for crock pot cooking). Combine them with the jalapeño, broth, spices, and chicken in a large pot or crock pot.

Onion cooking in a saucepan.

3. Cook until the chicken reaches 165°F.

Stovetop: Simmer covered for 20–30 minutes.

Crock pot: Cook on HIGH for 1½–2 hours.

raw chicken in the crock pot with broth.

4. Remove the chicken, shred it, and return it to the broth. Add the beans and green chiles.

adding a jar of beans to the crock pot.

5. Simmer covered for another 20–30 minutes on the stovetop, or cook on HIGH in the crock pot for another 1½–2 hours.

Ladle of white chicken chili.

For more details, keep reading. See the recipe card below for complete instructions and to print.

Chicken Options and Tips

  • Chicken breasts: Skinless boneless chicken breasts are best for keeping this chili low in fat. Cook to 165°F before shredding.
  • Chicken thighs: Boneless skinless thighs also work well but contain more fat. They shred more easily when cooked to about 180°F.
  • Rotisserie chicken: Use 4–5 cups of precooked shredded chicken, although 2–3 cups will also work. Sauté the onion and garlic first, then skip the initial chicken cooking step and proceed with adding the beans and green chiles.

👍 Options and Variations

  • Broth: Chicken broth or stock both work. I prefer low-sodium broth to control the seasoning.
  • Thickness: This is a thinner, broth-based chili. For a thicker chili, reduce the broth or stir in a slurry of 1 tablespoon cornstarch mixed with 2 tablespoons cold water during the last 20 minutes of cooking.
  • Beans: Great Northern beans are preferred, but navy or cannellini beans work well. Use precooked beans, not dry beans.
  • Tomatoes: Add a can of Rotel or diced tomatoes for a different taste.
  • Vegetarian: Omit the chicken and substitute vegetable broth for a bean chili.

🧂 How to Make Low-Sodium White Chicken Chili

You can reduce the sodium in this chicken chili with three simple changes without sacrificing too much taste.

  • Reduce the added salt by 30%–50%. This is the biggest adjustment you can make while keeping the chili delicious.
  • Use unsalted chicken broth. It's an easy substitution that won't significantly change the taste.
  • Drain and rinse the beans. This removes some sodium. Replace the bean liquid with water or unsalted broth.

Taste before serving and adjust the seasonings as needed.

↕️ How to Make a Smaller or Larger Recipe

The full recipe makes about 8 servings (10 cups) and fits in a 3½-quart crock pot. It is easy to cut in half or double.

  • Half recipe: Use a 2-quart mini crock pot.
  • Full recipe: Use a 3½-quart or larger crock pot.
  • Double recipe: Use a 6½-quart or larger crock pot.
  • Cooking time: Generally remains the same, but always check the chicken for an internal temperature of 165°F.

Use the serving adjustment in the recipe card to change ingredient amounts. The written instructions do not adjust automatically.

For the best cooking, never fill a crock pot more than ¾ full.

🍽️ What to Serve with White Chicken Chili

  • Low-fat option: Low Calorie Biscuits keep the meal light.
  • Classic cornbread: Homemade Cornbread is a delicious side for chili.
  • Cornmeal biscuits: Cornbread Biscuits are an easy alternative to traditional cornbread.

❄️ Storage and Reheating

  • Refrigerate: Store leftovers in an airtight container for up to 4 days.
  • Freeze: Freeze in airtight containers for 3–4 months. Smaller portions are convenient for quick meals.
  • Reheat: Thaw overnight in the refrigerator if frozen, then reheat gently on the stovetop or in the microwave until hot.

📖The Recipe Card

chicken chili on a spoon.
Print Recipe Add to Collection Go to Collections
5 from 1 vote

Healthy White Chicken Chili

Healthy white chicken chili with tender chicken, white beans, and bold spices. This delicious low-fat, low-calorie recipe is easy to make on the stovetop or in a crock pot.
Prep Time10 minutes mins
Cook Time1 hour hr
Shredding time5 minutes mins
Total Time1 hour hr 15 minutes mins
Course: Main Course
Cuisine: American
Keyword: Chicken Chili, Healthy Chili
Servings: 8 servings
Calories: 206.4kcal
Author: Dan Mikesell AKA DrDan

Ingredients

  • 2 skinless boneless chicken breasts
  • 14 oz low-sodium chicken broth
  • 1 onion medium chopped
  • 1 jalapeno pepper minced - optional
  • 3 cloves garlic crushed or minced
  • 1 tablespoon cumin
  • 1–2 teaspoons paprika
  • 2 teaspoon chili powder
  • ½ teaspoon cayenne pepper optional
  • 1 teaspoon salt to taste
  • ½ teaspoon black pepper

Part Two

  • 6 cups Northern Beans precooked a large jar
  • 4 oz diced green chiles a small can
US Customary - Convert to Metric

Instructions

  • Trim two medium-sized skinless boneless chicken breasts.
    Raw chicken with other ingredients for chili
  • Chop 1 medium onion, mince 1 jalapeno, and mince or crush 3 cloves of garlic.
    chopped onion on a black board
  • Saute the onion until starting to clear, then add the garlic and cook one more minute. Sauting is required for the stovetop and optional for the crock pot.
    cooking onion in a sauce pan
  • Add the onion and garlic to the crock pot or a large stovetop pot like a Dutch oven with one 14 oz can of low-sodium chicken broth, 1 tablespoon cumin, 1-2 teaspoons of paprika, 2 teaspoons of chili powder, 1 teaspoon salt, ½ teaspoon pepper, and optionally ½ teaspoon of cayenne pepper. Add chicken and cook on the stovetop; bring to a boil, then decrease to a simmer and cover for 20-30 minutes. Crock Pot: high for 1½ to 2 hours. Cook until the chicken reaches 165°F.
    raw chicken in the crock pot with broth
  • Remove the chicken, shred it with a fork, and return it to the liquid.
    shredding cooked chicken on a black board with forks
  • Add one 48 oz jar of pre-cooked Northern beans and one small can of green chiles. Rinse the beans, if desired, to decrease the sodium, and replace the liquid with 1-2 cups of water or low-sodium broth.
    adding a jar of beans to the crock pot
  • Simmer covered for 20-30 minutes on the stovetop, or in a crock pot on high for 1½ to 2 hours more.
    ladle of chicken chili

Notes

Pro Tips:

1. Crock pot size: The full recipe needs a 3½-quart or larger crock pot. A half recipe fits in a 2-quart mini crock pot, and a double recipe needs 6½ quarts or larger. Never fill more than ¾ full.
2. Cooking time: Times are for HIGH. Cooking on LOW generally takes about twice as long. Cook chicken to 165°F before shredding.
3. Chicken options: Boneless skinless chicken thighs also work. For precooked rotisserie chicken, use 4–5 cups and skip the initial chicken cooking time.
4. Adjust the heat: The jalapeño and cayenne pepper are optional. Adjust them to your taste. I prefer using both for a spicier chili.
5. Thickness: This is a thinner, broth-based chili. Reduce the broth for a thicker chili, or add a slurry of 1 tablespoon cornstarch and 2 tablespoons cold water during the last 20 minutes.
6. Storage: Refrigerate leftovers for up to 4 days or freeze for 3–4 months in airtight containers.

Nutrition

Serving: 12oz | Calories: 206.4kcal | Carbohydrates: 39.6g | Protein: 16.6g | Fat: 2.1g | Saturated Fat: 0.5g | Polyunsaturated Fat: 0.6g | Monounsaturated Fat: 0.5g | Trans Fat: 0.004g | Cholesterol: 18.1mg | Sodium: 855.1mg | Potassium: 822.3mg | Fiber: 9.3g | Sugar: 0.8g | Vitamin A: 379.2IU | Vitamin C: 11mg | Calcium: 114.2mg | Iron: 3.8mg

This recipe is based on my Excellent White Chicken Chili, a modified Pioneer Woman recipe. I simplified it, added a crock pot version, adjusted the spices, and made adaptations to make it healthy.

Editor's Note: Originally published September 21, 2014. Updated with expanded discussion and options, plus refreshed photos.

dogs playing in leaf pile.
9-month-old Molly and Lilly with a stick

New York Cheesecake Bars

Cheesecake bars on a blue plate.

These New York Cheesecake Bars are rich and creamy with a buttery graham cracker crust—the quick small-batch recipe you need when you want classic cheesecake without the fuss.

❓ Quick Answer: Are Cheesecake Bars Easier Than Cheesecake?

Yes. New York Cheesecake Bars have the same rich, creamy texture as a traditional baked cheesecake but are much easier to make and serve.
✅ No springform pan or water bath needed.
✅ A small-batch recipe, but easily adjustable for your needs.

Cheesecake bars on a blue plate.
[feast_advanced_jump_to]

😊 TL;DR — Recipe Summary

What is it? Rich and creamy New York Cheesecake Bars with a buttery graham cracker crust.

Why you'll love it? All the flavor of classic cheesecake in an easy small-batch recipe that adjusts easily for larger gatherings.

How to make it? Prebake the crust, mix the filling, bake until barely set, then chill before slicing into bars.

🥣 Ingredients

cream cheese with eggs and ingredients for bars.
  • Cream cheese — Full-fat cream cheese blocks work best. Bring to room temperature before mixing.
  • Sugar — Standard granulated sugar.
  • Sour cream — Adds richness and helps create a creamy texture.
  • Eggs — Room temperature eggs blend more smoothly into the batter.
  • Vanilla extract — Use pure vanilla extract for the best flavor.
  • Lemon juice — Optional but recommended. If using fresh lemon, add a little zest for extra flavor.
  • Crust — Graham crackers, powdered sugar, butter, and cinnamon make a buttery graham cracker crust.

👨‍🍳 Quick Overview: How to Make Cheesecake Bars

1. Make the Crust

Combine graham cracker crumbs, powdered sugar, cinnamon, and melted butter.

Press into the prepared baking dish and bake at 375°F until lightly browned and firm.

pressing crust into prepared pan with bottom of a glass.

2. Make the Filling

Beat cream cheese and sugar until smooth. Add eggs, sour cream, vanilla, and optional lemon juice.

Pour the batter over the baked crust.

beating cream cheese with sugar in a glass bowl with an electric mixer

3. Bake

Bake at 325°F for 30 to 40 minutes until the edges are set and lightly browned. The center should still jiggle slightly.

baked cheesecake bars in pan showing browning edge with shimming center.

4. Cool and Cut

Cool at room temperature, then refrigerate until completely chilled before cutting into bars.

Cheesecake bars on blue plates.

For more details, keep reading. See the Recipe Card below for complete instructions and to print.

✔️ Tips to Make Them Right Every Time

  • Lemon juice is optional but recommended. If using a fresh lemon, add a little zest for extra flavor.
  • Use room-temperature ingredients. Softened cream cheese and room-temperature eggs blend more smoothly for a creamy cheesecake filling.
  • Always line the pan with parchment paper. Let it overhang the edges so you can lift the cheesecake bars out easily. Otherwise, removing them can become an exercise in creative vocabulary.
  • Don't overbake. The edges should be set and lightly browned, while the center should still jiggle slightly. If you use an instant-read thermometer, the temperature should be about 180°F, measured about 1 inch from the edge. The bars will continue to firm as they cool.
  • For clean cuts, chill completely. Use a large sharp knife dipped in hot water and wiped dry between slices.
  • Serve plain or topped with whipped cream, fresh strawberries, blueberries, or your favorite fruit topping.

🍓 Favorite Toppings for Cheesecake Bars

  • Fresh strawberries or blueberries
  • Cherry pie filling
  • Whipped cream
  • Chocolate drizzle
  • Caramel sauce
  • Fresh lemon zest

⬆️ How to Make a Double Recipe

  1. Use the recipe card and adjust the servings from 12 to 24.
  2. Use the amount of ingredients in the ingredient list, not the instructions—those do not adjust.
  3. A double recipe fits nicely in a 9 by 13 baking dish.
  4. A double batch will take about 10 minutes longer to bake.

❄️ Storage of Leftovers

Store cheesecake bars covered in the refrigerator for up to 4 days.

To freeze, place chilled bars on a tray in the freezer until firm, about 1 hour. Wrap well and store in a freezer bag for up to 3 months. Thaw overnight in the refrigerator before serving.

Food Safety: Because cheesecake bars contain cream cheese, sour cream, and eggs, they should not be left above 40°F for more than 2 hours.

❓ FAQs

Are baked cheesecakes better than no-bake cheesecakes?

In my opinion, yes. Baked cheesecakes have the rich, dense, creamy texture that makes New York cheesecake famous. No-bake cheesecakes are delicious too, but they are lighter and more mousse-like in texture. Outside of the baking step, the amount of work is about the the same.

How do you make smooth cuts in cheesecake bars?

The cheesecake bars must be completely chilled before cutting. Use a long, sharp knife dipped in hot water and wiped dry. Make long cuts across the entire cheesecake, wiping and reheating the knife between slices as needed for clean, smooth edges.

📋 Other Snack Bars and Cheesecake Recipes

Not quite the bars you want? Try my popular Easy Lemon Bars or fruity Blueberry Cream Cheese Bars.

And check out the other cheesecake recipes, like Cream Cheese Cupcakes, Chocolate Chip Cheesecake, and Blueberry Cream Cheese Coffee Cake.

📖The Recipe Card

Cheesecake bars on a blue plate.
Print Recipe Add to Collection Go to Collections

New York Cheesecake Bars

Rich and creamy New York Cheesecake Bars with a buttery graham cracker crust. This easy small-batch recipe is baked in an 8X8 pan and easily doubles to a 9X13 pan.
Prep Time30 minutes mins
Cook Time35 minutes mins
Total Time1 hour hr 5 minutes mins
Course: Dessert
Cuisine: American
Keyword: 8X8 cheescake bars, Easy cheese cake bars, small batch cheesecake bars
Servings: 12
Calories: 323kcal
Author: Dan Mikesell AKA DrDan

Ingredients

Crust

  • 8 sheets graham crackers
  • 2 tablespoons powdered sugar
  • ¼ teaspoon cinnamon
  • 5 tablespoons butter
  • ⅛ teaspoon salt only if using unsalted butter

Batter

  • 1 pound cream cheese
  • 1 cup sugar
  • ¼ cup sour cream
  • 3 eggs
  • 1 teaspoon vanilla
  • 1 teaspoon lemon juice optional
US Customary - Convert to Metric

Instructions

  • The ingredient photo is for a double recipe. All instructions and ingredient amounts are for the single recipe.
    cream cheese with eggs and ingredients for bars
  • Prepare an 8X8 or 6X9 baking dish by lining it with parchment paper. Use two sheets and cut them to fit in a crossing pattern. Use dots of butter in the corners of the dish to help them stay down. They need to hang over a little so you can remove the bars from the pan.
    baking pan lined with crossing sheets of parchment paper
  • Crush 8 sheets of Graham crackers. Add 2 tablespoons of powdered sugar, ¼ teaspoon of cinnamon, and ⅛ teaspoon of salt if using unsalted butter. Mix to combine. Melt 5 tablespoons of butter and add.
    crushing graham crackers in bag with a glass
  • Mix well and press into the bottom of the prepared dish, and allow to run up the side about ¼ inch. Bake for 8-10 minutes to firm up. When the crust is done baking, decrease the oven temperature to 325°F.
    pressing crust into prepared pan with bottom of a glass
  • With a hand mixer or stand mixer, combine 1 pound of cream cheese and 1 cup of sugar until smooth. Add 3 eggs, ¼ cup sour cream, and 1 teaspoon vanilla. Add optional lemon juice if using it at this point. Mix well.
    beating cream cheese with sugar in a glass bowl with an electric mixer
  • Pour into the baking dish.
    pouring batter into prepared pan with crust
  • Bake for 30-40 minutes until the edge is set and just starting to brown some. The center will still appear soft. You can check the temperature; it should be 180°F, measured about 1 inch from the edge.
    baked cheesecake bars in pan showing browning edge with shimming center
  • Cool at room temperature for 30 minutes, then chill in the refrigerator until cold. Cut with a large sharp knife and run under hot water for clean slices.
    cheesecake bars on a blue plate

Notes

Pro Tips

  1. This small-batch recipe uses an 8X8 pan, but a 6X9 pan works well too.
  2. A double recipe fits in a cake pan-sized dish of 9X13. This will take about 10 minutes longer to cook.
  3. Your cooking time will vary by your oven and the pan used so watch for the end-points.
  4. This works much better if the eggs and cream cheese are at room temperature.
  5. It will be near impossible to get out of the pan in good shape without the parchment paper. I like to use longer pieces of paper so I can lift it out of the pan when done.
  6. A few dots of butter in the pan will hold the parchment in place and prevent shifting while you assemble this.
  7. Great to top it with a little fruit of your choice or whipped cream.
  8. Cooling at room temperature before refrigerating helps prevent cracking.
  9. Store covered in the refrigerator for up to 4 days or freeze for up to 3 months.

Nutrition

Calories: 323kcal | Carbohydrates: 28g | Protein: 5g | Fat: 20g | Saturated Fat: 12g | Polyunsaturated Fat: 1g | Monounsaturated Fat: 1g | Cholesterol: 86mg | Sodium: 255mg | Potassium: 35mg | Fiber: 0.4g | Sugar: 22g | Vitamin A: 700IU | Vitamin C: 0mg | Calcium: 40mg | Iron: 0.5mg

This is a small-batch version of one of the internet's most common cheesecake bar recipes. It is adapted from the King Arthur version with expanded detail and a few adjustments.

Editor's Note: Originally Published April 4, 2017. Updated with expanded options, refreshed photos, and a table of contents to help navigation.

dogs with purple puppy.

30-Minute Chicken Fried Cube Steak with Gravy

pouring gravy over chicken fried cube steak

Chicken Fried Cube Steak is a classic southern comfort food you can make at home in only 30 minutes—an easy weeknight recipe with restaurant-quality results.

Easy to scale up for to family size instead of the "for two" size—instructions below. This simplified recipe makes a wonderful weeknight dinner the whole family will love.

🐄Ingredients

Cube steak
Milk
Egg
Flour
Pantry spices—paprika, garlic powder, black pepper, seasoning salt (Lawry's or other), and optional cayenne pepper
Gravy—milk or beef broth

chicken fried steak on a blue plate with potatoes being covered with gravy.
[feast_advanced_jump_to]
Blue ribbon divider used for visual effect

Featured Comment from Pam:
"Oh my goodness! Just made this for my guy and myself and it is soooo delicious."

It is always time for great Southern comfort food. Chicken Fried Cube Steak has crispy, spicy breading outside and tender chicken inside. Smother it with wonderful milk gravy, and you have heaven on a plate.

It only takes 30 minutes to make with these quick and easy-to-follow step-by-step photo instructions. It has options for both the milk-based gravy for Chicken Fried Cube Steak and brown gravy if you want Country Fried Cube Steak.

👨‍🍳How to Make Chicken Fried Cube Steak with Gravy

cube steak with seasonings and egg.

Start with about one pound of cube steak in two large pieces.

adding oil to a frying pan.

In a larger fry pan, heat 4 tablespoons of vegetable oil over medium-high heat.

mixing spices into flour.

Set up a breading line. In pan #1, beat 1 egg with ½ cup of milk. In pan #2, add ¾ cup of flour with 1 teaspoon seasoning salt, ½ teaspoon paprika, ½ teaspoon garlic powder, and ½ teaspoon black pepper. Add a pinch of cayenne pepper if you want. Mix well.

coating the meat with egg mixture.

Dry the cube steaks. Coat cube steak in the flour mixture, and shake off excess. Coat in egg mixture, shake off excess, and one more coat of the flour mixture. Place on a plate and repeat for the next steak.

laying the coated meat into the hot oil.

By now, the oil should be shimmering. Using a fork, lay the steak into the oil.

steak in the pan cooking with edge browning and blood starting to come through the flour on top of the steak.

When the edges start to turn golden, and it looks like some blood is coming through the flour (4-5 minutes), it is time for your only flip. Fry another 3-4 minutes. A final internal temperature of 145° - 150° and golden brown.

tenting the steak on a plate with foil.

Remove steaks to a clean plate and tent lightly with foil.

whisking flour into droppings in pan.

Lower burner to medium. Add 4 tablespoons of the flour mixture from coating pan #2 to 4 tablespoons of the oil and drippings in the pan—you may need to remove some. Whisk for a few minutes to cook the flour.

adding milk to the roux in the pan with a whisk.

Slowly add 2 cups of milk or beef broth while continuing to whisk. It should start thickening in a few minutes.

whisking gravy until thickened.

Add salt and pepper to taste. With milk gravy, go heavy on the pepper.

For more details, keep reading. See the Recipe Card below for complete instructions and to print.

Make it Country Fried Cube Steak

The two most accepted differences are the spiciness of the breading and the gravy.

For the breading, eliminate the seasoning salt and replace half of it with salt. You can adjust other spices if you want. Some recipes only have salt and pepper. The egg as a base for the bread can be changed to milk but I suggest keeping the egg, it will stick better.

The gravy is easy to change. Use beef broth instead of milk, and don't use spiced flour; use plain flour.

⬆️How to make this recipe bigger

Think of that crispy golden brown breading smothered in gravy—

  1. Use the recipe card and adjust the number of servings.
  2. Use the volume of ingredients in the ingredient list, not the instructions—those do not adjust. You will have more flour than needed and can hold back on that a little.
  3. Use a big skillet. I have a 15-inch skillet that can easily hole four cube steaks.
  4. If doing more than four, you may need to heat the oven to 200° and place cook cube steaks on it covered with foil to keep warm during batch cooking.
  5. Cook all the cube steak before making gravy.

Comfort Food Recipes

Some other comfort food recipes you will love are Beef Tips and Gravy, Pan Fried Pork Chops with Gravy, Meatloaf Burgers, and Oven Fried Chicken with Gravy. Or other diner classics like Home Fries, Iowa Breaded Pork Tenderloin Sandwich, and Salisbury Steak Recipe.

🐄About the Gravy Options

  • Milk gravy is just gravy using milk as the liquid instead of broth. It is usually heavily peppered and has the spices of the breading.
  • The best way to make milk gravy is to use the seasoned flour from the breading tray and make a roux with the oil and drippings in the pan, then add the milk and thicken. Heavy pepper is recommended.
  • Use the same roux method to make brown gravy, but uses beef broth instead of milk. It will have more spice than traditional country-fried gravy due to spicy flour—I love this, but you can use flour without spices if you want and add some salt and pepper.
  • For more information about making gravy, see How to Make Gravy from Scratch—Quick & Easy.

❓FAQs

How to make the breading stick to the meat?

First: Dry the meat well before starting the breading.
Second: Shake excess flour and egg off after each coat.
Third: Let the meat sit with the coating for 5 minutes before cooking.
Fourth: Use a fork to handle the meat once coated and only flip once.

What is cube steak?

Cube steak usually comes from top or bottom round steak or sirloin steak

The name "cube" refers to the shape of the indentations left by the mechanical tenderizer used to make the steak tender. You can do the mechanical tenderization at home, but most of us will buy it already cubed.

Is Country Fried Steak the same as Chicken Fried Steak?

They are almost the same, and the definitions are fussy. And there are regional differences also. Both are fried cube steaks coated with spiced flour, similar to what coats fried chicken.

Chicken fried steak has a spicy flour coating held on by an egg, similar to fried chicken. And it is combined with peppery milk-based gravy. A classic Texas roadside diner meal that every restaurant has in the South and most of the Midwest.

Country fried steak is also fried cube steak. The coating may or may not have egg and may be less spicy. The gravy is brown, not creamy milk-based gravy. You will see a lot of "mays" in there because many recipes for country fried are the same as chicken fried outside of the gravy. But even the gravy gets confused sometimes.

I grew up in the midwest, and we called it "fried cube steak with gravy" and would specify milk gravy if used. I included both types of gravy in this recipe; you can call it anything you want. And you can vary the breading spices, but I suggest keeping the egg.

Blue ribbon divider used for visual effect

This recipe is listed in these categories. See them for more similar recipes.

101's Best Recipes, 30-Minute Dinner Recipes, Beef Recipes, Comfort Food Recipes

Have you tried this recipe, or have a question? Join the community discussion in the comments.

📖The Recipe Card

pouring gravy over chicken fried cube steak
Print Recipe Add to Collection Go to Collections
4.67 from 3 votes

30-Minute Chicken Fried Cube Steak with Gravy

Chicken Fried Cube Steak is a classic southern comfort food you can make at home in only 30 minutes—an easy weeknight recipe with restaurant-quality results.
Prep Time10 minutes mins
Cook Time20 minutes mins
Total Time30 minutes mins
Course: Main Course
Cuisine: American
Keyword: Chicken Fried Steak
Servings: 2
Calories: 606kcal
Author: Dan Mikesell AKA DrDan

Ingredients

  • 1 pound cube steak
  • ½ cup milk or beef broth
  • 1 large egg
  • ¾ cup flour
  • 1 teaspoon seasoning salt Lawry's is good
  • ½ teaspoon paprika
  • ½ teaspoon garlic powder
  • ½ teaspoon pepper
  • cayenne pepper optional pinch

Ingredient for Gravy plus flour from above

  • 2 cups milk
  • salt and pepper to taste
US Customary - Convert to Metric

Instructions

  • Start with about one pound of cube steak in two large pieces.
    cube steak with seasonings and egg
  • In a larger fry pan, heat 4 tablespoons of vegetable oil over medium-high heat.
    adding oil to a frying pan
  • Set up a breading line. In pan #1, beat 1 egg with ½ cup of milk. In pan #2, add ¾ cup of flour with 1 teaspoon seasoning salt, ½ teaspoon paprika, ½ teaspoon garlic powder, and ½ teaspoon black pepper. Add a pinch of cayenne pepper if you want. Mix well.
    mixing spices into flour
  • Dry the cube steaks. Coat cube steak in the flour mixture, and shake off excess. Coat in egg mixture, shake off excess, and one more coat of the flour mixture. Place on plate and repeat for next steak.
    coating the meat with egg mixture
  • By now, the oil should be shimmering. Using a fork, lay the steak into the oil.
    laying the coated meat into the hot oil
  • When the edges start to turn golden, and it looks like some blood is coming through the flour (4-5 minutes), it is time for your only flip. Fry another 3-4 minutes. A final internal temperature of 145° - 150° and golden brown.
    steak in the pan cooking with edge browning and blood starting to come through the flour on top of the steak
  • Remove steaks to a clean plate and tent lightly with foil.
    tenting the steak on a plate with foil

Making Gravy-Optional but recommended

  • Lower burner to medium. Add 4 tablespoons of the flour mixture from coating pan #2 to 4 tablespoons of the oil and drippings in the pan—you may need to remove some. Whisk for a few minutes to cook the flour.
    whisking flour into droppings in pan
  • Slowly add 2 cups of milk or beef broth while continuing to whisk. It should start thickening in a few minutes.
    adding milk to the roux in the pan with a whisk
  • Add salt and pepper to taste. With milk gravy, go heavy on the pepper if doing the milk gravy.
    whisking gravy until thickened

Notes

Pro Tips

  1. Use the flour that is already seasoned to make the roux. If you need more flour, just use regular flour.
  2. If making brown gravy for Country Fried Cube Steak, use beef broth, and you may use plain flour if you want less spice in the gravy.
  3. Use the oil used to fry the steak for the gravy. You need 4 tablespoons and may need to remove some.
  4. To help the breading stick better, make sure the steak is dry before starting, shake off excess well between coats, let set for 5 minutes before cooking, use a fork to handle the meat once coated, and only flip once.
Nutrition note. The nutrition is calculated using a LARGE 8 oz steak and you consuming half the gravy. More reasonable serving ¼ to ⅓ of the total making the calories 300 or 400 calories.

Nutrition

Calories: 606kcal | Carbohydrates: 60g | Protein: 66g | Fat: 11g | Saturated Fat: 4g | Polyunsaturated Fat: 0.03g | Monounsaturated Fat: 0.1g | Cholesterol: 200mg | Sodium: 1451mg | Potassium: 599mg | Fiber: 2g | Sugar: 16g | Vitamin A: 1050IU | Vitamin C: 0.2mg | Calcium: 400mg | Iron: 6.3mg

Inspired by the Pioneer Woman version of Chicken Fried Steak.

Originally Published  February 24, 2018. Updated with expanded options, refreshed photos, and a table of contents to help navigation.

image of Molly and Lilly dogs chasing Mr. Squirrel

Quick and Easy French Bread Pizza in 20 Minutes

Quick French Bread Pizza from 101 Cooking for Two

Delicious Quick and Easy French Bread Pizza is the perfect 20-minute evening meal or a party. Full of your favorite toppings, browned melted cheese, and crispy crust.

The perfect recipe to let kids customize their pizzas, and it's faster to make than pizza delivery.

🥖Ingredients

French bread
Pizza sauce
Toppings of choice.
Mozzarella cheese
Butter and garlic powder—optional to brush the bread

French bread pizza on a gray plate.
[feast_advanced_jump_to]
Blue ribbon divider used for visual effect

Featured Comment from Celesti:
"5 stars—We made this tonight with day old French bread. It turned out perfect.."

We all need a fast and easy dinner at times. This homemade French bread pizza is baked in the oven for a delicious dinner. This is perfect for the family that can't agree on toppings or for parties, cut up as finger food.

A small baguette will make two large servings, while a full-size loaf will make 4-6 servings. It is easy to prep the toppings a few days ahead, and they will come together in only a few minutes.

👨‍🍳How to Make French Bread Pizza

French bread with toppings for pizza.

Preheat oven to 375° convection or 400° conventional. While preheating, you should have time to prepare the pizza.

Cutting French bread in half on a white board.

Slice a loaf of French bread horizontally. The recipe is for a 9-inch loaf—2 servings. For a full-size loaf, you will have 4-6 servings, depending on the size—adjust the other ingredients, and cooking time will increase.

melting butter in a small bowl in a microwave.

Optional toasting with garlic butter: You should do this if using sub-buns or the French bread has a soft center. Mix 2 tablespoons of melted butter and ½ teaspoon of garlic powder. Brush the bread with the butter mixture and broil it on a baking sheet for a few minutes to light brown. For a large loaf, use double the amount.

browning sausage in a skillet.

Prep your favorite pizza toppings. I browned ½ pound of Italian sausage and drained it well. Plus, I trimmed some pepperoni in half.

spreading sauce on French bread halves.

Top with sauce. It took about ½ cup for the two halves. Keep it light; you are adding flavor, not soaking the bread or filling holes.

French bread pizzas topped and ready to bake.

Add toppings.

French bread pizzas coming out of oven.

Bake on the middle rack until nicely browned—about 10 minutes.

cut up French bread pizza on black board.

Cut into easy pieces.

For more details, keep reading. See the Recipe Card below for complete instructions and to print.

⏰How long to bake French bread pizza?

About 10 minutes at 375° convection or 400° conventional oven. The browning of the cheese will tell you when done. A larger French bread pizza will take slightly longer.

✔️Ingredient tips and variations to get it right every time

  • 🥖The Bread
    • You need nice French bread. This will be half the taste, and bland white bread won't do. You need to know your baker.
    • My 9-inch loaf of bread is 2 large servings. A full-size loaf will be wider but not twice as long and give 4-6 servings.
    • Don't buy the cheap stuff. You want something that tastes outstanding and comes from some excellent gluten development.
    • Some French bread will have a harder crust. Opt for a bit softer crust for this recipe, which will usually be sold in plastic instead of paper bags. Do not buy the baguettes that are sold uncovered.
    • If the bread is very soft inside, give it a brush of olive oil and toast it under a broiler for a few minutes until firming up and browning a little.
  • 🥣The Sauce
    • Be careful about the amount of sauce. The bread will act like a sponge and absorb it. You want some taste, not a sloppy mess. A little too little is better than too much here. It takes about ¼ cup per 9-inch pizza (half a loaf.), so jar sauce is very convenient.
    • If you're doing a large amount for a party, it may be worth making your own.
    • My simple homemade sauce recipe will make about 1 ½ cups and freeze well.
    • One 6 oz can of tomato paste and 6 oz water.
    • 1 teaspoon salt, ½ teaspoon pepper, 1 clove garlic, and ½ teaspoon oregano. A pinch of red pepper flakes is optional.
  • 👨‍🍳Toppings
    • Remember, you have a limited surface area to cover. Cut things like pepperoni slices in half and chop vegetables small. And only add a few toppings.
    • Meats: Italian sausage, bacon, pepperoni, and ham are the common ones.
    • Vegetables: chopped bell peppers, mushrooms, olives, or red onions.
    • Cheese: Everybody uses mozzarella cheese, but a sprinkle of Romano or Parmesan cheese adds a nice flavor.

Pizza Recipes

Check out some other easy pizza recipes, like Tortilla Pizzas, Crock Pot Pizza, Bisquick® Pizza Dough, White Pizza, and Basic Homemade Pizza Dough. This recipe is featured in Game Day Party Recipes.

❓FAQs

What can I do about the bread getting soggy?

The most important factor is the choice of bread. Some will have excellent gluten formation and be more resistant to becoming soggy. But on to things you can do.
1) Use the optional garlic butter and toast lightly.
2) Do not overdo the sauce; only use a light coat.
3) Put the cheese on before the sauce, like Chicago pizza. You can add more cheese after the sauce and toppings if you want.
4) Try not to use toppings that release a lot of water like chunks of pineapple or even tomatoes.

Can I freeze French bread pizza?

Yes. After it is baked and cooled, seal it airtight and freeze it for 3-4 months. Thaw overnight in the refrigerator before reheating.

How to reheat French bread pizza?

Any pizza is best reheated in the oven on a baking sheet at 375° for 10-15 minutes. An air fryer or toaster oven will also work well. Microwaves will tend to get soggy results.

Blue ribbon divider used for visual effect

This recipe is listed in these categories. See them for more similar recipes.

101's Best Recipes, 30-Minute Dinner Recipes, Appetizer and Party Recipes, Italian Recipes, Pizza Recipes

Have you tried this recipe, or have a question? Join the community discussion in the comments.

📖The Recipe Card

French Bread Pizza on a gray plate
Print Recipe Add to Collection Go to Collections
5 from 3 votes

Quick and Easy French Bread Pizza in 20 Minutes

Delicious Quick and Easy French Bread Pizza is the perfect 20 minute evening meal or a party. Full of your favorite toppings, browned melted cheese, and crispy crust. 
Prep Time10 minutes mins
Cook Time10 minutes mins
Total Time20 minutes mins
Course: Main Course
Cuisine: Italian
Keyword: French Bread Pizza, Pizza
Servings: 2
Calories: 589kcal
Author: Dan Mikesell AKA DrDan

Ingredients

  • 1 loaf French bread 9 inch for two servings
  • Prepared pizza sauce
  • Toppings of choice.
  • mozzarella cheese
US Customary - Convert to Metric

Instructions

  • Preheat oven to 375° convection or 400° conventional. While preheating, you should have time to prepare the pizza.
    French bread with toppings for pizza
  • Slice a loaf of French bread horizontally. The recipe is for a 9-inch loaf—2 servings. For a full-size loaf, you will have 4-6 servings, depending on the size—adjust the other ingredient, and cooking time will increase.
    Graphic Cutting French bread in half on a white boardfor Pinterest of French Bread Pizza
  • Optional toasting with garlic butter: You should do this if using sub-buns or the French bread has a soft center. Mix 2 tablespoons of melted butter and ½ teaspoon of garlic powder. Brush the bread with the butter mixture and broil it on a baking sheet for a few minutes to light brown. For a large loaf, use double the amount.
    melting butter in a small bowl in a microwave
  • Prep your favorite pizza toppings. I browned ½ pound of Italian sausage and drained it well. Plus, I trimmed some pepperoni in half.
    browning sausage in a skillet
  • Top with sauce. It took about ½ cup for the two halves. Keep it light; you are adding flavor, not soaking the bread or filling holes.
    spreading sauce on French bread halves
  • Add toppings.
    French bread pizzas topped and ready to bake
  • Bake on the middle rack until nicely browned—about 10 minutes.
    French bread pizzas coming out of oven

Notes

Pro Tips:

  1. I suggest using a softer crust of French bread. Those will probably be sold in plastic bags, not paper or unwrapped. If you start with a hard crust and bake it more, it will be too hard.
  2. If doing a larger amount, it is worth the time to do your sauce. My homemade sauce recipe: One 6 oz can of tomato paste and 6 oz water. 1 teaspoon salt, ½ teaspoon pepper, 1 clove garlic, and ½ teaspoon oregano. An optional pinch of crushed red pepper for heat. This will make about 1 ½ cups of sauce, which is three times what I use here for two 9-inch pizzas so that you can judge from there.
  3. Do not overdo the sauce; the bread can act like a sponge and absorb too much.
  4. Top as you wish.
  5. Great for a pizza party for teens. They can prepare as they wish.
  6. The results are very dependent on the quality of the bread.
  7. I generally only cook what we will eat but store and reheat it like leftover pizza.
  8. I do prepare toppings ahead frequently.
  9. Nutrition is calculated on a full half of a 9 inch baguette.

Nutrition

Calories: 589kcal | Carbohydrates: 61g | Protein: 31g | Fat: 25g | Saturated Fat: 12g | Cholesterol: 65mg | Sodium: 1611mg | Fiber: 3g | Sugar: 6g | Vitamin A: 550IU | Vitamin C: 1.7mg | Calcium: 840mg | Iron: 4mg

Publisher Note: Originally Published November 15, 2015. Updated with expanded options, refreshed photos, and a table of contents to help navigation.

Smiling dogs in the yard.

Low-Fat Homemade Dog Treats—Healthy & Delicious

Pile of homemade dog treats on a wire rack

Low Fat Homemade Dog Treats are the perfect low-calorie treat for your dog. With only five ingredients, your dog will love the peanut butter and pumpkin taste. It is much healthier than commercial treats—any veterinarian would approve.

🐾Ingredients

Pumpkin puree
Peanut butter—beware of low caloric that may have Xylitol (very toxic to dogs)
Eggs
Flour—AP, whole wheat, or others—depending on your dog.
Cinnamon and salt

Pile of homemade dog treats.
[feast_advanced_jump_to]
Blue ribbon divider used for visual effect

🐾Why you should make these dog treats

  • It's time to get the pups something special and healthier than most other dog biscuits. Your dog will love them, and you won't feel as guilty—four paws way up for this one.
  • It is easy to adjust the ingredients. If your vet recommends specific diets, like a low-fat diet for pancreatitis or weight loss. Or you can make them gluten-free for wheat sensitivity by changing the flour.
  • Much lower in calories for overweight dogs—only about 30 calories per dog biscuit vs. the 120 we were using.
  • Uses 4 simple, healthy ingredients: pumpkin puree, peanut butter, eggs, salt, and flour. Some cinnamon may be added to make us humans feel it is tasty.
  • A bonus is they are a lot cheaper than store-bought dog treats, especially the pet boutique's gourmet ones.
  • DISCLAIMER—You must discuss your dog's health with and follow your veterinarian's recommendations for your dog's diet and health needs—not the internet. These occasional treats should not be a significant portion of your pet's diet.

👨‍🍳How to Make Healthy Low-Fat Homemade Dog Treats

ingredients for dog treats.

Preheat oven to 350° convection or 375° conventional.

wet ingredients in the stand mixer.

Combine pumpkin puree, eggs, water, peanut butter, salt, and cinnamon. Slowly mix in whole wheat or other flour.

dough in two pieces on a black board.

Place the dough on a lightly floured surface and cut it in half for easier handling.

cutting the dough roll into pieces.

Roll out the dough to ¼ inch thick and use bone-shaped or other cookie cutters. Or roll into logs of 1-inch diameter. Cut into ¼ to ½ inch pieces.

dog biscuts spread over parchment paper.

Prep two large baking sheets with parchment paper and distribute the biscuits evenly.

dog treats on a wire rack.

Bake for 30 minutes for semi-hard or longer for harder bones. The bones must reach 165° internal temperature for food safety due to the eggs.

For more details, keep reading. See the Recipe Card below for complete instructions and to print.

🥜Ingredients options

  • Pumpkin Puree—Use real puree, not pumpkin pie filler, which may have harmful spices like nutmeg. You could use squash or sweet potato instead.
  • Peanut Butter—Dogs love peanut butter, which has excellent protein and healthy fats, but DO NOT use any brand with Xylitol, which is very toxic to dogs. It is found mainly in lower-caloric peanut butter, but READ THE LABEL. Also, many types of nuts are toxic to dogs, so be careful about other nuts or nut butter.
  • Flour—Almost any flour will do. I tend to use whole wheat, but all-purpose flour is fine. Or use alternative flour like rice or oat flour, which are gluten-free if that is what you need. Soy flour will work well, but some dogs and owners have problems with it. Coconut flour and other nut flours should be avoided unless you are sure they are safe.
  • Eggs—The eggs will help hold everything together. Use two whole eggs or four egg whites to eliminate 10 grams of fat and 115 calories for the entire recipe, Only about 2 calories and a fraction of a gram of fat per treat.
  • Cinnamon—Optional. It is primarily for you—skip it if you want. A small amount is safe.

🐕Tips to make them right every time

  • Mixing tips
    • A good stand mixer earns its keep with this recipe. But you can use a food processor or hand mix in a large bowl.
    • The amount of water will vary a lot depending on the flour used. You are trying to get to a pie crust consistency. Add a bit more water or flour to get there. The dough should not be very sticky.
    • You can blend in other dog-safe ingredients like rolled oats or wheat germ. Just be sure you are using safe additives.
    • Here are some everyday things toxic to dogs: Grapes/raisins, chocolate, onion, garlic, chives, avocados, citrus, and many more things can have issues. So before using a product, be sure it is safe and read all labels.
  • Cutting tips
    • The shape doesn't matter to the dog. But we humans like bone or holiday shapes. I generally roll the dough into logs and cut it into ¼ to ½ inch thick disks.
    • If you want to cut shapes, roll the dough onto a floured surface about ¼ inch thick and use a cookie cutter to make what you want.
  • Baking tips
    • A large baking sheet with a non-stick covering like parchment paper or a silicone baking mat is suggested. A coat of PAM on bare metal is not enough—they stick.
    • The suggested 40 minutes at 375° is generally correct. It will produce a nice dry dog cookie, especially if it is ¼ inch thick.
    • Baking time will vary by size and thickness, so watch to color and get to at least 165°. Longer is OK to crisp them more.
    • If you need softer for an older dog, undercooked (30 minutes total) to leave more moisture. They still need to reach 165° due to the eggs. But softer means more moisture, which means spoiling (molding) faster. Just be aware of the issues.

How to Store Homemade Dog Treats

Generally, you can store these dog treats for 5 to 7 days at room temperature, but it may be shorter if you make them softer. Keep them in an airtight container. Refrigerating will extend the storage time to 1 to 2 weeks.

They will freeze well when stored airtight for up to 3 months.

Like other homemade baked products—these do not have the preservatives you will find in store-bought treats. So mold will come faster than you think.

❓FAQs

What type of flour can I use?

I generally use whole wheat or AP flour—oat or rice flour works well. Soy flour and almond flour are usually safe, but many dogs will be sensitive to soy or almond products.

Coconut flour and other nut flours should be avoided unless you are sure they are safe for your dog. Consult your veterinarian if unsure.

What can I add to dog treats?

You can blend in other dog-safe ingredients like rolled oats or wheat germ. Just be sure you are using safe additives. If in doubt, get your vet's advice.

Here are everyday things that are toxic to dogs: Grapes/raisins, chocolate, onion, garlic, chives, avocados, citrus, and many more things can have issues. So before using a product, be sure it is safe and read all labels.

Blue ribbon divider used for visual effect

📖The Recipe Card

Pile of homemade dog treats on a wire rack
Print Recipe Add to Collection Go to Collections

Low-Fat Homemade Dog Treats—Healthy & Delicious

Low Fat Homemade Dog Treats are the perfect low-calorie treat for your dog. With only five ingredients, your dog will love the peanut butter and pumpkin taste. Much healthier than commercial treats—any veterinarian would approve.
Prep Time15 minutes mins
Cook Time40 minutes mins
Total Time55 minutes mins
Course: American
Cuisine: American
Keyword: Healthy homemade dog treats, low calorie dog treats homemade, low fat dog treats homemade, Low Fat Dog Treats Recipe
Servings: 60
Calories: 26kcal
Author: Dan Mikesell AKA DrDan

Ingredients

  • 7 oz can pumpkin
  • 3 tablespoons peanut butter
  • 2 egg or 4 egg whites
  • ½ teaspoon salt
  • ½ teaspoon cinnamon
  • ¼ to ½ cup water as needed
  • 3 cups whole wheat flour
US Customary - Convert to Metric

Instructions

  • Preheat oven to 350° convection or 375° conventional.
    ingredients for dog treats
  • Combine ½ of a 14 oz can of pumpkin puree with 2 eggs, ¼ cup water, 3 tablespoons peanut butter, ½ teaspoon salt, and ½ teaspoon cinnamon.
    wet ingredients in the stand mixer
  • With a stand mixer dough hook on two or by hand, slowly mix in 3 cups of whole wheat or other flour. You may need more water—you want the consistency of pie dough. If mixing by hand, do as well as you can in the bowl, then move to a floured area to finish combining.
  • Place the dough on a lightly floured surface and cut it in half for easier handling.
    dough in two pieces on a black board
  • Roll out the dough to ¼ inch thick and use bone-shaped or other cookie cutters. Or roll into logs of 1-inch diameter. Cut into ¼ to ½ inch pieces.
    cutting the dough roll into pieces
  • Prep two large baking sheets with parchment paper and distribute the biscuits evenly.
    dog biscuts spread over parchment paper
  • Bake for 30 minutes for semi-hard or longer for harder bones. The bones must reach 165° internal temperature for food safety due to the eggs.
    dog treats on a wire rack

Notes

Recipe Tips:

  1. This dough is dry, and a stand mixer helps a lot. You can do it by hand or use a food processor.
  2. Using 4 egg whites vs. 2 whole eggs will save 10 gms of fat and 115 calories over the entire recipe. So, about 2 calories and a fraction of a gram of fat per treat.
  3. If the dough is too dry, add a bit of water. If sticky, then more flour. You are aiming for non-sticky pie crust consistency.
  4. To make gluten-free, substitute with rice or oat flour.
  5. Lower-calorie peanut butter frequently is made with xylitol. Xylitol is quite toxic for dogs and can be deadly to them.
  6. CHECK ALL LABELS for toxic ingredients.
  7. 40 minutes is recommended, but if you want softer than 30  minutes.
  8. These do not have the preservatives you will find in store-bought treats. They can be at room temperature for a few days. Refrigerated for about 5 days or frozen for 3-4 months.

Nutrition

Calories: 26kcal | Carbohydrates: 5g | Protein: 1g | Fat: 0.5g | Saturated Fat: 0.1g | Polyunsaturated Fat: 0.1g | Monounsaturated Fat: 0.2g | Sodium: 23mg | Potassium: 42mg | Fiber: 1g | Sugar: 0.1g | Vitamin A: 250IU | Vitamin C: 0.4mg | Calcium: 2mg | Iron: 0.2mg

Based on Allrecipes Peanut Butter and Pumpkin Dog Treats. I increased the pumpkin and provided low-fat and gluten-free options. And decrease the cooking time slightly to keep them softer for Jake's senior teeth.

Originally Published May 6, 2012. Updated with expanded options, refreshed photos, and a table of contents to help navigation.

Jake in the flowers in 2010.
Jake sitting in flowers

Crock Pot Chicken Tortilla Soup

tortilla soup in a white bowl

This easy Crock Pot Chicken Tortilla Soup is loaded with tender chicken, beans, and vegetables in a flavorful, spicy broth. It's a healthy, satisfying dinner with just 10 minutes of prep.

Let your crock pot do the work with this simple dump-and-go recipe using everyday ingredients.

tortilla soup in a white bowl.
[feast_advanced_jump_to]

quote mark
Featured Comment by William:
⭐⭐⭐⭐⭐
"Absolutely perfect recipe."

📌 TL;DR — Crock Pot Chicken Tortilla Soup

  • What: An easy chicken tortilla soup crock pot recipe with tender chicken, beans, and vegetables in a flavorful, spicy broth.
  • Why: A healthy, low-fat, low-calorie soup that's satisfying comfort food with just 10 minutes of prep.
  • How: Add everything to a 4-quart or larger crock pot. Cook on LOW for 5–6 hours until the chicken reaches 165°F and the vegetables are tender.

🐓 Ingredients

chicken breasts with soup ingredients.
  • Chicken—breasts, thighs, or rotisserie chicken
  • Aromatics—onion and garlic
  • Vegetables—celery, corn, black beans
  • Tomatoes—RoTel and diced tomatoes
  • Pantry ingredients—chicken broth, cumin, chili powder, salt, black pepper, cayenne pepper (optional)
  • Tortilla strips—optional for serving

👨‍🍳 Quick Overview: Chicken Tortilla Soup in Crock Pot

1. Trim the chicken into bite-size pieces and chop the onion and celery.

trimmed and cubed chicken on a white board.

2. Add everything to a 4-quart or larger crock pot. A half recipe will fit in a 2-quart mini crock pot.

mixing ingredients in the crock pot.

3. Cook on LOW for 5–6 hours until the chicken reaches 165°F and the vegetables are tender.

cooked soup in a ladle.

👇 For the complete printable recipe, see the recipe card below.

👨‍🍳 Rotisserie Chicken and Other Options

  • Rotisserie chicken: Cook the soup without chicken on LOW for 3 hours. Add shredded rotisserie chicken and cook for another hour.
  • Chicken thighs: Substitute boneless, skinless thighs for breasts without changing the cooking method.
  • Vegetables: Add bell peppers or zucchini, or substitute other beans, such as kidney or white beans.
  • Thicker soup: Start with half the chicken broth and add more near the end if needed.

⬇️ Half Recipe in a Mini Crock Pot

This recipe makes about 3 quarts (8 servings) and needs a 4-quart or larger crock pot.

A half recipe (4 servings) is great for two with leftovers and uses a 2-quart mini crock pot. You may use a larger crock pot, but it may cook a bit faster.

For larger batches, use a bigger crock pot without filling it more than 75% full.

Adjust the number of servings in the recipe card. The ingredient amounts will adjust, but the instructions will not.

🥣 Serving Chicken Tortilla Soup

Top with crispy tortilla strips, shredded cheese, avocado, cilantro, or sour cream. Use your favorites.

For homemade tortilla strips, slice flour tortillas into thin strips, spray lightly with cooking spray, and bake at 375°F for 10–15 minutes until golden brown.

🥡 Storage and Reheating

Refrigerate leftovers in an airtight container for 3–4 days or freeze for 3–4 months.

Thaw frozen soup overnight in the refrigerator. Reheat on the stovetop or in the microwave until hot.

📋 More Crock Pot Chicken Soup Recipes

  • Crock Pot Chicken Noodle Soup
  • Chicken Vegetable Soup in a Crock Pot
  • Chicken Parmesan Soup

❓ FAQs

What is chicken tortilla soup?

Chicken tortilla soup is a flavorful, mildly spicy tomato-based broth with chicken, beans, corn, and vegetables. It's usually served with crispy tortilla strips and toppings like cheese, avocado, or sour cream.

Can I use whole chicken breasts and shred them?

Yes. Add whole boneless, skinless chicken breasts to the crock pot with the other ingredients. About an hour before the end of cooking, remove the chicken once it reaches 165°F, shred it with two forks, and return it to the soup to finish cooking.

How can I make chicken tortilla soup milder or spicier?

For less heat, replace the RoTel with regular diced tomatoes and add mild green chilies if desired. For more heat, use hot RoTel, cayenne pepper, or minced jalapeños.

Is chicken tortilla soup healthy?

Yes. This version is low-fat and low-calorie, with plenty of protein and vegetables. Use lower-sodium broth and rinse the beans to reduce sodium.

📖The Recipe Card

tortilla soup in a white bowl
Print Recipe Add to Collection Go to Collections
4.34 from 21 votes

Crock Pot Chicken Tortilla Soup

Easy Crock Pot Chicken Tortilla Soup with tender chicken, beans, and vegetables in a flavorful, spicy broth. A healthy, low-fat, low-calorie dinner with just 10 minutes of prep.
Prep Time10 minutes mins
Cook Time5 hours hrs
Total Time5 hours hrs 10 minutes mins
Course: Soup
Cuisine: Mexican
Keyword: Chicken Soup, Tortilla Soup
Servings: 8 servings
Calories: 159kcal
Author: Dan Mikesell AKA DrDan

Ingredients

  • 2 skinless boneless chicken breasts or thighs
  • 1 onion medium
  • 2 ribs celery
  • 10 oz RoTel Diced tomatoes with Green Chilies
  • 14 oz diced tomatoes
  • 1 cup frozen corn or 1 can corn drained. White corn preferred.
  • 14 oz black beans rinsed and drained
  • 2 cloves garlic crushed
  • 28 oz lower sodium chicken broth
  • 1 teaspoon cumin
  • 1 teaspoon chili powder
  • 1 teaspoon salt to taste
  • ½ teaspoon pepper to taste
  • ¼ teaspoon cayenne pepper optional
US Customary - Convert to Metric

Instructions

  • Chop one medium onion and a couple of celery ribs.
    chopped celery and onion on a black board
  • Trim 2 medium-sized skinless boneless chicken breasts. Leave them whole to shred later, or you may cut them into bite-size pieces. If leaving whole but very large, cut in half to aid cooking.
    trimmed and cubed chicken on a white board
  • In a 4-quart or bigger crock pot, add veggies, one 10 oz can RoTel (Diced Tomatoes with Green Chilies), one 14 oz can diced tomatoes, 1 cup frozen corn, one 14.5 oz can black beans, rinsed, 2 cloves crushed garlic, two 14 oz cans lower-sodium chicken broth, 1 teaspoon cumin, 1 teaspoon chili powder, 1 teaspoon salt, ½ teaspoon pepper, and ¼ teaspoon cayenne pepper (optional).
    mixing ingredients in the crock pot
  • Add the prepared chicken to the pot. If using whole chicken breasts, remove them with one hour left in cooking, shred them, and replace them in the crock pot.
    adding cubes of raw chicken to a crock pot
  • Cook for 5-6 hours on low until the chicken is 165°F, and the veggies are tender.
    cooked soup in a ladel

Notes

Pro Tips

1. Use a 4-quart or larger crock pot. A half recipe fits in a 2-quart mini crock pot.
2. For shredded chicken, cook whole boneless breasts to 165°F, shred with two forks, and return to the soup.
3. For rotisserie chicken, cook the soup without chicken on LOW for 3 hours. Add shredded rotisserie chicken and cook for another hour.
4. Adjust the heat with mild or hot RoTel, cayenne pepper, or jalapeños.
5. For a thicker soup, start with less broth and add more near the end as needed.
 

Nutrition

Calories: 159kcal | Carbohydrates: 23g | Protein: 14g | Fat: 2g | Saturated Fat: 1g | Trans Fat: 1g | Cholesterol: 18mg | Sodium: 376mg | Potassium: 648mg | Fiber: 6g | Sugar: 3g | Vitamin A: 261IU | Vitamin C: 11mg | Calcium: 58mg | Iron: 3mg

Editor's Note: Originally published January 11, 2014. Updated with simplified instructions, additional cooking options, and improved small-batch guidance.

dogs in snow with sticks.

Baked Green Beans with Bacon

green beans with bacon on an orange plate

Baked Green Beans with Bacon are the perfect side dish with any meal—an easy green bean recipe with brown sugar, garlic, bacon, and tender green beans.

🥓Ingredients

Green beans—whole, frozen, or fresh
Bacon
Soy sauce
Pantry ingredients—butter, brown sugar, garlic powder

green beans with bacon on an orange plate.
[feast_advanced_jump_to]
Blue ribbon divider used for visual effect

Featured Comment from Anne:
"5 stars—This was delicious and so easy to prepare."

It is our best green bean recipe with bacon and a sweet and savory sauce of brown sugar, soy sauce, and garlic that uses frozen or fresh green beans.

We all need reliable side dishes, and this one has never failed us. It's perfect for almost any meal, even holiday or company meals.

It is an easy recipe with step-by-step photo instructions and is simple to adjust to your needs.

👨‍🍳How to Make Baked Green Beans with Bacon

bacon with frozen green beans and seasonings.

Preheat oven to 375° convection or 400° conventional.

cooking cut up bacon in a fry pan.

Cut 3-4 pieces of bacon into pieces and fry. Stop just before it is crispy and drain on a paper towel.

mixing topping for beans in glass bowl.

Melt 2 tablespoons of butter in a microwave. Add 2 tablespoons brown sugar, 1 tablespoon soy sauce, and ½ teaspoon garlic powder.

pouring topping over beans and bacon in baking dish.

Add 1 pound of fresh or frozen green beans to an 8 by 8 or a 6 by 9 baking dish. Spread the bacon over the beans. Drizzle the liquid over the dish. Note: fresh green beans should be blanched first.

green beans with bacon on a fork.

Bake until beans are tender and any thinner beans are browning. It takes about 20-25 minutes for fresh beans or 35-40 minutes for frozen whole beans.

For more details, keep reading. See the Recipe Card below for complete instructions and to print.

Green Beans Tips

  • Using frozen whole beans has produced consistent results. They are already blanched but not cooked. Do not use cut or French-cut frozen green beans.
  • Picking the Best Fresh Green Beans
    • Pick fresh green beans with vibrant green color and smooth skin without seed swells.
    • Avoid large, thick, or skinny beans.
    • They should have good firmness, no bad spots, and not be wrinkled.
    • Fresh off the vine or from the farmer's market is the best is the best is the best. Use the store produce department if you must.
  • If using fresh green beans, I suggest blanching them in boiling salt water for 2 minutes, then putting them in an ice water bath to cool. And watch closely for browning.

When to use these green beans

This recipe is a great side dish for Pan Seared Oven Baked Chicken Breasts, Pan Seared Oven Roasted Pork Tenderloin, and Breaded Pork Chops. But it will be excellent in both casual and formal dining.

Other easy vegetable recipes

Check out other great vegetable recipes like Green Beans with Toasted Almonds, Roasted Parmesan Asparagus, and Green Bean Casserole.

This recipe is featured in Mother's Day Recipes and Christmas Recipes roundup.

FAQs—Storage and reheating leftovers

How to store leftover green beans with bacon

Let leftovers cool completely, and store in the refrigerator sealed airtight for 3 days.

To freeze, spread out cold leftovers on parchment paper in a single layer and freeze. Store in an airtight container, freezer zip-lock suggested, with minimal air for 3 months. Thaw overnight before reheating.

How to reheat leftover green beans with bacon

To reheat, spread over a baking sheet with parchment paper. Bake in a 400° oven until hot—10-15 minutes. You can also reheat it in an air fryer or a skillet on the stovetop. Avoid the microwave.

Blue ribbon divider used for visual effect

This recipe is listed in these categories. See them for more similar recipes.

Side Dish Recipes

Have you tried this recipe, or have a question? Join the community discussion in the comments.

📖The Recipe Card

green beans with bacon on an orange plate
Print Recipe Add to Collection Go to Collections
4.34 from 6 votes

Baked Green Beans with Bacon

Baked Green Beans with Bacon are the perfect side dish with any meal—an easy green bean recipe with brown sugar, garlic, bacon, and tender green beans.
Prep Time10 minutes mins
Cook Time40 minutes mins
Total Time50 minutes mins
Course: Vegetable
Cuisine: American
Keyword: Bacon Green Beans
Servings: 6 servings
Calories: 93kcal
Author: Dan Mikesell AKA DrDan

Ingredients

  • 1 pound whole green beans frozen or fresh
  • 3-4 strips bacon
  • 2 tablespoons butter
  • 2 tablespoons brown sugar
  • 1 tablespoon soy sauce low sodium preferred
  • ½ teaspoon garlic powder
US Customary - Convert to Metric

Instructions

  • Preheat oven to 375° convection or 400° conventional.
    bacon with frozen green beans and seasonings
  • Cut 3-4 pieces of bacon into pieces and fry. Stop just before crispy and drain on a paper towel.
    cooking cut up bacon in a fry pan
  • Melt 2 tablespoons of salted butter in a microwave. Add 2 tablespoons brown sugar, 1 tablespoon soy sauce, and ½ teaspoon garlic powder.
    mixing topping for beans in glass bowl
  • Add 1 pound of fresh or frozen green beans to an 8 by 8 or a 6 by 9 baking dish. Spread the bacon over the beans. Drizzle the liquid over the dish. Note: fresh green beans should be blanched first.
    pouring topping over beans and bacon in baking dish
  • Bake until beans are tender and any thinner beans are browning. About 20-25 minutes for fresh beans or 35-40 minutes for frozen whole beans.
    green beans with bacon on a fork

Notes

Pro Tips

  1. Doubles easily in a 9 by 13 dish. Cooking time will be about the same.
  2. This works fine with frozen whole green beans. Do not use cut or French green beans. I keep frozen beans in the freezer for this recipe.
  3. Fresh green beans also work well for this but pick firm beans with good color, smooth skin, and no seed swells. Also, mostly the same size works best. Blanching first is highly recommended.
  4. Tips on buying the best green beans are in the post.
  5. If using fresh green beans, blanch in boiling salt water for 2 minutes, then an ice water bath to cool.
  6. Easy to prep ahead for dinner. Cook the bacon, make the sauce and then assemble and bake.
  7. We use this for company meals and usually make it with frozen whole beans. It is reliably done for use at 35-40 minutes in the oven. Great for planning.

Nutrition

Calories: 93kcal | Carbohydrates: 10g | Protein: 3g | Fat: 5g | Saturated Fat: 3g | Cholesterol: 14mg | Sodium: 197mg | Potassium: 180mg | Fiber: 2g | Sugar: 6g | Vitamin A: 638IU | Vitamin C: 9mg | Calcium: 31mg | Iron: 1mg

My wife came up with this inspiration piece, Smothered Green Beans at Plain Chicken. I'm sure Stephanie at Plain Chicken would not even recognize it coming from her inspiration.

Editor's Note: Originally Published February 22, 2017. Updated with expanded options, refreshed photos, and a table of contents to help navigation.

dogs standing in the leaf pile.

Chicken Broccoli Rice Casserole Recipe

fork full of casserole

This Chicken Broccoli Rice Casserole Recipe combines tender chicken, broccoli, rice, and plenty of cheese with a buttery Parmesan breadcrumb topping.

Made from scratch without canned soup, it uses simple ingredients and streamlined instructions. Make it ahead for a family dinner, use leftover chicken or turkey, or cut the recipe in half for a smaller household.

Fork full of casserole.
[feast_advanced_jump_to]

quote mark
Featured Comment by Cerwyn:
⭐⭐⭐⭐⭐
"With the exception of 3 small pieces for my husband and daughter, I ate the whole thing! Lol. 5 stars. Really wonderful!"

📝 TL;DR — Recipe Summary

What: A cheesy chicken broccoli rice casserole made from scratch without canned soup, topped with buttery Parmesan breadcrumbs.

Why: A delicious, comforting family dinner with simple ingredients, streamlined preparation, and make-ahead options. Easy to cut in half for smaller households.

How: Cook the rice and broccoli, sauté the chicken, combine everything with milk, mayonnaise, and cheese, then top and bake until golden brown.

🐓 Ingredients

raw chicken with broccoli and other ingredients.
  • Chicken breasts—boneless, skinless
  • Rice—uncooked long-grain white rice
  • Chicken broth—low sodium
  • Broccoli—fresh or frozen
  • Aromatics—onion and garlic
  • Creamy ingredients—milk and mayonnaise
  • Cheese—mild cheddar or Monterey Jack
  • Seasonings—salt and pepper
  • Topping—Panko breadcrumbs, butter, and Parmesan cheese

👨‍🍳 Quick Overview: Chicken Broccoli Rice Casserole

1. Trim the broccoli into bite-size pieces. Cook it with the rice in chicken broth until the liquid is absorbed.

cooking broccoli in sauce pan.

2. While the broccoli and rice cook, cut the chicken into bite-size pieces and cook with the onion until the chicken reaches 165°F. Add the garlic near the end.

raw chicken and onion cooking in fry pan.

3. Combine the cooked broccoli and rice with the chicken. Stir in the milk, mayonnaise, salt, pepper, and most of the shredded cheese. Transfer to a casserole dish.

adding cooked rice and broccoli to cooked chicken in fry pan.

4. Mix the topping of Panko bread crumbs, melted butter, and grated Parmesan cheese. Top the casserole with shredded cheese and then the topping.

adding topping to casserole.

5. Bake at 375°F for about 30 minutes until golden brown and bubbling. Rest for 10 minutes before serving.

browned casserole in dish.

For more details, keep reading. See the recipe card below for complete instructions and to print.

⬇️ Scaling Chicken Broccoli Rice Casserole for Two or More

This recipe makes 8 generous servings in a 9×13-inch baking dish, but it is easy to make a half recipe for two with leftovers or a smaller household.

  1. Half recipe: Makes 4 servings. Use a 6×9-inch or 8-inch square baking dish.
  2. Adjust ingredients: Change the number of servings in the recipe card to 4. Use the adjusted ingredient list, not the instructions, which do not automatically change.
  3. Baking time: Expect about the same baking time, but check for a golden-brown topping and bubbling edges.
  4. Leftovers: Consider making the full recipe since leftovers refrigerate and freeze well.

📆 How to Make Chicken Broccoli Rice Casserole Ahead

This casserole is perfect for making ahead. Assemble the casserole without the breadcrumb topping. Refrigerate uncovered for about an hour to cool before covering tightly.

  • Refrigerate: Store the unbaked casserole covered in the refrigerator for up to 2–3 days.
  • Freeze: Wrap the cooled, unbaked casserole tightly with plastic wrap and aluminum foil. Freeze for up to 3 months.
  • Bake: Thaw frozen casseroles overnight in the refrigerator. Remove the wrapping; make and add the Panko Parmesan topping. Bake at 375°F until golden brown, bubbling, and heated to 165°F in the center. Allow extra baking time since the casserole starts cold.

Let the casserole rest for 10 minutes before serving.

🥡 Storing and Reheating Leftovers

Refrigerate: Store leftover casserole in an airtight container for up to 4 days.

Freeze: Store airtight in the freezer for up to 3 months. Thaw overnight in the refrigerator before reheating.

Reheat: Cover and warm in a 350°F oven until heated through to 165°F. Individual servings can be reheated in the microwave.

📝 More Easy Casserole Recipes

  • Easy Turkey Tetrazzini
  • Tuna Noodle Casserole
  • Cheesy American Goulash
  • Chicken Pot Pie

❓FAQs

Can I use rotisserie chicken or leftover turkey?

Yes. Use about 4 cups of cooked, shredded or chopped chicken or turkey instead of raw chicken breasts. Skip cooking the chicken and add the precooked meat when combining the rice, broccoli, and other ingredients.

Can I use frozen broccoli?

Yes, measure by volume. A good-sized head of broccoli will make about 2 cups of fresh broccoli. So use 2 cups of frozen, but more or less is fine; it is a casserole. A standard 12 oz frozen bag will be about 3 cups but varies. So the whole package would generally be fine.

Can I use instant rice or brown rice?

No. This recipe is designed for regular, uncooked long-grain white rice. Instant rice and brown rice require different cooking times and liquid amounts, so they are not recommended.

📖The Recipe Card

fork full of casserole
Print Recipe Add to Collection Go to Collections
5 from 3 votes

Chicken Broccoli Rice Casserole Recipe

This cheesy Chicken Broccoli Rice Casserole Recipe is made from scratch without canned soup. Tender chicken, broccoli, and rice are topped with buttery Parmesan breadcrumbs for a delicious family dinner in about an hour.
Prep Time30 minutes mins
Cook Time30 minutes mins
Total Time1 hour hr
Course: Main Course
Cuisine: American
Keyword: Cheesy Casserole, Cheesy Chicken, Broccoli & Rice Casserole, Chicken Broccoli Rice Casserole Recipe
Servings: 8
Calories: 483kcal
Author: Dan Mikesell AKA DrDan

Ingredients

  • 1½ cups uncooked long-grain rice
  • 3 cups chicken broth low sodium
  • 2-3 cups broccoli-fresh or frozen one head fresh
  • 1-1½ pound skinless boneless chicken breast trimmed and cut into ½ inch pieces
  • 1 tablespoon butter for cooking the chicken
  • 1 onion small diced
  • 3-4 cloves garlic crushed
  • ½ teaspoon salt
  • ¼ teaspoon pepper
  • ½ cup milk
  • 3 tablespoons mayonnaise
  • 2 cups shredded mild cheddar cheese or Monterey Jack cheese

Topping

  • 1 cup Panko bread crumbs
  • 3 tablespoons butter melted
  • ¼ cup grated Parmesan cheese
US Customary - Convert to Metric

Instructions

  • Preheat the oven to 375°F. Spray a 9×13-inch baking dish with cooking spray.
    raw chicken with broccoli and other ingredients
  • Cut one head of broccoli into bite-size pieces, or use 2–3 cups of frozen broccoli.
    chopped broccoli on black board with knife
  • Bring 3 cups of low-sodium chicken broth to a boil. Add 1½ cups of uncooked long-grain white rice and the broccoli. Cover, reduce heat to low, and cook for about 15 minutes, until the liquid is absorbed and the rice is tender.
    cooking broccoli in sauce pan
  • While the rice cooks, dice one small onion and cut 1–1½ pounds of boneless, skinless chicken breasts into ½-inch pieces.
    trimmed and chopped chicken on red board
  • Melt 1 tablespoon of butter in a large skillet over medium-high heat. Add the chicken and onion. Cook until the chicken reaches 165°F and the onion is translucent, about 9–10 minutes. Add 3–4 cloves of crushed garlic during the last minute.
    raw chicken and onion cooking in fry pan
  • Remove the skillet from the heat and stir in the cooked rice and broccoli. Add ½ cup milk, 3 tablespoons mayonnaise, ½ teaspoon salt, ¼ teaspoon pepper, and 1½ cups shredded cheddar or Monterey Jack cheese. Mix well.
    adding cooked rice and broccoli to cooked chicken in fry pan
  • In a small bowl, combine 1 cup Panko breadcrumbs, 3 tablespoons melted butter, and ¼ cup grated Parmesan cheese.
    adding melted butter to bread crumbs in bowl
  • Transfer the casserole mixture to the prepared baking dish. Sprinkle with the remaining ½ cup shredded cheese, followed by the Panko Parmesan topping.
    adding topping to casserole
  • Bake for about 30 minutes, until golden brown and bubbling.
    casserole in large spoon
  • Rest for 10 minutes before serving to allow the liquid to absorb. Do not skip this step.
    fork full of casserole

Notes

Pro Tips

1. Rice: Use regular uncooked long-grain white rice, not instant or brown rice. The cooking time and liquid amounts are designed for white rice.
2. Chicken: Substitute about 4 cups of cooked rotisserie chicken or leftover turkey. Add it when combining the rice, broccoli, and cheese.
3. Broccoli: Fresh or frozen broccoli works well. Use about 2–3 cups, adjusting slightly to taste.
4. Cheese: I prefer Monterey Jack, but mild cheddar is also excellent.
5. Smaller recipe: Cut the recipe in half for 4 generous servings in an 8-inch square or 6×9-inch baking dish. Use the adjusted ingredient list when scaling.
6. Make ahead and leftovers: Assemble ahead without the breadcrumb topping and add it just before baking. Refrigerate leftovers for up to 4 days or freeze for up to 3 months.

Nutrition

Calories: 483kcal | Carbohydrates: 43g | Protein: 34g | Fat: 19g | Saturated Fat: 10g | Cholesterol: 99mg | Sodium: 659mg | Potassium: 762mg | Fiber: 3g | Sugar: 4g | Vitamin A: 972IU | Vitamin C: 70mg | Calcium: 330mg | Iron: 2mg

Editor's Note: Originally Published October 23, 2016. Updated with expanded discussion and refreshed photos.

dogs playing in leaf pile

Adapted from Food.com Cheesy Broccoli Rice Casserole.

Easy Apple Cinnamon Muffins

apple and cinnamon muffins on cooling rack B

Soft and tasty Easy Apple Cinnamon Muffins, topped with a simple glaze, are the perfect way to start your day or enjoy as a delicious apple-and-cinnamon snack. Make them your way, standard size, jumbo, or mini-muffins.

Simple and fast to make in about 35 minutes. Hand mixing only—no need for a stand mixer.

apple and cinnamon muffins on cooling rack.
[feast_advanced_jump_to]

🤔 TL;DR — Recipe Summary

What it is? A simple apple muffin recipe with chunks of real apple and extra flavor from apple juice.

Why you will love them: Quick enough to make fresh for any meal. Easy to make a half batch. Adjustable for regular, jumbo, and mini-muffins.

How to make it: Dice the apple and pat dry. Mix wet and dry ingredients together and bake in the muffin tin. Add the optional glaze for a special treat.

🍎 Ingredients

apples and muffin ingredients.

Apples—Gala or Honeycrisp suggested
Apple juice—or cider
Eggs
Butter
Milk
Pantry ingredients—flour, sugar, baking powder, salt, cinnamon, nutmeg, powdered sugar

👨‍🍳 Quick Overview: How to Make Apple Cinnamon Muffins

1. Prepare fresh apples

Peel 2 medium apples and chop them into ¼ inch pieces (about the size of a peanut). Spread over paper towels and firmly pat with more paper towels to dry some.

drying bits of apple on paper towels.

2. Combine dry ingredients and add apples

Mix dry ingredients: flour, sugar, baking powder, salt, cinnamon, and nutmeg. Mix well, add the apple, and mix to coat the apple.

adding dried apple bits to the dry mixture.

3. Combine wet ingredients and mix into dry

Combine wet ingredients: apple juice or cider, eggs, and melted butter—whisk to combine.

Add the wet ingredients to the dry ingredients and mix by hand to combine—do not over-mix.

pouring wet mixture into dry mix.

4. Fill the muffin tin and bake

Fill the paper liners to about ¾ full.

Bake at 350°F until the top is golden brown, and a toothpick comes out clean—about 20-25 minutes.

baked muffins in a pan.

5. Option: add glaze

Mix a glaze of powdered sugar, vanilla, and milk.

After the muffins cool on a rack for 10 minutes, coat them with glaze.

adding glaze to muffins with a spoon.

For more details, keep reading. See the Recipe Card below for complete instructions and to print.

⏰ Cooking Time

Cooking time will vary by the oven and even the pan used. Generally, the muffins will take 20 to 25 minutes, but always bake to the endpoint.

The good old toothpick test is always good to determine when the muffins are done. Also, you can check the temperature, they are done at about 200°F on an instant-read thermometer.”

🧁 Jumbo and Mini Muffin Options

This recipe is for 12 standard-size muffins, but you can make different sizes. Make them like you want: mini, regular, or jumbo—cook to the endpoint and not by time alone.

Fill the paper liners to about ¾ full. Generally, bake mini muffins for 10 to 15 minutes and large muffins for 25 to 30 minutes.

Other Muffin and Apple Recipes

Check out some other easy, tasty muffin recipes, like Strawberry Cinnamon Muffins, Cinnamon Nut Muffins, Banana Nut Muffins, and Whole Wheat Blueberry Muffins.

And if you have extra apples, try Small Batch Apple Crisp, Apple Berry Crumble, or Apple Crumb Pie.

Storing leftover muffins

Muffins are good at room temperature for about 24 hours but need to be protected from drying out. They are good refrigerated for 3-4 days and frozen for 3-4 months.

❓ FAQs

What are the best apples to use in apple muffins?

There are a lot of good cooking apples, but the total cooking time of the muffins is relatively low. So cut the apples small and use a softer apple like Gala or Honeycrisp.

Why do the apples need to be dry?

When the apples or other fruit bakes, they can release fluid that can cause the baked goods to develop holes around the fruit. By cutting the pieces small, pressing them some with paper towels, and coating them with flour, the issues will decrease or disappear.

Why are my muffins not tender?

Like biscuits and quick bread, muffins can be easily over-mixed. That leads to gluten development, and any micro air pockets disappear. Chewy is good in bread but not muffins.

Also, overcooking muffins can make muffins less tender.

📖The Recipe Card

apple and cinnamon muffins on cooling rack B
Print Recipe Add to Collection Go to Collections
4 from 1 vote

Easy Apple Cinnamon Muffins

Soft and tasty Easy Apple Cinnamon Muffins, topped with a simple glaze, are the perfect way to start your day or as a delicious apple and cinnamon snack.
Prep Time10 minutes mins
Cook Time25 minutes mins
Total Time35 minutes mins
Course: Breakfast
Cuisine: American
Keyword: Apple Muffins
Servings: 12
Calories: 175kcal
Author: Dan Mikesell AKA DrDan

Ingredients

  • 2 apples peeled and cut into ¼ inch pieces

Dry

  • 2 cups flour
  • ⅓ cup sugar
  • 1 tablespoon baking powder
  • 1 teaspoon salt
  • 1 teaspoon cinnamon
  • ¼ teaspoon nutmeg

Wet

  • ¾ cup apple cider or juice
  • 2 eggs
  • 2 tablespoons butter melted

Glaze

  • ⅔ cup powdered sugar
  • 2 teaspoons milk adjust as needed
US Customary - Convert to Metric

Instructions

  • Preheat oven to 350°. Prep a 12 muffin tin with paper liners.
    apples and muffin ingredients
  • Peel 2 medium apples and chop them into ¼ inch pieces (about the size of a peanut). Spread over paper towels and firmly pat with more paper towels to dry some.
    drying bits of apple on paper towels
  • Mix dry ingredients together: 2 cups of flour, ⅓ cup sugar, 1 tablespoon baking powder, 1 teaspoon salt, 1 teaspoon cinnamon, and ¼ teaspoon nutmeg. Mix well, add the apple, and mix to coat the apple.
    adding dried apple bits to the dry mixture
  • Combine wet ingredients. ¾ cup apple juice or cider, 2 eggs, and 2 tablespoons melted butter—whisk to combine.
    mixing eggs and wet ingredients in metal bowl
  • Add the wet ingredients to the dry ingredients and mix by hand to combine—do not over mix
    pouring wet mixture into dry mix
  • Fill the paper liners to about ¾ full.
    muffin papers filled partly with raw dough
  • Bake until the top is golden brown and a toothpick comes out clean—about 20-25 minutes.
    baked muffins in a pan
  • Mix a glaze of ⅔ cup powdered sugar, a few drops of vanilla, and about 2 teaspoons of milk.
    ingredients for glaze with bowl
  • After the muffins cool on a rack for about 10 minutes, coat them with the glaze.
    adding glaze to muffins with a spoon

Notes

Pro Tips

  1. A very easy recipe to cut in half.
  2. Most apples, other than delicious, are good for this recipe. Gala and Honeycrisp are recommended
  3. Be sure to cut the apples small and dry well, or you will have small steam pocket holes in your muffins, and the apple pieces may not cook completely.
  4. Cooking time will vary by the oven and even the pan used. Generally, the muffins will take 20 to 25 minutes, but always bake to the endpoint.
  5. When are they done? The good old toothpick test is generally always good. Also, done is about 200° so an instant-read thermometer can be helpful.
  6. This recipe is for 12 standard-size muffins, but you can make different sizes. Make them like you want: mini, regular, or jumbo just cook to the endpoint and not by time alone. Generally, bake mini muffins for 10 to 15 minutes and large muffins for 25 to 30 minutes.
  7. Good refrigerated for 3-4 days and frozen for 3-4 months.

Nutrition

Calories: 175kcal | Carbohydrates: 35g | Protein: 3g | Fat: 3g | Saturated Fat: 1g | Cholesterol: 32mg | Sodium: 224mg | Potassium: 181mg | Fiber: 1g | Sugar: 17g | Vitamin A: 114IU | Vitamin C: 2mg | Calcium: 56mg | Iron: 1mg

Editor's Note: Originally Published November 1, 2016. Updated with expanded options and improved formatting to help navigation.

dogs playing in leaf pile.

This recipe is a muffin adaptation of Cook's Country Apple Fritter Recipe.

Chicken Fajita Quesadillas in 30 Minutes

Image of Chicken Fajita Quesadilla on a blue plate

This easy chicken fajita quesadilla recipe packs all the flavor of fajitas into a crispy, cheesy quesadilla with restaurant-quality flavor. It's made at home with everyday ingredients.

🤔 TL;DR – Recipe Summary

What: Make crispy chicken fajita quesadillas with juicy chicken, peppers, onions, homemade fajita seasoning, and melted cheese.

Why: Restaurant-style flavor using everyday ingredients in one skillet.

How: Cook the chicken and vegetables with the homemade seasoning, then fold them with cheese inside tortillas and cook until golden and crispy.

Fajita quesadilla with trimmings on a blue plate.
[feast_advanced_jump_to]

quote mark
Featured Comment from Dina:
"I loved this quick and delicious recipe. I made it with rotisserie chicken…"

🐓 Ingredients

fresh chicken with tortillas and spices.
  • Chicken— Boneless skinless chicken breasts are my preferred choice, but boneless skinless thighs work well too. Short on time? Use shredded rotisserie or other precooked chicken.
  • Bell pepper and onion— Traditional fajita vegetables. Use green, red, or any color bell pepper.
  • Homemade fajita seasoning— Chili powder, cumin, onion powder, garlic powder, and kosher salt. Packaged fajita seasoning may be substituted—add salt to taste.
  • Cheese— A Mexican or Tex-Mex blend melts well, but cheddar, Monterey Jack, or pepper jack are all good choices.
  • Flour tortillas— I prefer 8-inch flour tortillas, but 10-inch tortillas also work.

👨‍🍳 Quick Overview: Chicken Fajita Quesadillas

1. Prep the chicken, onion, and bell pepper. Slice the chicken into bite-size pieces for quick, even cooking.

trimmed chicken on red board.

2. Cook the chicken and vegetables in a hot skillet with the homemade fajita seasoning until the chicken reaches 165°F and the vegetables are tender.

adding trimmed chicken to pan with pepper and onion.

3. Place a tortilla in a lightly oiled skillet. Sprinkle with cheese, then spoon the chicken mixture over half of the tortilla.

adding chicken mixture to totilla with cheese in skillet.

4. When the cheese begins to melt, fold the tortilla in half and cook until golden and crispy. Remove to a plate and tent lightly with foil while cooking the remaining quesadillas.

folding half the tortilla on the meat in a skillet.

For more details, keep reading. See the Recipe Card below for complete instructions and to print.

🍗 Using Rotisserie Chicken

Rotisserie or other precooked chicken works great in these chicken fajita quesadillas and is a good time-saver.

Cook the peppers and onion first, then stir in the chicken and homemade fajita seasoning. Continue cooking until the vegetables are tender and the chicken is heated through.

As a general guide, 1 pound of raw chicken equals about 3 cups of cooked shredded or chopped chicken.

🍽️ Serving

Serve with Mexican rice, refried beans, or chunky guacamole for a complete meal. Top with sour cream, salsa, pico de gallo, shredded lettuce, diced tomatoes, jalapeños, or your favorite taco toppings.

❄️ Storing and Reheating Leftovers

Store leftover chicken fajita quesadillas in an airtight container in the refrigerator for up to 3 days or freeze for up to 3 months.

Thaw overnight in the refrigerator if frozen. Reheat in a lightly oiled skillet over medium heat until hot and crispy, or warm in a 375°F oven or air fryer for a few minutes. Avoid the microwave if possible—it softens the tortilla.

Related Recipes

If you enjoy these chicken fajita quesadillas, try my Easy Chicken Fajitas, Sheet Pan Chicken Fajitas, Slow Cooker Chicken Fajitas, and Grilled Chicken Fajitas. Or try out Marinated Steak Fajitas or Pork Tenderloin Fajitas.

❓ FAQs

What is the difference between a chicken quesadilla and a chicken fajita quesadilla?

A chicken quesadilla is simply a tortilla filled with chicken and cheese. A chicken fajita quesadilla adds sautéed peppers, onions, and fajita seasoning, giving it the classic fajita flavor found at many Mexican restaurants.

Can I use chicken thighs or rotisserie chicken?

Yes. Boneless skinless chicken thighs work well but will take a few extra minutes to cook. Cook thighs to a final internal temperature of 180°–185°F for the best texture. Rotisserie or other precooked chicken is also a great shortcut—cook the peppers and onions first, then stir in the chicken and seasoning until heated through.

What cheese is best for chicken fajita quesadillas?

A Mexican or Tex-Mex cheese blend is my first choice because it melts well. Cheddar, Monterey Jack, pepper Jack, or a combination also work well.

Can I make chicken fajita quesadillas ahead of time?

It's best to prepare the chicken and vegetable filling ahead of time, then refrigerate it for up to 3 days or freeze it for up to 3 months. Reheat the filling before assembling and cooking the quesadillas so the cheese melts quickly and the tortillas become crisp.

📖The Recipe Card

fajita quesadilla with trimmings on a blue plate
Print Recipe Add to Collection Go to Collections

Chicken Fajita Quesadillas in 30 Minutes

Chicken Fajita Quesadillas with sautéed onions, green peppers, seasoned chicken, and melted cheese in a crispy tortilla—an easy home recipe with everyday ingredients.
Prep Time10 minutes mins
Cook Time20 minutes mins
Total Time30 minutes mins
Course: Main Course
Cuisine: Mexican
Keyword: Chicken Fajita Quesadillas, Chicken Fajitas, Chicken Quesadillas
Servings: 4
Calories: 562kcal
Author: Dan Mikesell AKA DrDan

Ingredients

  • 1 pound chicken breast, thighs, or precooked
  • 1 onion medium
  • 1 green or red pepper

Homemade Fajita Seasoning (or use a package fajita seasoning)

  • 2 teaspoons chili powder
  • ½ teaspoon cumin
  • ½ teaspoon onion powder
  • ½ teaspoon garilc powder
  • ½ teaspoon kosher salt

Assembly

  • 4 8-inch flour tortillas
  • 2 cups shredded cheese of choice
  • 3 tablespoons oil for fry pan use
US Customary - Convert to Metric

Instructions

  • Slice 1 medium onion into ¼ inch slices and 1 green or red pepper into ½ inch wide slices. You can cut the strips into shorter strips to make serving easier.
    Chopped pepper and onion on white board
  • Trim ¾ to 1 pound of skinless, boneless chicken breast into ¼-inch-thick slices cross-grain, then into small bite-sized pieces.
    trimmed chicken on red board
  • In a large skillet over medium-high heat, add 1 tablespoon oil, and when shimmering, add the veggies and chicken. Mix in 2 teaspoons of chili powder, ½ teaspoon each of cumin, onion powder, garlic powder, and kosher salt.
    adding trimmed chicken to pan with pepper and onion
  • Stir frequently. Cook until chicken is done to 165° (and onion and pepper are tender—about 10 minutes. You can stop here and refrigerate or freeze for later, but it needs to be hot when used in the next step.
    cooking chicken and vegetables in fry pan
  • In a large skillet over medium to medium-high heat, add 2 teaspoons of vegetable oil. When shimmering, add an 8-inch tortilla. Working quickly, sprinkle the top with about ½ cup of shredded cheese over the entire surface and about ¾ cup of the chicken mixture over half of the surface.
    adding chicken mixture to totilla with cheese in skillet
  • When the cheese starts to melt, fold the half of the tortilla without the chicken over the chicken half. Remove to plate and tent lightly with foil and continue to repeat cooking more. You will probably need to add a teaspoon or so of oil for each new tortilla.
    folding half the tortilla on the meat in a skillet

Notes

Pro Tips

  1. If you want to use pre-cooked rotisserie chicken, start cooking the onion and peppers, then add the chicken and spices after a few minutes.
  2. Consider one pound of raw chicken approximately equal to 3 cups of shredded cooked chicken.
  3. I like to use 8-inch flour tortillas for this, but 10-inch works fine. 12-inch is a bit big to handle.
  4. Be sure the meat mixture is warm when adding it to the tortilla.
  5. Use the cheese you want. I suggest a Mexican blend.
  6. Don't overfill or they'll be hard to fold.
  7. Cook over medium to medium-high heat so the tortilla crisps before the cheese overbrowns.
  8. You can refrigerate the meat mixture for 3-4 days or freeze it for 3-4 months. Consume the final quesadilla when hot.

Nutrition

Calories: 562kcal | Carbohydrates: 21g | Protein: 41g | Fat: 34g | Saturated Fat: 14g | Cholesterol: 132mg | Sodium: 998mg | Potassium: 633mg | Fiber: 2g | Sugar: 4g | Vitamin A: 1007IU | Vitamin C: 27mg | Calcium: 457mg | Iron: 2mg


Editor's Note: Originally published on May 2, 2017, as Chicken Fajita Quesadillas. Updated with expanded options, refreshed photos, and a table of contents to help navigation.

Molly running fast.

Crock Pot Cashew Chicken

cashew chicken on with rice on a gray plate

Packed with tender breaded chicken, cashews, and a wonderful sauce, this Crock Pot Cashew Chicken recipe works in a small crock pot but is easy to scale to larger amounts.

A great "take-out at home" crock pot cashew chicken recipe has tender breaded chicken with crunchy cashews and vegetables cooked in a wonderful sauce.

🐓Ingredients

Chicken—breasts or thighs
Cornstarch
Garlic
Cashew nuts
Pantry ingredients—oil, pepper, low sodium soy sauce, rice wine vinegar, ketchup, brown sugar, ground ginger, red pepper flakes
Optional—water chestnuts and other vegetables like a frozen stir-fry mix.

cashew chicken on with rice on a gray plate.
[feast_advanced_jump_to]
Blue ribbon divider used for visual effect

Featured Comment from Deborah:
"5 stars. This one of our family Favorites! So easy and delicious. The only problem is the are seldom any leftovers. My husband can eat the whole thing himself."

An easy crock pot version of this popular Chinese-American restaurant dish fits in a 3-quart crock pot but is simple to double for larger households.

This simple recipe with step-by-step photo instructions uses common pantry ingredients most people will have at home. It has enough sauce to cook, added vegetables and rice for a complete meal.

👨‍🍳How to Make Cashew Chicken in a Crock Pot—Step-by-Step

raw chicken with cashews and spices.

1. Chop 1 ½ to 2 pounds of chicken into 1-inch chunks. Use skinless boneless chicken breasts or thighs.

adding trimmed chicken to ziplock bag.

2. To a 1-gallon food storage bag, add 3 tablespoons cornstarch and ½ teaspoon pepper. Add chicken and shake well to coat.

browning coated chicken in black pan.

3. Heat 2 teaspoon oil over medium-high heat and add chicken. Gently stir every few minutes until browning nicely—about 6 minutes.

mixing sauce in bowl.

4. Combine ½ cup low sodium soy sauce, 2 tablespoons rice wine vinegar, 4 tablespoons ketchup, 1 tablespoon brown sugar, 4 cloves minced garlic, ¼ teaspoon dry ginger, and ¼ teaspoon red pepper flakes (optional.)

mixing sauce into chicken and other ingredients.

5. Add chicken, one 8 oz sliced water chestnuts drained, and the sauce to the crock pot. If you like softer cashews, add them now. Other vegetables can be added at this point. If you want more crunch, add the nuts near the end of cooking.

cashew chicken in ladle over a crock pot.

6. Cook on low for 2 ½ to 3 hours or more until the chicken is 165° for breasts or 185° for thighs. Try to stir it about halfway through.

For more details, keep reading. See the Recipe Card below for complete instructions and to print.

⏲️How long does it take to cook chicken in a crock pot

The chicken will usually reach 165° in about 2 ½ hours on low, give or take a bit, depending on your crock pot and other ingredients. Frozen vegetables will extend the time. So, grab the internal temperature of the chicken before stopping.

I don't suggest cooking on high. It is easy to overcook chicken in a crock pot and yield poor results.

✔️Tips to get it right every time

  • For a coating, cornstarch works well but needs a short browning before going in the crock pot. You can also make this without the cornstarch coating and skip the browning, but it is much better with it.
  • Add other vegetables like broccoli, bell peppers, celery, or carrots. Add them at the start of cooking.
  • If you add a lot of vegetables, double the sauce for the current level. You may want to thicken more with a slurry of 1 tablespoon of cornstarch in some cold water.
  • The cashews can be raw or already roasted, but try to use unsalted or low-salt nuts. If you want your cashews firm and crunchy, add them near the end of cooking, but at the beginning works well for me since I like a softer texture.
  • Ginger and vinegar are slightly lower in this recipe than in similar recipes. Increase if you want.

Other Chinese Recipe

Check out some other take-out at-home recipes. Start with my favorite General Tso Chicken. Or try Crock Pot Beef and Broccoli, Easy Chicken Stir Fry.

Serving Cashew Chicken

Serve with Baked Rice or Egg Fried Rice. It also goes well with stir-fried vegetables.

↕️Increasing or decreasing the recipe amount

  • The full recipe makes about 8 cups, which fits nicely in a 3-quart crock pot.
  • Use the recipe card and adjust the number of servings to half or double.
  • Use the amount of ingredients in the ingredient list, not the instructions—those do not adjust.
  • The half recipe will fit in a 2-quart mini crock pot.
  • A double recipe fits in a 6-quart or larger crock pot.
  • Don't overfill a crock pot. They cook best if less than 75% full.
  • You can cook a smaller amount in a larger crock pot, but it may cook a little faster.
  • Cook for the same amount of time.
  • Remember, all crock pots do not cook the same, so watch the endpoint.

❓FAQs

How do you lower the sodium in cashew chicken?

Like most Chinese cooking, there is a lot of sodium. Use low-sodium soy sauce. And the cashews should be unsalted or only lightly salted. Low-sodium ketchup is also available. Please note that no salt is added to this recipe.

Do I have to use the cornstarch for breading?

No, the chicken does not need to be coated.

How to make cashew chicken gluten-free.

Tamari is great for soy sauce in recipes; similar in taste and usage, it is made with different ingredients. It is commonly available and even comes in a low-sodium variety. But always read all labels; there is a rare brand of tamari that will not be gluten-free.

Other possible points for gluten are the ketchup and even the rice vinegar. Again, read all labels if you want gluten-free.

Blue ribbon divider used for visual effect
cashew chicken on a fork.

📖The Recipe Card

cashew chicken on with rice on a gray plate
Print Recipe Add to Collection Go to Collections
4.50 from 2 votes

Crock Pot Cashew Chicken

Packed with tender breaded chicken, cashews, and a wonderful sauce, this Crock Pot Cashew Chicken recipe works in a small crock pot but is easy to scale to larger amounts.
Prep Time15 minutes mins
Cook Time2 hours hrs 30 minutes mins
Total Time2 hours hrs 45 minutes mins
Course: Main Course
Cuisine: Chinese
Keyword: Cashew Chicken, Crock Pot Cashew Chicken
Servings: 6
Calories: 318kcal
Author: Dan Mikesell AKA DrDan

Ingredients

  • 1½ pounds boneless skinless chicken breasts or thighs upto 2 pounds
  • 3 tablespoons cornstarch
  • 2 teaspoons oil
  • ½ teaspoon pepper
  • ½ cup low sodium soy sauce
  • 2 tablespoons rice wine vinegar
  • 4 tablespoons ketchup
  • 1 tablespoon brown sugar
  • 4 cloves garlic crushed
  • ¼ teaspoon ground ginger
  • ¼ teaspoon red pepper flakes to taste
  • 8 oz sliced water chestnuts drained-optional
  • 1 cup cashews not salted
  • other vegetables optional
US Customary - Convert to Metric

Instructions

  • Chop 1 ½ to 2 pounds of chicken into 1-inch chunks. Use skinless boneless chicken breasts or thighs.
    raw chicken with cashews and spices
  • To a 1-gallon food storage bag, add 3 tablespoons cornstarch and ½ teaspoon pepper. Add chicken and shake well to coat.
    adding trimmed chicken to ziplock bag
  • Heat 2 teaspoon oil over medium-high heat and add chicken. Gently stir every few minutes until browning nicely—about 6 minutes.
    browning coated chicken in black pan
  • Combine ½ cup low sodium soy sauce, 2 tablespoons rice wine vinegar, 4 tablespoons ketchup, 1 tablespoon brown sugar, 4 cloves minced garlic, ¼ teaspoon dry ginger, and ¼ teaspoon red pepper flakes (optional.
    mixing sauce in bowl
  • Add chicken, one 8 oz sliced water chestnuts drained, and the sauce to the crock pot. If you like softer cashews, add them now. Other vegetables can be added at this point also. If you want more crunch, add the nuts near the end of cooking.
    mixing sauce into chicken and other ingredients
  • Cook on low for 2 ½ to 3 hours or a bit more until chicken is 165° if breasts or 185° if thighs. Try to stir it about halfway through.
    cashew chicken in ladle over a crock pot
  • Serve over rice and trim as you wish.
    cashew chicken on a fork

Notes

Pro Tips

  1. This fits in a 3-quart crock pot. You can use bigger if you want. I try to fill a crock pot between 25% to 66% full, but I do occasionally push to 75%, but cooking takes longer.
  2. You can use chicken thigh meat but then use the cooking endpoint of 185°.
  3. You can also make this without the cornstarch coating and skip the browning, but it is much better with it.
  4. Use low-sodium soy sauce and avoid adding anything with salt if possible.
  5. The cashews can be raw or already roasted. Use salt-free or low-salt.
  6. The size of your cut-up chicken pieces will partly determine the cooking time. But it also varies by your crock pot.
  7. Good refrigerated for 3-4 days or frozen for 3 months.

Nutrition

Calories: 318kcal | Carbohydrates: 17g | Protein: 29g | Fat: 15g | Saturated Fat: 3g | Cholesterol: 73mg | Sodium: 937mg | Potassium: 626mg | Fiber: 1g | Sugar: 5g | Vitamin A: 110IU | Vitamin C: 2mg | Calcium: 23mg | Iron: 2mg

Editors Note: Originally Published October 2, 2016. Updated with expanded options, refreshed photos, and a table of contents to help navigation.

Molly running with ear llop

Cinnamon Biscuits with Vanilla Frosting

frosted cinnamon biscuit on a blue plate

This Cinnamon Biscuits recipe is full of great cinnamon roll flavor in every bite. An easy 30-minute recipe to make hot-out-of-the-oven cinnamon pastries for breakfast.

Even an inexperienced cook can make these biscuits with simple step-by-step photo instructions with pantry ingredients.

Ingredients

Flour
Baking powder—aluminum-free baking powder
Milk—or buttermilk
Egg
Butter
Pantry ingredients—salt, cinnamon, sugar, vanilla extract, powdered sugar
Nuts (optional)—chopped pecans or walnuts

frosted cinnamon biscuit on a blue plate.
[feast_advanced_jump_to]
Blue ribbon divider used for visual effect

Featured Comment from Jill:
"5 stars. Great recipe, will definitely make these again."

It is easy and quick to have a great cinnamon roll flavor in a biscuit with vanilla, cinnamon, and sugar. They do not crumble like some biscuits due to strengthening with an egg, and they are topped with delicious vanilla frosting. Think of them as the lazy man's cinnamon rolls.

They have a great homemade taste, unlike Pillsbury™ biscuits, and are easy to make into copycats of Hardee's™ Cinnamon Raisin Biscuits or Bojangles™ Cinnamon Biscuits.

For other cinnamon sweet treats, check out Small Cinnamon Coffee Cake and Cinnamon Apple Cake.

👨‍🍳How to Make Cinnamon Biscuits

ingredients for cinnamon biscuits.

Preheat oven to 425°.

cutting butter into flour.

Mix flour, baking powder, salt, cinnamon, and sugar. Cut butter into the flour with a pastry cutter or fork.

pouring milk into bowl with flour and an egg.

Mix in milk, egg, and vanilla.

cut dough into 8 pieces on black board.

Form it into a log and cut it into eight equal slices.

brushing butter on biscuits.

Spread on a baking pan and brush with melted butter.

baked cinnamon biscuits on small tray.

Bake until golden brown—about 18-20 minutes.

mixing frosting in metal bowl.

Mix a frosti of powdered sugar, milk, and vanilla.

pouring frosting on to biscuits.

Remove from the oven and allow to cook for about 5 minutes before frosting.

For more details, keep reading. See the Recipe Card below for complete instructions and to print.

✔️Tips to get it right every time

  • Cutting in the butter puts most people off from a recipe like this. It is easier to cut in cold butter, chop the butter into small cubes, or shred it with a box shredder.
  • Using buttermilk will make the biscuits slightly lighter.
  • The biscuit dough can be adjusted with a bit more flour or milk. IF YOU
  • You can make this a "drop biscuit." That will cut out a few steps but not much.
  • The frosting is optional, but you want it. Adjust the thickness of the frosting by adding a few drops more milk or extra powdered sugar.
  • Make the frosting slightly thin so it will easily spread over the warm biscuits.
  • These are a nice size, but you can make them bigger by dividing the dough into 6 equal parts.
  • You can use self-rising flour to replace the flour, salt, and baking powder. Use Bisquick®️ , similar to the self-rising flour but also has fats, so it also replaces the butter. I don't recommend either for this recipe. They will work, but the results will be better with the recipe as written.
tray of frosted cinnamon biscuits.

Variations

Copycat of Hardee's®️ Cinnamon Raisin Biscuits

  • Add ½ cup of raisins.
  • You can make these as a drop or cut biscuits.

Copycat of Bojangles®️ Cinnamon Biscuits

  • Skip the cinnamon and vanilla in the biscuit dough (I suggest keeping them).
  • Mix a cinnamon filling of 2 tablespoons of melted butter, 2 teaspoons of cinnamon, and ¼ cup dark brown sugar.
  • Press a well into the center top of each biscuit and add 1 teaspoon of the mixture.

Serving

Serve with a bowl of fresh fruit and breakfast meat, like Convection Oven Bacon or Bake Sausage Patties.

Other easy breakfast recipes

Try some other great breakfast recipes like Small Cinnamon Coffee Cake, Cinnamon Streusel Coffee Cake, Cinnamon Swirl Bread, or our favorite Betty Crocker Banana Bread. And for the holidays, try Small French Toast Casserole.

Making ahead of time

You can make your biscuits a day or two ahead. Make out the biscuits, cover them tightly on a pan with plastic wrap, and refrigerate them for 1-2 days. Let set at room temperature for 15-20 minutes before baking.

You can also freeze uncooked biscuits. Make individual biscuits and freeze them on parchment paper. When frozen, move to an airtight container. They can be stored for 2-3 months. Spread on a tray and cover refrigerated overnight—then bake.

Storing leftovers

Fresh is best but will be good for up to about 2 days at room temperature if sealed airtight.

You can freeze cooked leftovers, but I'm not a fan of freezing the frosting. So freeze for up to 3 months without any frosting. And then make a bit of frosting when needed.

FAQs

Can I use Bisquick®️?

Yes, you can replace the flour, baking powder, and salt with an equal volume of Bisquick. Bisquick also has some fat but not enough to replace the butter in this recipe, so use all the suggested butter.

Blue ribbon divider used for visual effect

This recipe is listed in these categories. See them for more similar recipes.

Bread Recipes, Breakfast Recipes

Have you tried this recipe, or have a question? Join the community discussion in the comments.

📖The Recipe Card

frosted cinnamon biscuit on a blue plate
Print Recipe Add to Collection Go to Collections
4.16 from 26 votes

Cinnamon Biscuits with Vanilla Frosting

This Cinnamon Biscuits recipe is full of great cinnamon roll flavor in every bite. An easy 30-minute recipe to make hot-out-of-the-oven cinnamon pastries for breakfast.
Prep Time10 minutes mins
Cook Time20 minutes mins
Total Time30 minutes mins
Course: Breakfast, Sweets
Cuisine: American
Keyword: Cinnamon Biscuits, Cinnamon Roll Biscuits
Servings: 8 biscuits
Calories: 318kcal
Author: Dan Mikesell AKA DrDan

Ingredients

  • 2 ¼ cup flour
  • 1 tablespoon aluminum free baking powder
  • 1 teaspoon salt
  • 1 teaspoon cinnamon
  • ½ cup sugar
  • ¾ cup milk
  • 1 egg
  • ¼ cup butter cut in
  • 1 teaspoon vanilla extract
  • 1 tablespoon butter melted for top
  • ½ cup chopped pecans or walnuts Optional

Glaze

  • 1 cup powder sugar
  • ¼ teaspoon vanilla extract
  • 1-2 tablespoons milk
US Customary - Convert to Metric

Instructions

  • Preheat oven to 425°.
    ingredients for cinnamon biscuits
  • Mix dry ingredients of 2 ¼ cups flour, one tablespoon baking powder, one teaspoon salt, one teaspoon cinnamon, and ½ cup sugar. Mix well. Cut ¼ cup butter into the flour with a pastry cutter or fork.
    cutting butter into flour
  • Add ¾ cup milk, one egg, and one teaspoon of vanilla extract. Add optional nuts of using.
    pouring milk into bowl with flour and egg
  • Mix until completely combined. Then, roll the dough into a log on a lightly floured surface and cut it into eight equal slices. You may need more flour if it is too sticky, but don't overdo it, or they will not rise well.
    cut dough into 8 pieces on black board
  • Spray a baking sheet with PAM. Place biscuits on a baking sheet. Melt 1 tablespoon of butter and brush tops.
    brushing butter on biscuits
  • Bake until golden brown—about 18-20 minutes.
    baked cinnamon biscuits on small tray
  • While baking the biscuits, combine 1 cup of powdered sugar, ¼ teaspoon vanilla, and 1-2 tablespoons of milk to make the glaze the thickness you want.
    mixing frosting in metal bowl
  • Remove from the oven and allow to cook for about 5 minutes before frosting.
    tray of frosted cinnamon biscuits

Notes

Pro Tips

  1. The "cutting in" of the butter is what puts most people off from a recipe like this. Use cold butter and cut into small cubes or shred the better before cutting in with a pastry cutter or fork.
  2. Always use aluminum-free baking powder due to after-taste issues.
  3. Do not knead or refrigerate the dough. Just cook biscuit style.
  4. You can make this a "drop biscuit". That will cut out a few steps but not much.
  5. The frosting is optional, but you really want it.
  6. You can make them bigger by dividing the dough into 6 equal parts.
  7. Fresh is best but will be good for up to about 2 days at room temperature if sealed airtight.
  8. Freezing instructions are in the post.

Nutrition

Calories: 318kcal | Carbohydrates: 56g | Protein: 5g | Fat: 8g | Saturated Fat: 5g | Cholesterol: 40mg | Sodium: 346mg | Potassium: 81mg | Fiber: 1g | Sugar: 29g | Vitamin A: 298IU | Calcium: 153mg | Iron: 2mg

Originally Published May 8, 2016. Updated with expanded options, refreshed photos, and a table of contents to help navigation.

Lilly with purple puppy.

Pork Tenderloin Carnitas

park carnitas taco on a white plate-2

Juicy and delicious, these healthy Pork Tenderloin Carnitas are fall-apart tender. Make delicious pork tacos or fajitas today with these healthy citrus-infused carnitas.

Easy to make in a Dutch oven by following the simple step-by-step photo instructions.

🐖Ingredients

Pork tenderloin
Jalapeno
Aromatics—onion and garlic
Vegetables—bell peppers and onion
Fruits—orange and lime
Pantry ingredients—chicken broth, vegetable oil, cumin, paprika, kosher salt, black pepper
Tortillas and toppings—for serving

park carnitas taco on a white plate.
[feast_advanced_jump_to]
Blue ribbon divider used for visual effect

Featured Comment from Megan:
"5 stars, Seriously one of the best things I've ever made! And I never comment on recipes. The flavor and moist-fall-apartness is awesome! and very healthy too:)"

Great tasting pork tenderloin carnitas infused with a spicy citrus flavor that is fall-apart tender and juice. A low-fat alternative uses chunks of pork tenderloin to replace the more traditional pork butt and no lard.

Just braise the pork and cook off the fluid to concentrate the flavors. Then, use the fond from the evaporated spicy braising liquid to add extra flavor to the vegetables—so wonderful.

These carnitas will fit a healthy diet like a low-calorie or low-fat diet or even a low-carb keto diet.

👨‍🍳How to Make Pork Tenderloin Carnitas

pork tenderloin and carnita ingredients.

Heat 2 tablespoons of vegetable oil in a Dutch oven over medium-high heat.

pork tenderloin trimmed and cut into cubes.

Start with about 1 ½ to 2 pounds of pork tenderloin. I used one large, but two smaller ones would be okay—just a few more leftovers. Rinse and pat dry. Remove silverskin and extra fat. Cut into 1 ½ inch cubes.

dicing jalapino on black board.

Mince 1 jalapeno without seeds and 2 cloves of garlic.

Mixing cubes of tenderlion with spices in clear bowl.

Mixed pork, jalapeno, garlic, salt, pepper, cumin, and paprika. Mix well until the pork is covered.

browning tenderloin in the Dutch oven.

Add 2 teaspoons of vegetable oil to a porcelain-coated Dutch oven over medium-high heat. When the oil is hot, saute the pork until well browned — about 10 minutes.

adding orange juice to browned meat.

When pork is browned well, remove from heat. Add 1 ½ cup chicken broth and juice of one orange and one lime. Scrap the bottom of the pan to loosen up the built-up fond (browned bits and caramelized drippings on the bottom of the pan).

a red Dutch oven in the oven.

Place covered in a 325° oven (no need to preheat) for 2 hours undisturbed.

cooked pork in Dutch oven uncoverd in oven.

After 2 hours, increase the oven temperature to 425° and remove the lid. Cook another 20 minutes or so until all fluid is gone.

cooking peppers and onion in fry pan.

While the carnitas are finishing in the oven, cut up one green pepper, one red pepper, and one large onion and saute with 2 teaspoons oil over medium-high heat until tender and browning.

adding cooked veggies to dirty Dutch oven.

Remove the carnitas, and if there is any fond in the pan, add the veggies and scrape the fond loss with a wooden spoon to get that taste.

Make pork carnitas tacos with tortillas with toppings of your choice. Or use in many other dishes.

For more details, keep reading. See the Recipe Card below for complete instructions and to print.

✔️Tips to make it right every time

  • You must have a pan that is stovetop and oven-safe. Also, it must clean easily, or you will not be able to clean it after this cooking technique. A Dutch oven with a baked-on porcelain coating is ideal.
  • Orange juice and lime juice can be used for fresh fruit. Garlic powder and onion powder can also be used.
  • You can add other spices to the braising fluid.
  • You can simmer the fluid off on the stovetop or use the oven. As the fluid goes away, the flavors concentrate and produce a wonderful fond in addition to the concentrated flavor in the pork and used for the vegetables—you should never waste a good fond.
  • I added citrus flavors to the carnitas. What you use is a personal choice, but the tenderloin absorbs flavor well.

Other Carnitas Recipes

Check out some other carnitas recipes, like Pork Carnitas in the Oven, Crock Pot Pork Carnitas, or Chicken Carnitas AKA Carnitas de Pollo.

Serving

Serve the carnitas as shredded pork tacos on flour tortillas topped with sour cream, shredded cheese, and cilantro. Sides of refried or black beans, along with chips and salsa, are all I need.

Serve with refried beans, Chunky Guacamole, and Mexican Rice. And it goes well with Pineapple Mango Salsa and corn chips.

In addition to pork carnitas tacos, the pork can be used in burritos, on nachos, enchiladas, or other dishes.

If your carnitas are not browned well, shred them on a baking sheet and place them under a broiler for a few minutes.

🍽️Storage of leftovers

Leftovers can be stored airtight in the refrigerator for 4 days or frozen for 3 months.

Reheat covered in the oven or the microwave.

FAQs

What are carnitas?

Carnitas stands for "little meats" and are found on the street in Mexico cooking in large vats of lard. They are generally chunks of pork butt.

The most common home method is braising in a spicy fluid broth and then cooking off the liquid on the stovetop, but is it easier to uncover and bake it off in the oven.

Blue ribbon divider used for visual effect

This recipe is listed in these categories. See them for more similar recipes.

Healthy Recipes, Low Fat Recipes, Mexican Recipes, Pork Tenderloin Recipes

Have you tried this recipe, or have a question? Join the community discussion in the comments.

📖The Recipe Card

park carnitas taco on a white plate-2
Print Recipe Add to Collection Go to Collections
5 from 1 vote

Pork Tenderloin Carnitas

Juicy and delicious, these healthy Pork Tenderloin Carnitas are fall-apart tender. Make delicious pork tacos or fajitas today with these healthy citrus-infused carnitas.
Prep Time5 minutes mins
Cook Time2 hours hrs 30 minutes mins
Total Time2 hours hrs 35 minutes mins
Course: Main Course
Cuisine: Mexican
Keyword: Healthier Carnitas, Pork Carnitas, Pork Tenderloin Carnitas
Servings: 4 servings
Calories: 307kcal
Author: Dan Mikesell AKA DrDan

Ingredients

  • 1 ½ pound pork tenderloin
  • 1 jalapeno cored and seeded chopped
  • 2 cloves garlic minced or crushed
  • 1 teaspoon cumin
  • 1 teaspoon paprika
  • 1 teaspoon kosher salt
  • ½ teaspoon pepper
  • 2 teaspoons vegetable oil
  • 1 ½ cup chicken broth
  • 1 orange
  • 1 lime

Vegetables

  • 2 teaspoons vegetable oil
  • 1 red pepper
  • 1 green pepper
  • 1 onion large

Serving

  • tortillas and topping
US Customary - Convert to Metric

Instructions

  • Heat 2 tablespoons of vegetable oil in a Dutch oven over medium-high heat.
    pork tenderloin and carnita ingredients
  • Start with about 1 ½ to 2 pounds of pork tenderloin. I used one large, but two smaller ones would be okay—just a few more leftovers. Rinse and pat dry. Remove silverskin and extra fat. Cut into 1 ½ inch cubes.
    pork tenderloin trimmed and cut into chunks
  • Mince 1 jalapeno without seeds and 2 cloves of garlic.
    dicing jalapino on black board
  • Mixed pork, jalapeno, garlic, salt, pepper, cumin, and paprika. Mix well until the pork is covered.
    mixing chunks of pork butt with spices in a white bowl
  • Add 2 teaspoons of vegetable oil to a porcelain-coated Dutch oven over medium-high heat. When the oil is hot, saute the pork until well browned — about 10 minutes.
    browning tenderloin in Dutch oven
  • When pork is browned well, remove from heat. Add 1 ½ cup chicken broth and juice of one orange and one lime. Scrap the bottom of the pan to loosen up the built-up fond (browned bits and caramelized drippings on the bottom of the pan).
    adding orange juice to browned meat
  • Place covered in a 325° oven (no need to preheat) for 2 hours undisturbed.
    red Dutch oven in the oven
  • After 2 hours, increase the oven temperature to 425° and remove the lid. Cook another 20 minutes or so until all fluid is gone.
    cooked pork tenderloin in Dutch oven uncoverd in oven
  • While the carnitas are finishing in the oven, cut up one green pepper, one red pepper, and one large onion and saute with 2 teaspoons oil over medium-high heat until tender and browning.
    cook peppers and onion in fry pan
  • Remove the carnitas and if there is any fond in the pan, add the veggies and scrape the fond loss with a wooden spoon to get that taste.
    added cooked veggies to dirty Dutch oven
  • Make pork carnitas tacos with tortillas with toppings of your choice. Or use in many other dishes.
    park carnitas taco on a white plate-2

Notes

Pro Tips

  1. Remember that pork tenderloin is not a pork loin.
  2. I suggest a good porcelain-coated Dutch oven or you may well ruin your pan.
  3. Vary the spices as you want.
  4. Good refrigerated or 3-4 days. You can freeze the meat for a 3 months
  5. Nutritional information is for meat, seasoning, and vegetables but does not include tortillas or other serving options.

Nutrition

Calories: 307kcal | Carbohydrates: 14g | Protein: 38g | Fat: 11g | Saturated Fat: 5g | Cholesterol: 111mg | Sodium: 701mg | Potassium: 996mg | Fiber: 3g | Sugar: 7g | Vitamin A: 1399IU | Vitamin C: 91mg | Calcium: 49mg | Iron: 3mg

Originally Published July 7, 2013. Updated with expanded options, refreshed photos, and a table of contents to help navigation.

baby Lilly with green toy.

Oven Fried Pork Tenderloin Sandwiches

Pork Tenderloin Sandwich on white plate

Oven fried breaded pork tenderloin sandwiches are a lighter take on the classic Midwest favorite. Made with tender pork tenderloin, seasoned breading, and a buttered baking sheet, they bake up crispy and golden without the mess of deep frying.

If you grew up in Iowa, Indiana, or across the Midwest, this sandwich probably brings back memories of small-town cafés, county fairs, and diners where the pork hung well beyond the bun. This oven-fried version delivers that same crispy comfort-food experience with an easy oven method that's perfect for lunch or dinner at home.

❓Quick Answer: Can You Make Breaded Pork Tenderloin Sandwiches in the Oven?

  • Yes. Oven-frying is a leaner, healthier cooking method that creates a crispy, golden breaded coating without deep frying.
  • Bake the breaded pork tenderloin on a preheated buttered baking sheet, flipping once for even browning.
  • The pork is done when it reaches 145°F and the breading is golden brown.
Pork Tenderloin Sandwich on white plate.
[feast_advanced_jump_to]

quote mark
Featured Comment Sheila:
⭐⭐⭐⭐⭐
"5 stars Soooo good!! Even my hubby, who often prefers the deep fried comfort these provide, loved them!"

🤔 TL;DR – Recipe Summary

What: An oven-fried version of the classic Midwest breaded pork tenderloin sandwich, baked without deep frying.

Why: The buttered baking sheet creates a crisp breaded coating while keeping the pork tender and juicy.

How: Butterfly and pound pork tenderloin, coat with your favorite breading, bake on a buttered baking sheet, flip once, and cook to 145°F.

🐖 Ingredients and Options

ingredients for baked pork tenderloin sandwich.

Pork: Pork tenderloin is my preferred choice because it's naturally tender, flavorful, and easy to butterfly and pound into sandwich-size cutlets. Throughout the Midwest, mechanically tenderized pork loin cutlets—plain or already breaded—are commonly sold in grocery stores and are an excellent substitute.

Breading: Panko breadcrumbs are my favorite for a crispy oven-fried coating. You can also use crushed saltine crackers for the classic Iowa and Indiana version or crushed potato chips for another popular regional variation.

Pantry ingredients: Egg, milk, butter, seasoning salt, and black pepper.

👨‍🍳 Quick Overview: Oven Fried Breaded Pork Tenderloin Sandwiches

Trim a pork tenderloin, divide it into four pieces of approximately equal weight, butterfly each piece across the grain, then pound to about ½ inch thick.

cutting pork tenderloin.

Pat the pork dry, coat with egg wash, then your favorite breading. Let the coating rest for a few minutes to help it adhere better.

shaking off excess coating.

While the coating rests, melt the butter on the baking sheet in the preheated oven. Place the breaded pork directly in the melted butter on the baking sheet.

melted butter in sheet pan.

Bake in a 375°F (350° convection) oven for 20 minutes. Flip and bake for another 10 minutes until golden brown. Serve hot.

Browned breaded pork tenderloin on the tray.

For more details, keep reading. See the Recipe Card below for complete instructions and to print.

✔️ Pro Tips

  • Pork is safe to eat at 145°F, but these thin cutlets will usually be much hotter by the time the breading is crisp and golden. For this recipe, cook for the crispy, golden coating rather than the internal temperature.
  • Let the breading rest for a few minutes before baking so it adheres better.
  • Feel free to use mechanically tenderized pork loin and your favorite breading, including Panko, crushed saltines, or potato chips.
  • Melt the butter on the baking sheet while the oven preheats. The hot butter helps create the oven-fried crust.
  • Flip only once for even browning.
  • Traditional breading is lightly seasoned. Add garlic powder, onion powder, paprika, cayenne, or your favorite seasoning blend if you like a little more flavor.

🤔 How to Keep the Breading Attached

These simple techniques help the breading stay attached during baking and when you flip the pork.

  1. Pat the pork dry with paper towels before starting the breading process.
  2. Shake off the excess egg wash and breading after each coating.
  3. Let the breaded pork rest for at least 5 minutes before baking to help the coating adhere.
  4. Flip the pork only once, using a fork at the edge instead of tongs to avoid pulling off the breading.

🍽️ Serving Oven Fried Pork Tenderloin Sandwiches

Serve on a soft hamburger bun with lettuce, tomato, onion, pickle, and your favorite condiments. For the classic Iowa and Indiana sandwich, many people skip the extras or keep it simple with pickles and onions.

Complete the meal with Corn on the Cob, Spinach Salad with Bacon, or your favorite potato salad, coleslaw, or baked beans.

❄️ Storing Leftovers

Store leftover pork tenderloin sandwiches or cutlets in an airtight container in the refrigerator for up to 3 days or freeze for 3 months.

Reheating

Thaw overnight if frozen. Reheat in a 350°F oven, loosely covered with foil, until hot. A microwave works for quick reheating but the breading won't stay as crisp.

Iowa Breaded Pork Tenderloin Sandwich (Pan Fried)

Make your own comfort food with this breaded tenderloin sandwich. A classic from Iowa and Indiana made with a flattened pork filet coated with breadcrumb crust and pan-fried.

Pork Tenderloin Sandwich with mayo

Related recipes

Check out other pork sandwiches, like Grilled Pork Tenderloin Sandwiches, Crock Pot Shredded Pork Tenderloin, Pulled Pork Loin in the Crock Pot, and Crock Pot Pulled Pork Butt.

📖The Recipe Card

Pork Tenderloin Sandwich on white plate
Print Recipe Add to Collection Go to Collections
5 from 11 votes

Oven Fried Breaded Pork Tenderloin Sandwiches

Oven Fried Pork Tenderloin Sandwiches are great tasting with crisp breading. A healthier version of that great Iowa comfort food. Perfect for a retro lunch or easy dinner.
Prep Time15 minutes mins
Cook Time30 minutes mins
Total Time45 minutes mins
Course: Main Course
Cuisine: American
Keyword: baked breaded pork tenderloin, baked pork tenderloin sandwich, breaded pork tenderloin in oven
Servings: 4 servings
Calories: 634kcal
Author: Dan Mikesell AKA DrDan

Ingredients

  • 1 pork tenderloin
  • 1 egg
  • ¼ cup milk
  • 4 tablespoon butter
  • ½ cup AP flour
  • ½ cup Panko bread crumbs
  • 1 tablespoon seasoning salt Lowery's or similar
  • ½ teaspoon pepper
US Customary - Convert to Metric

Instructions

  • Preheat oven to 375°F (350° convection).
    ingredients for baked pork tenderloin sandwich
  • Trim a pork tenderloin of any visible fat and the silverskin. Cut the tenderloin into four approximately equal pieces by weight. Next, “butterfly” the pieces. Do this by cutting ¾ of the way through and folding it back to double the size. On the thinner end, which would be longer, do two cuts, one-third on opposite sides of the meat.
    cutting pork tenderloin
  • Next, cover with plastic wrap or place in a zip lock bag and pound to about ½ inch thick or thinner if you want.
    flattening the pork with meat mallet
  • Place 4 tablespoons of butter on a large baking tray and place in the oven for a few minutes to melt the butter.
    melted butter in sheet pan
  • Set up two pans. In the first, combine 1 egg and ¼ cup milk. Whip well. In the second pan, combine ½ cup flour, ½ cup Panko breadcrumbs, 1 tablespoon seasoning salt, and ½ teaspoon pepper.
    the start of the coating line
  • Pat the pork dry with paper towels. Coat with the egg wash, shaking off the excess.
    dipping tenderloin in egg wash
  • Coat well with the breading mixture and shake off the excess.
    shaking off excess coating
  • Let the breaded pork rest for about 5 minutes while the butter melts on the baking sheet in the oven. Then place the pork in the melted butter.
    place tenderloins on tray with melted butter
  • Place in the oven for 20 minutes. Flip and bake for another 10 minutes until golden brown. Serve hot.
    browned pork tenderloin cutlet

Notes

Pro Tips

  1. Pork is safe at 145°F, but these thin cutlets are usually much hotter by the time the breading is crisp and golden. Cook for the crispy, golden coating rather than the internal temperature.
  2. Feel free to use mechanically tenderized pork loin or your favorite breading.
  3. Let the breading rest for a few minutes before baking so it adheres better.
  4. Melt the butter on the baking sheet while the oven preheats for the best oven-fried crust.
  5. Flip only once for even browning.
  6. Traditional breading is lightly seasoned. Add garlic powder, onion powder, paprika, cayenne, or your favorite seasoning blend if you like more flavor.
  7. Store leftovers refrigerated for up to 3 days or freeze for up to 3 months.
 

Nutrition

Calories: 634kcal | Carbohydrates: 6g | Protein: 96g | Fat: 23g | Saturated Fat: 9g | Cholesterol: 330mg | Sodium: 449mg | Potassium: 1794mg | Fiber: 1g | Sugar: 1g | Vitamin A: 220IU | Calcium: 51mg | Iron: 4.8mg

👍 The Midwest Pork Tenderloin Sandwich Tradition

If you're not from Iowa, Indiana, or parts of the Midwest, you may be wondering why this sandwich has such a devoted following. The breaded pork tenderloin sandwich is a small-town icon, with cafés, diners, and taverns proudly claiming to serve the biggest, best, or most award-winning version.

Around much of Iowa, you don't even need to say "pork"—just ask for a tenderloin sandwich, and everyone knows exactly what you mean. Every year, Iowa even celebrates the tradition with contests recognizing outstanding pork tenderloin sandwiches, while local newspapers highlight the state's favorite destinations.

Indiana shares the same passion for this Midwest classic. Whether served on a bun much smaller than the pork or made at home with family recipes, it's a comfort-food tradition that has been passed from one generation to the next. This oven-fried version keeps that tradition alive with a lighter cooking method that's easy to make in your own kitchen.

Ten week old Molly and Lilly.

This recipe combines the oven-fried method from my Crispy Oven Fried Chicken with the classic flavor of my Iowa Fried Breaded Pork Tenderloin Sandwich in an easy recipe that scales well for your needs.

Originally Published March 8, 2014. Updated with expanded options, refreshed photos, and a table of contents to help with navigation.

Grilled Mixed Vegetables

Grilled Mixed Vegetables in a white bowl

Delicious Grilled Mixed Vegetables cooked on the grill complement any meal. You can easily add them to your grill while you cook dinner to complete your meal.

🥕Ingredients

Potatoes
Carrots
Bell peppers
Zucchini, Yellow squash, Broccoli
Olive oil, salt and pepper

image of Grilled Mixed Vegetables on a white plate
[feast_advanced_jump_to]
Blue ribbon divider used for visual effect

Featured Comment from Blackfeather:
"Very good!"

Nothing's better than roasted veggies unless they are grilled with a little char—the perfect way to increase your vegetables. Everybody will enjoy great grilled veggies with their grilled meals. Change the mixture to your preferences and use seasonal vegetables.

It uses a grill temperature in the 450°-500° range, Which matches most chicken and pork recipes and can also be adapted to beef grilling. It only uses olive oil and simple seasoning. No fancy marinade is needed for great taste.

👨‍🍳How to Grill Mixed Vegetables

multiple raw vegetables in a grill pan with salt pepper and oil.

Preheat the grill to 450°-500° range surface temperature. That is medium-high on most grills.

three bowls of prepared vegetable with oil.

Prep the veggies you want. I'm doing small potatoes cut into about 1-inch pieces (30 minutes). Baby carrots (25 minutes). Broccoli, peppers, zucchini, and yellow squash, all at 15 minutes. Give them a nice coat of oil and season with salt and pepper to taste. I used my 7:2:2 seasoning.

carrots and potatoes in grill pan.

Start grilling with a closed hood and stir every 5 minutes. Potatoes first, then at the first stir, add the carrots. Do not use a smaller grill pan—they will not cook well.

pouring vegetables into grill pan.

At 15 minutes into cooking, add the other veggies.

For more details, keep reading. See the Recipe Card below for complete instructions and to print.

grilled vegetables on gray plate.

🥕About Vegetable Grilling Time

The cooking time for vegetables will vary by the type of vegetable.

  • Root vegetables, like potatoes and carrots, will take longer. About 30 minutes for 1-inch chunks of potatoes and 25 minutes for thinner carrots, cherry tomatoes, and pieces of red onion.

    Note that a done potato has an internal temperature of at least 190°, but 200°-210° is much better.
  • Softer vegetables like broccoli, peppers, zucchini, bell peppers, and yellow squash will take about 15 minutes.
  • If you want different veggies, as always, Google is your friend. Grill times are about the same as oven-roasting times for vegetables.

Be sure the veggies have a generous coat of oil. Plus, a little salt and pepper. I used my All Purpose Seasoning - 7:2:1 and 7:2:2 to add some garlic flavor.

♨️The Grill Temperature

The general grill surface temperature range to cook vegetables is about 450°. So they go well with other things like pork tenderloin, pork chops, or most chicken recipes.

If you are cooking something at a higher temperature, like burgers or steaks, you will burn the outside of the vegetables before the inside is done at that temperature—not a good thing. If you have a large grill surface, you can do zone cooking with a hot area for the beef and a lower temperature area for the vegetables.

If you use a lower temperature, it will take longer, but usually, the results will be acceptable.

Please note that we are talking about the grill surface temperature, not the temperature on your hood thermometer, which is useless. Please see Guide to Grill Temperature on a Gas Grill.

Associated recipes

The perfect side dish for most grilled meals, like Grilled Whole Chicken. The cooking time and temperature work well on a gas grill while grilling pork tenderloin, grilling chicken breasts, or grilling pork chops. Or turn down the heat on part to the gas grill while Grilling burgers or Grilled New York Strip Steaks.

And try some other grilled side dish recipes like Grilled Baby Red Potatoes, Brown Sugar Cinnamon Glazed Grilled Pineapple, Grilling Asparagus, or Grilled Stuffed Tomatoes; Italian Style.

❓FAQs

Are grilled vegetables healthy?

Absolutely, all they need is a bit of oil and light seasoning. It is a great way to increase your healthy vegetable intake.

What vegetables can be cooked on a grill?

You can enhance the taste of almost any vegetable by grilling. The grilling time will vary by the vegetable, along with the size and thickness of that vegetable.

Blue ribbon divider used for visual effect

This recipe is listed in these categories. See them for more similar recipes.

Grill Side Dish Recipes, Side Dish Recipes

Have you tried this recipe, or have a question? Join the community discussion in the comments.

Step-by-Step Photo Instructions

📖The Recipe Card

Grilled Mixed Vegetables in a white bowl
Print Recipe Add to Collection Go to Collections
5 from 1 vote

Grilled Mixed Vegetables

Delicious Grilled Mixed Vegetables cooked on the grill compliments any meal. You can easily add them to your grill while you cook dinner to complete your meal.
Prep Time10 minutes mins
Cook Time30 minutes mins
Total Time40 minutes mins
Course: Vegetable
Cuisine: American
Keyword: Grilled Mixed Vegetables, Grilled Vegetables
Servings: 6 Servings
Calories: 99kcal
Author: Dan Mikesell AKA DrDan

Ingredients

  • ¾ pound potatoes cleaned and cut into 1-inch pieces
  • ¼ pound baby carrots
  • 2 green or red peppers 1-inch pieces
  • 1 zucchini small ½ inch slices
  • 1 yellow squish small ½ inch slices
  • 1 head broccoli trimmed into florets
  • salt and pepper to taste or 7:2:2
  • olive oil Just to coat
US Customary - Convert to Metric

Instructions

  • Preheat the grill to 450°-500° range surface temperature. That is medium-high on most grills.
    multiple raw vegetables in a grill pan with salt pepper and oil
  • Prep the veggies you want. I'm doing small potatoes cut into about 1-inch pieces (30 minutes). Baby carrots (25 minutes). Broccoli, peppers, zucchini, and yellow squash, all at 15 minutes. Give them a nice coat of oil and season with salt and pepper to taste. I used my 7:2:2 seasoning.
    three bowls of prepared vegetable with oil
  • Start grilling with a closed hood and stir every 5 minutes. Potatoes first, then at the first stir, add the carrots. Do not use a smaller grill pan, they will not cook well.
    carrots and potatoes in grill pan
  • At 15 minutes into cooking, add the other veggies.
    pouring vegetables into grill pan
  • Serve immediately.
    Grilled Mixed Vegetables in a white bowl

Notes

Pro TIps

  1. The recommended grill surface temperature is about 450°. The grill surface temperature is not the same as the hood thermometer.
  2. This requires a large grill basket or pan, as written. You can not "crowd the pan" and expect this to cook well.
  3. Lower grill temperature will take longer but will usually be ok. But a higher grill temperature will generally burn the outside of the vegetables before the inside is done.
  4. Be sure the veggies have a coat of oil. Plus, a little salt and pepper. I used my 7:2:2 Seasoning.
  5. Other veggies can be used. Discussed in the post.
  6. Note that a done potato has an internal temperature of at least 190°, but 200°-210° is much better.

Nutrition

Calories: 99kcal | Carbohydrates: 15g | Protein: 2g | Fat: 4g | Saturated Fat: 1g | Polyunsaturated Fat: 0.4g | Monounsaturated Fat: 2g | Sodium: 425mg | Potassium: 452mg | Fiber: 3g | Sugar: 3g | Vitamin A: 3050IU | Vitamin C: 94.9mg | Calcium: 20mg | Iron: 1.1mg

Editors note: Originally published June 11, 2016. Updated with expanded options, refreshed photos, and a table of contents to help navigation.

dogs standing in the yard.

  • « Previous Page
  • 1
  • …
  • 4
  • 5
  • 6
  • 7
  • 8
  • …
  • 10
  • Next Page »

DrDan imageHi, I'm DrDan.
Welcome to 101 Cooking for Two, the home of great everyday recipes with easy step-by-step photo instructions.
About DrDan

Top THANKSGIVING RECIPES

  • turkey slice with gravy on orange plate.
    How to Roast a Turkey Breast in the Oven
  • Cut ham with pineapple honey glaze on a white plate
    Small Ham in a Crock Pot (2–4 lb Boneless Ham)
  • slice of Ribeye Roast on a white plate
    Small Boneless Prime Rib (Ribeye) Roast
  • Sausage dressing on a white plate.
    Old Fashioned Sausage Dressing Recipe
  • A spoonful of green bean casserole.
    Green Bean Casserole Without Mushroom Soup
  • Sweet potato casserole on a white plate
    Old Fashioned Sweet Potato Casserole
SITES THAT I WORK WITH OR HAVE HAD RECIPES FEATURED OR REFERENCED.

Footer

BACK TO TOP
OF PAGE
Join the club
SUBSCRIBE TODAY

About

  • About DrDan and the Blog
  • Contact Me
  • Comment Policy
  • Guest Posts, Partnering, and Business Questions

Content

  • Food FAQ
  • Kitchen Reference Sheets
  • Recipes Featured in the Videos
  • Guide To Cooking for Two
  • Old Saved Recipes Collections

dogs by the pond

↑ back to top ↑a

Privacy Policy | Terms of Service | Contact

COPYRIGHT © 2010-2026 101 COOKING FOR TWO. ALL RIGHTS RESERVED | BASED ON FOODIE PRO THEME